• Skip to primary navigation
  • Skip to main content
  • Skip to primary sidebar
  • Skip to footer

Watch What U Eat logo

  • About us
    • Privacy Policy
  • Recipes
    • Main Course
    • Breakfast
    • Snacks or Appetizer
    • Dessert and Sweets
    • Non Alcoholic Drinks
    • Indian Recipes
  • Guide to Healthy Eating
  • Shop
  • Videos
  • Contact us
  • Subscribe
  • Nav Social Menu

    • Facebook
    • Instagram
    • Pinterest
menu icon
go to homepage
subscribe
search icon
Homepage link
  • Summer Drinks
  • Recipe Index
  • About us
  • Contact us
    • Facebook
    • Instagram
    • Pinterest
  • ×

    2 Comments

    A bowl filled with shawarma chicken, creamy hummus, fluffy quinoa, and roasted peppers, topped with fresh cilantro, olives and lime for garnish.

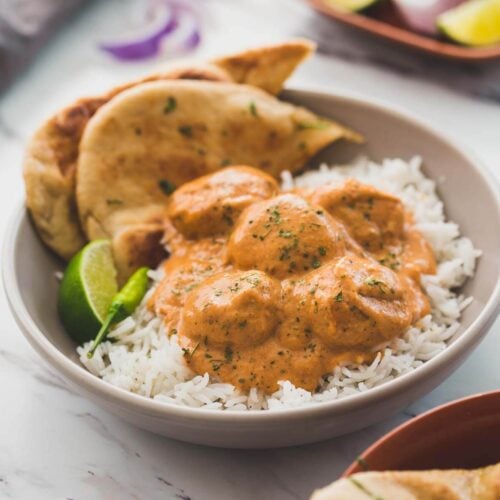
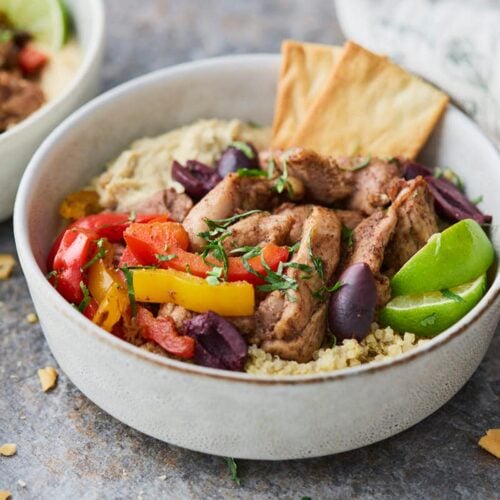
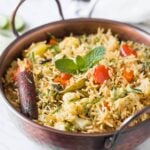
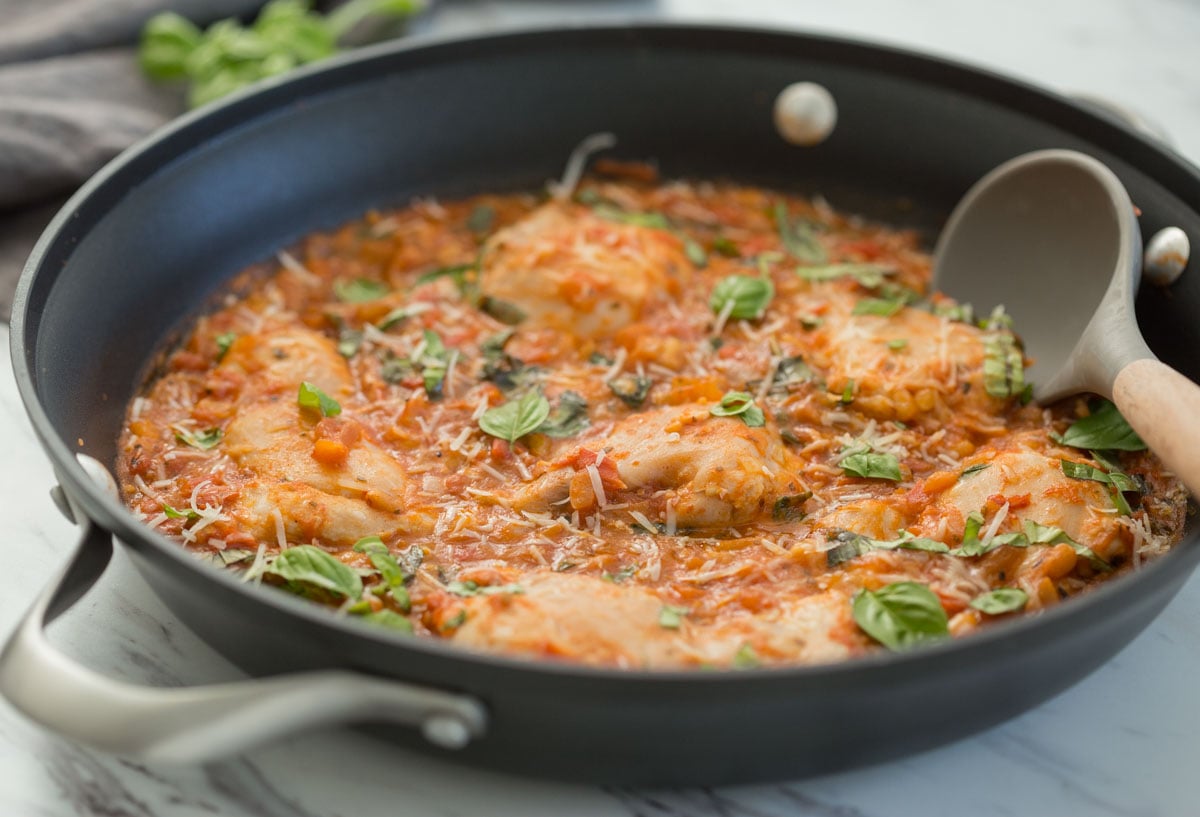
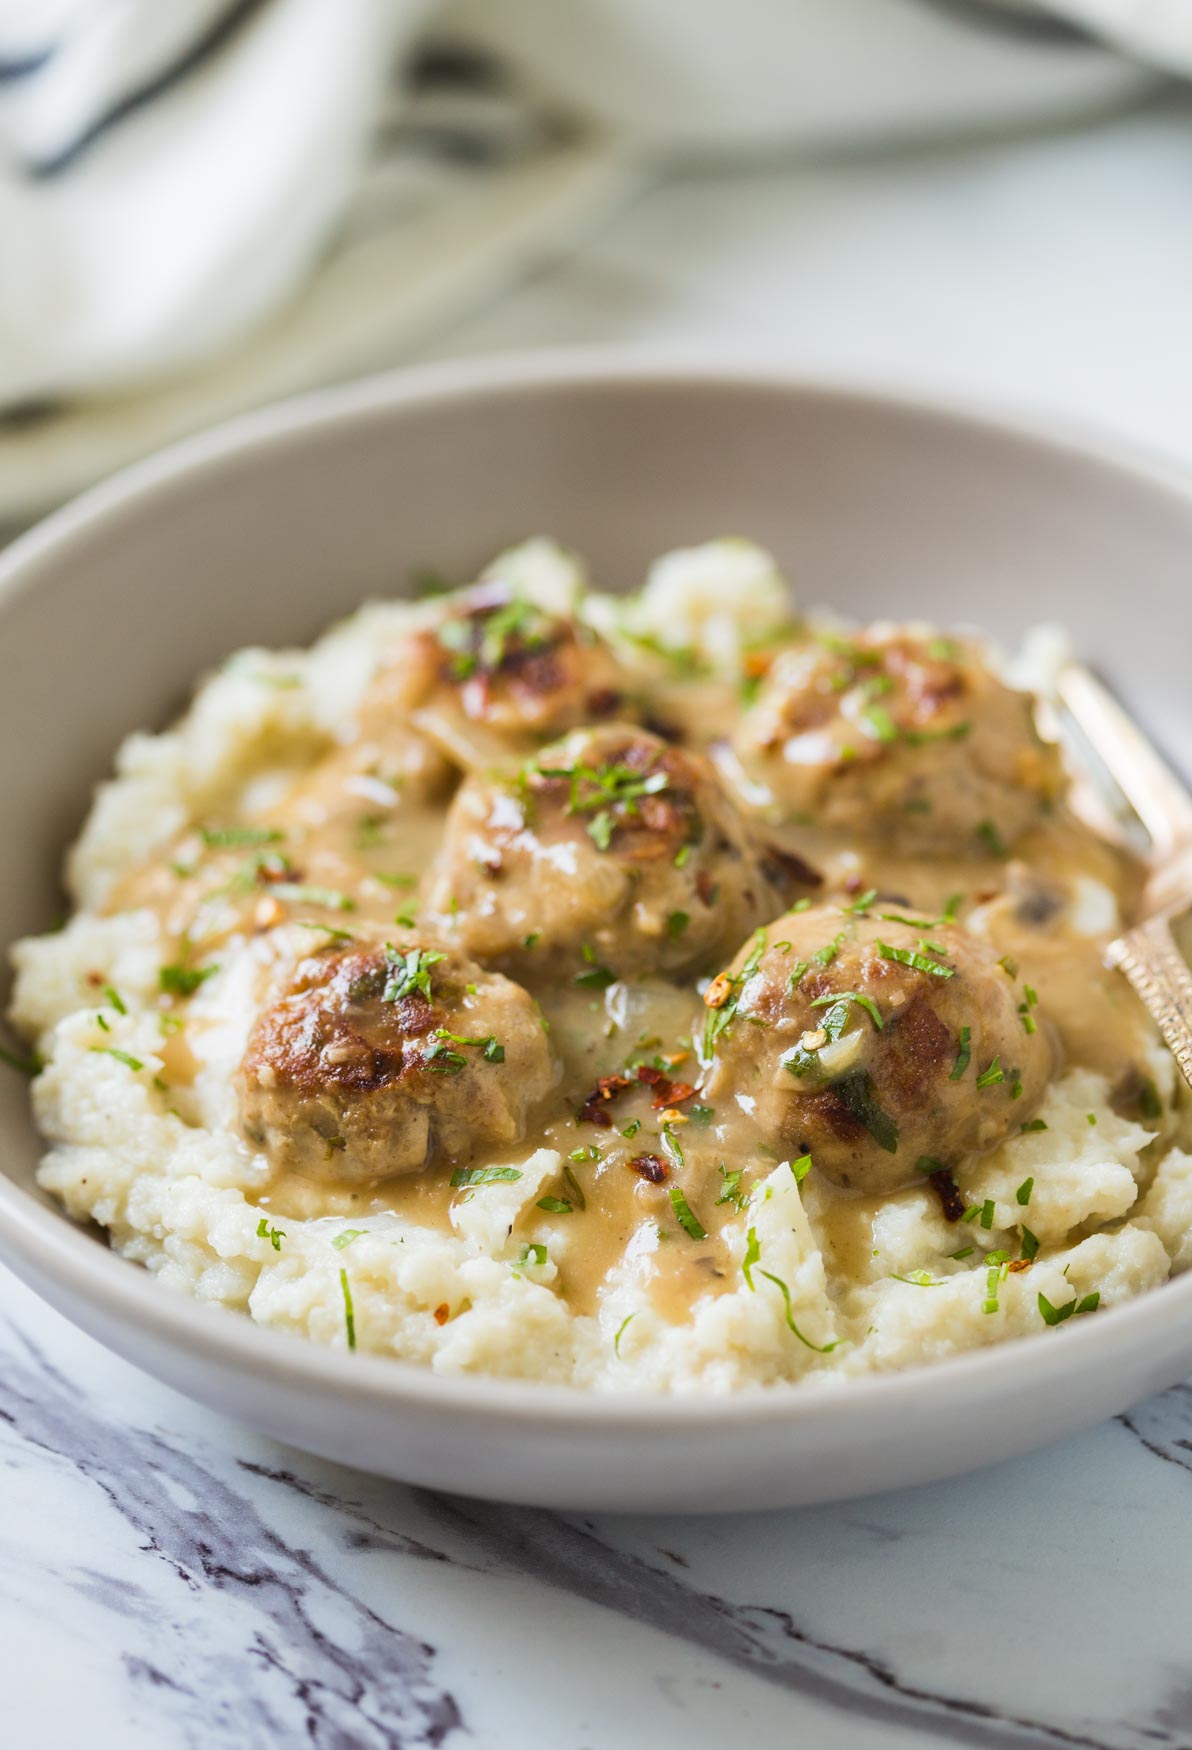
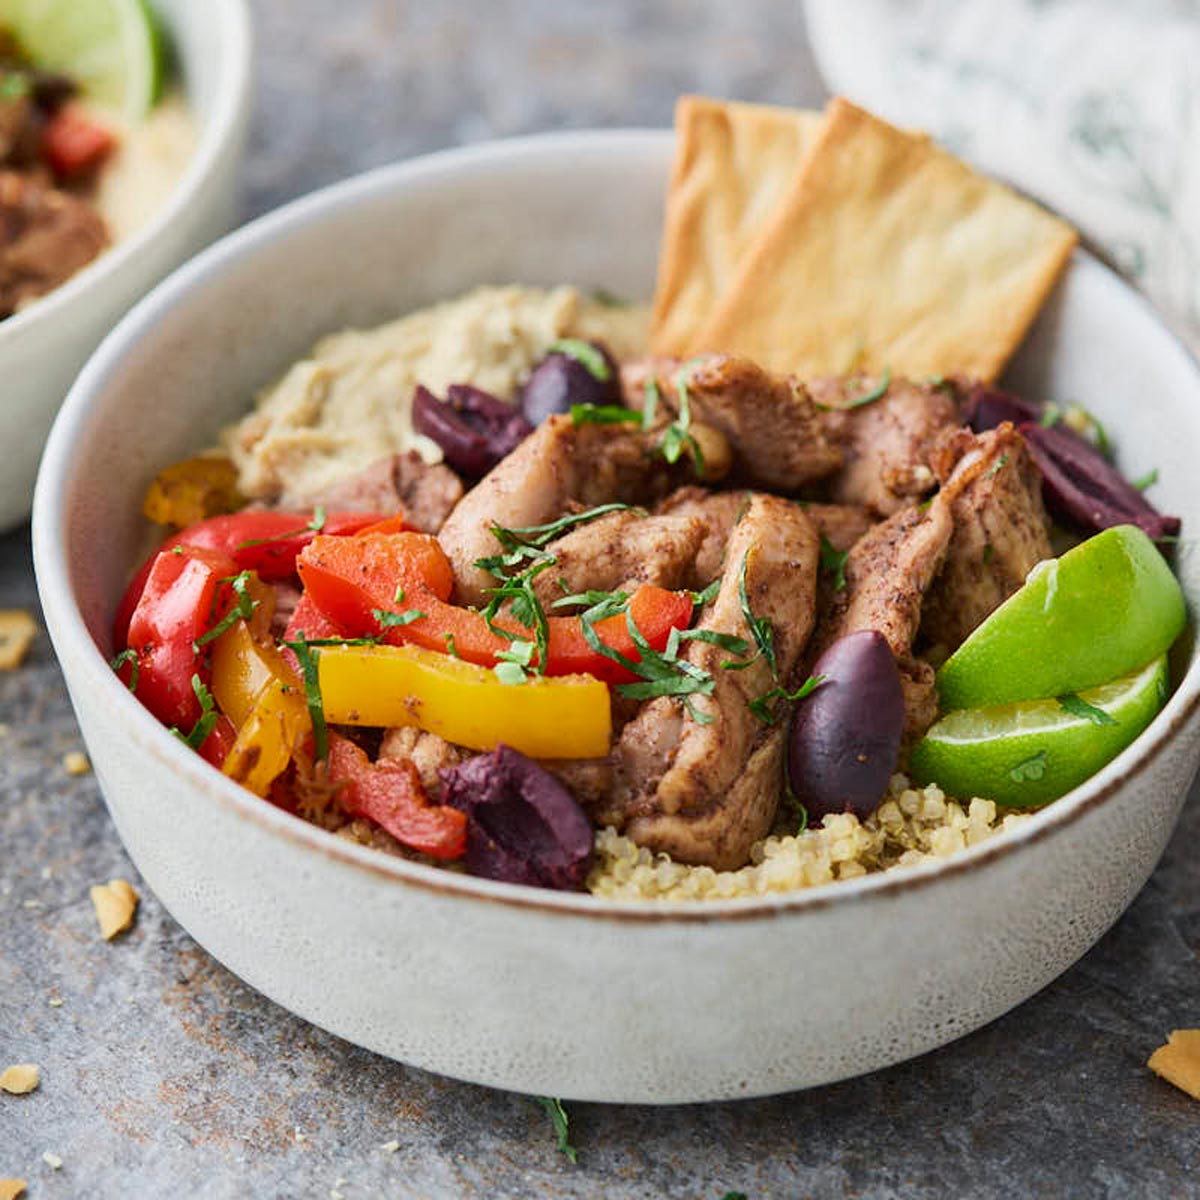
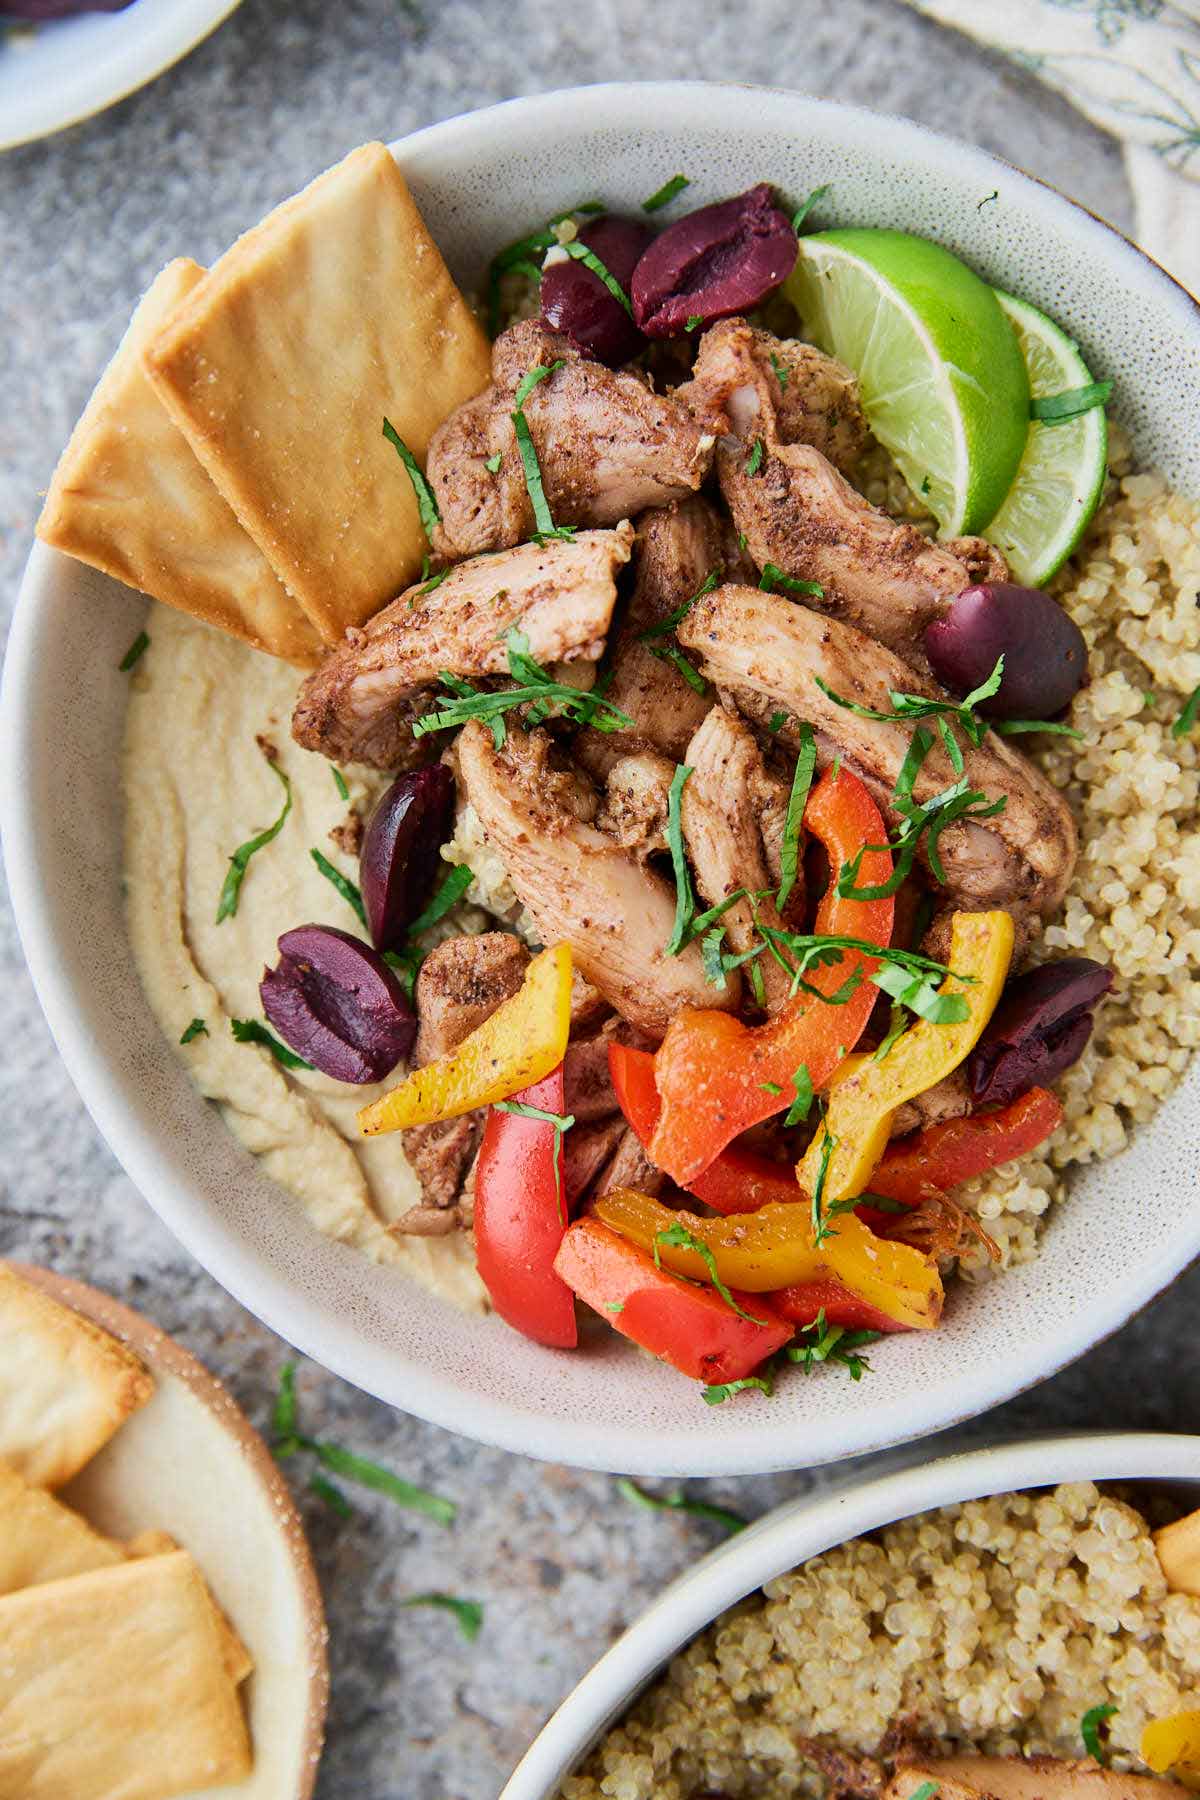
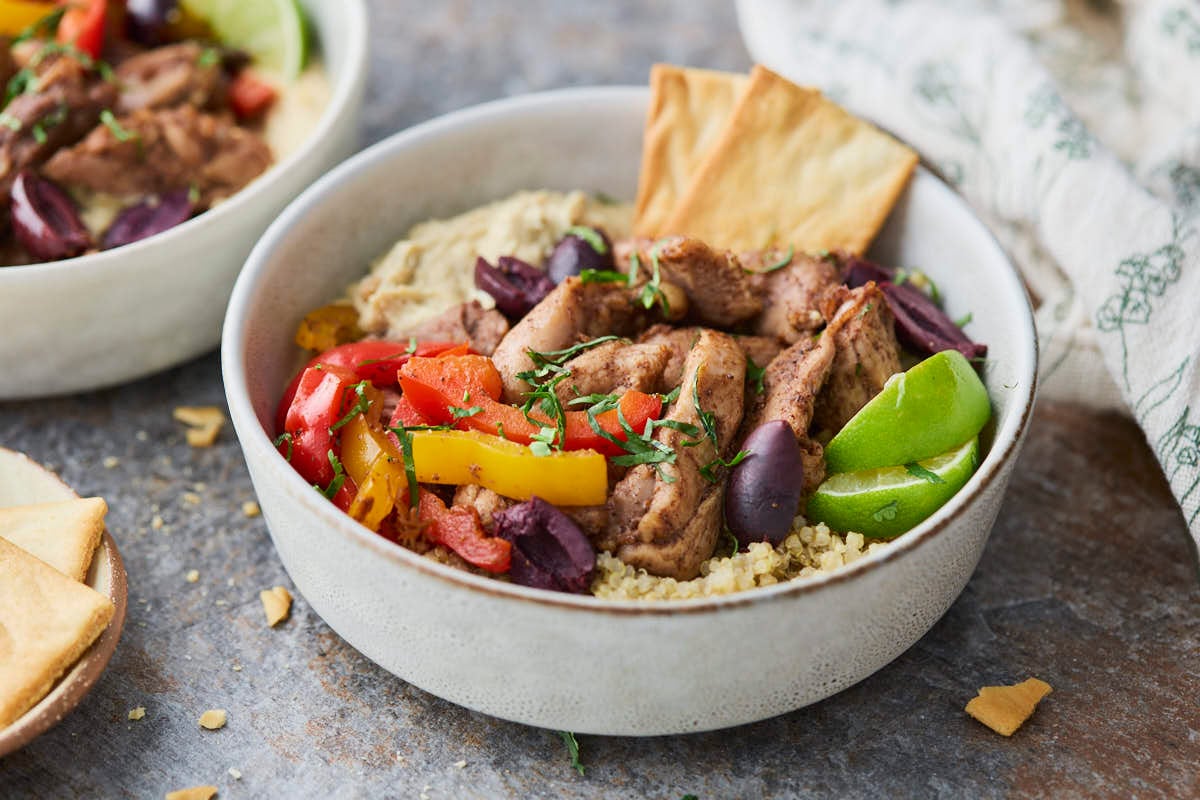
    This super flavourful, satisfying, and filling chicken hummus bowl with quinoa is a must-try dish for a healthy meal. The colors and flavors in this Mediterranean-style dish are so irresistible.

    Assembled roasted shawarma chicken hummus bowl with quinoa and peppers, topped with fresh herbs, olives and lime wedges.

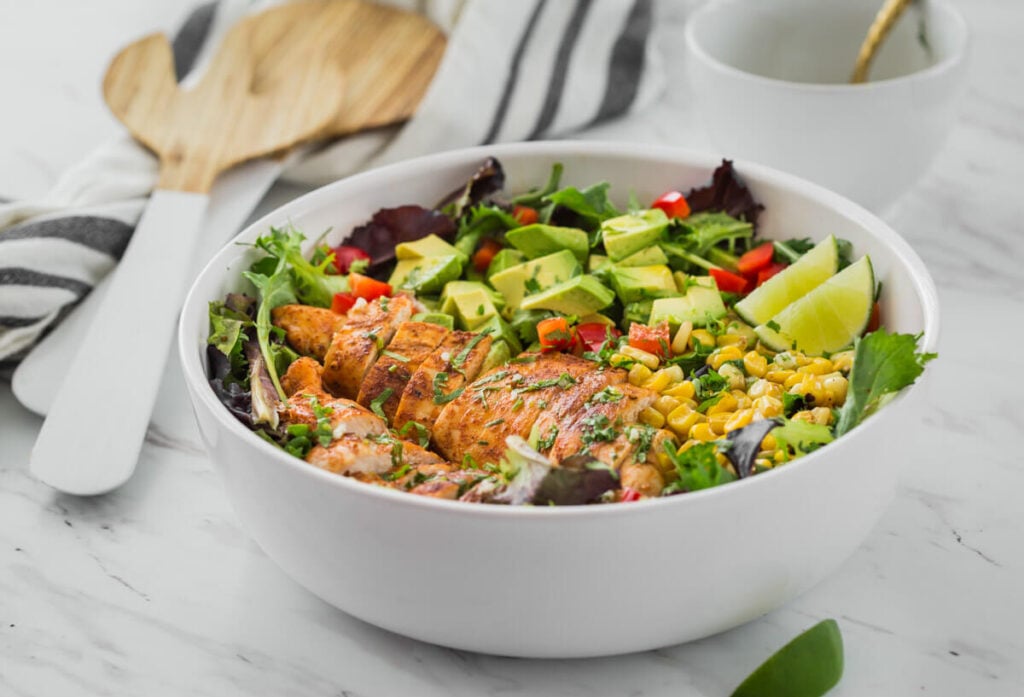
    I love making wholesome dishes, such as one-pot Mexican chicken and rice, that include grains, veggies/greens, and protein all in one dish for a healthy and easy lunch or dinner.

    Likewise, this shawarma chicken hummus bowl is prepared with healthy protein, fluffy quinoa, and roasted veggies.

    [feast_advanced_jump_to]

    What is special about this dish

    • Protein-rich and a filling bowl for a healthy meal.
    • Loaded with flavors and aromas that will make you more hungry.
    • Colorful veggies and toppings in a bowl make it tempting.
    • Easy to prepare and ready in 30-45 mins. if you have all the ingredients.
    • Perfect for the party crowd.
    • You can include this hummus bowl in summer barbeque menus.
    • Versatile - customize toppings as per your liking.
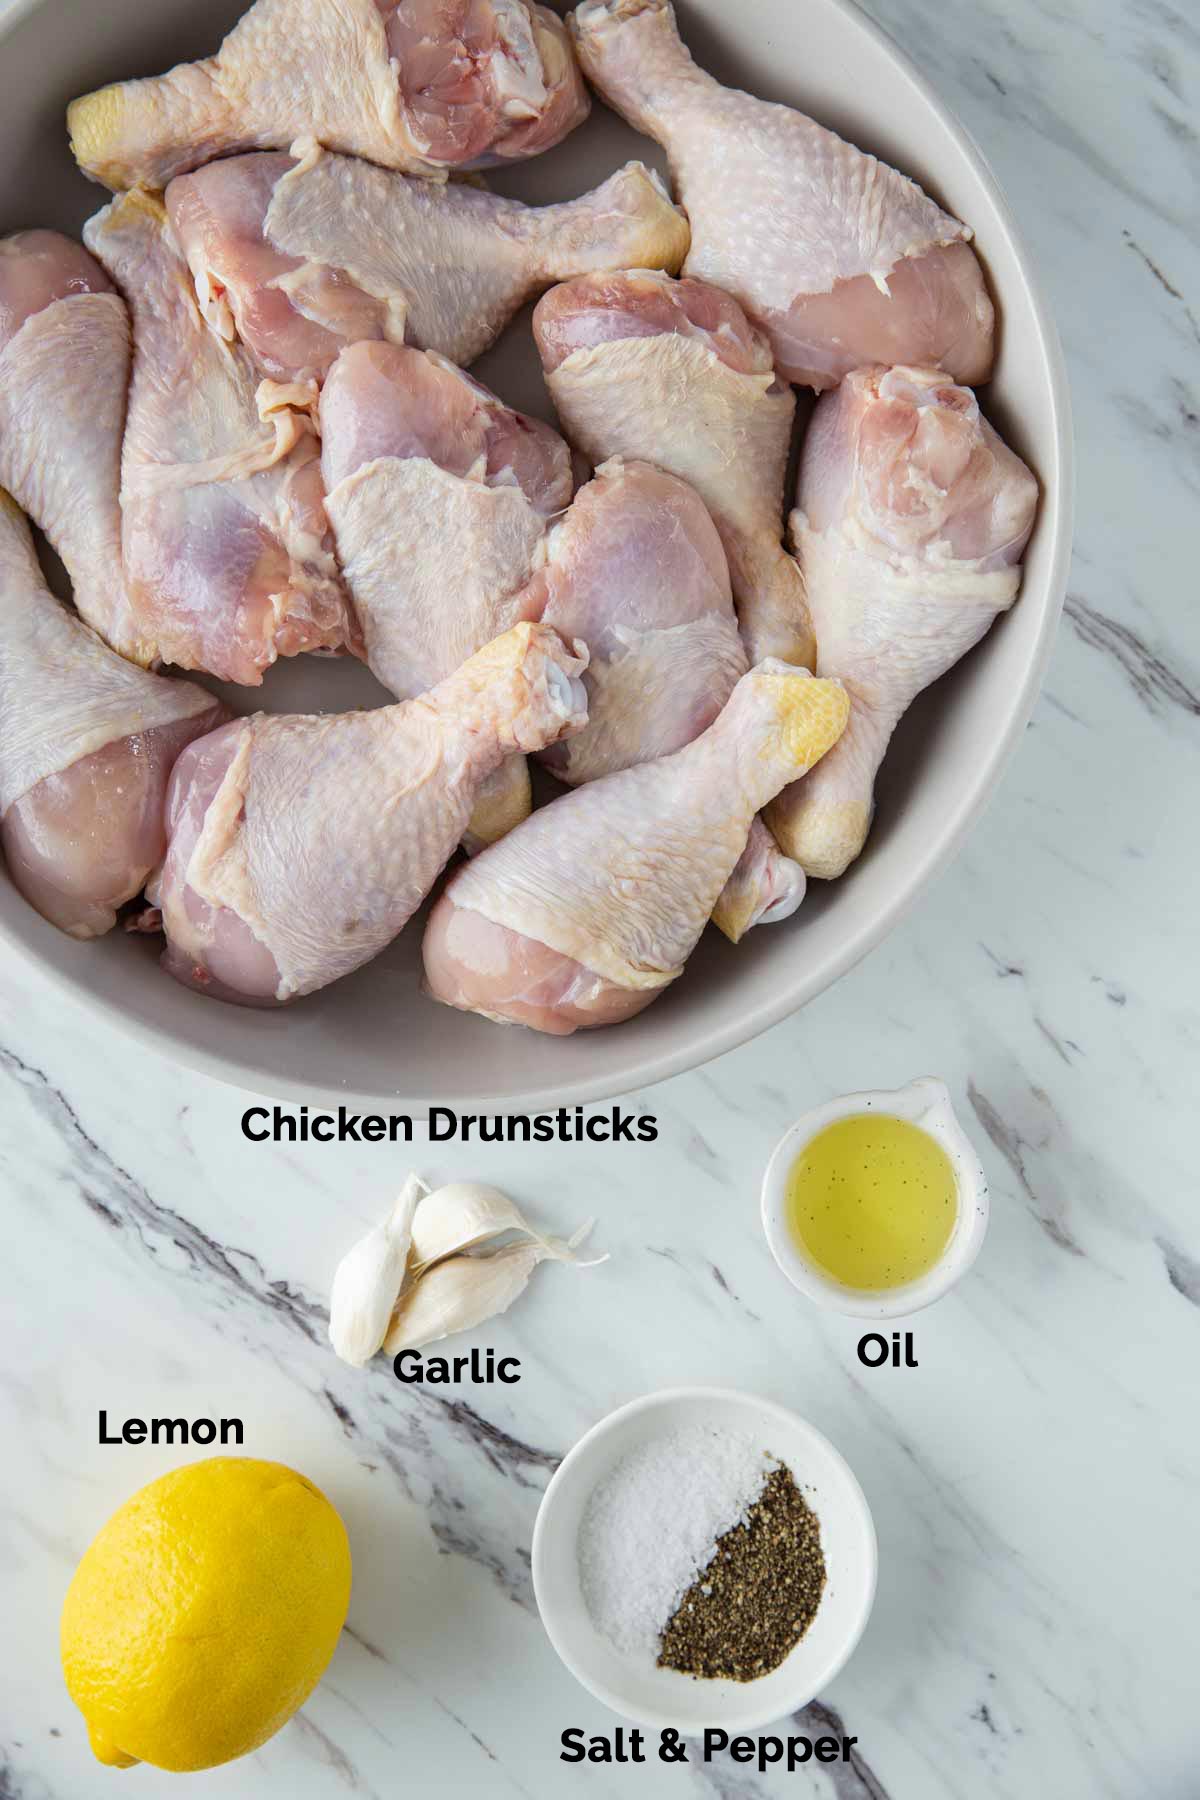
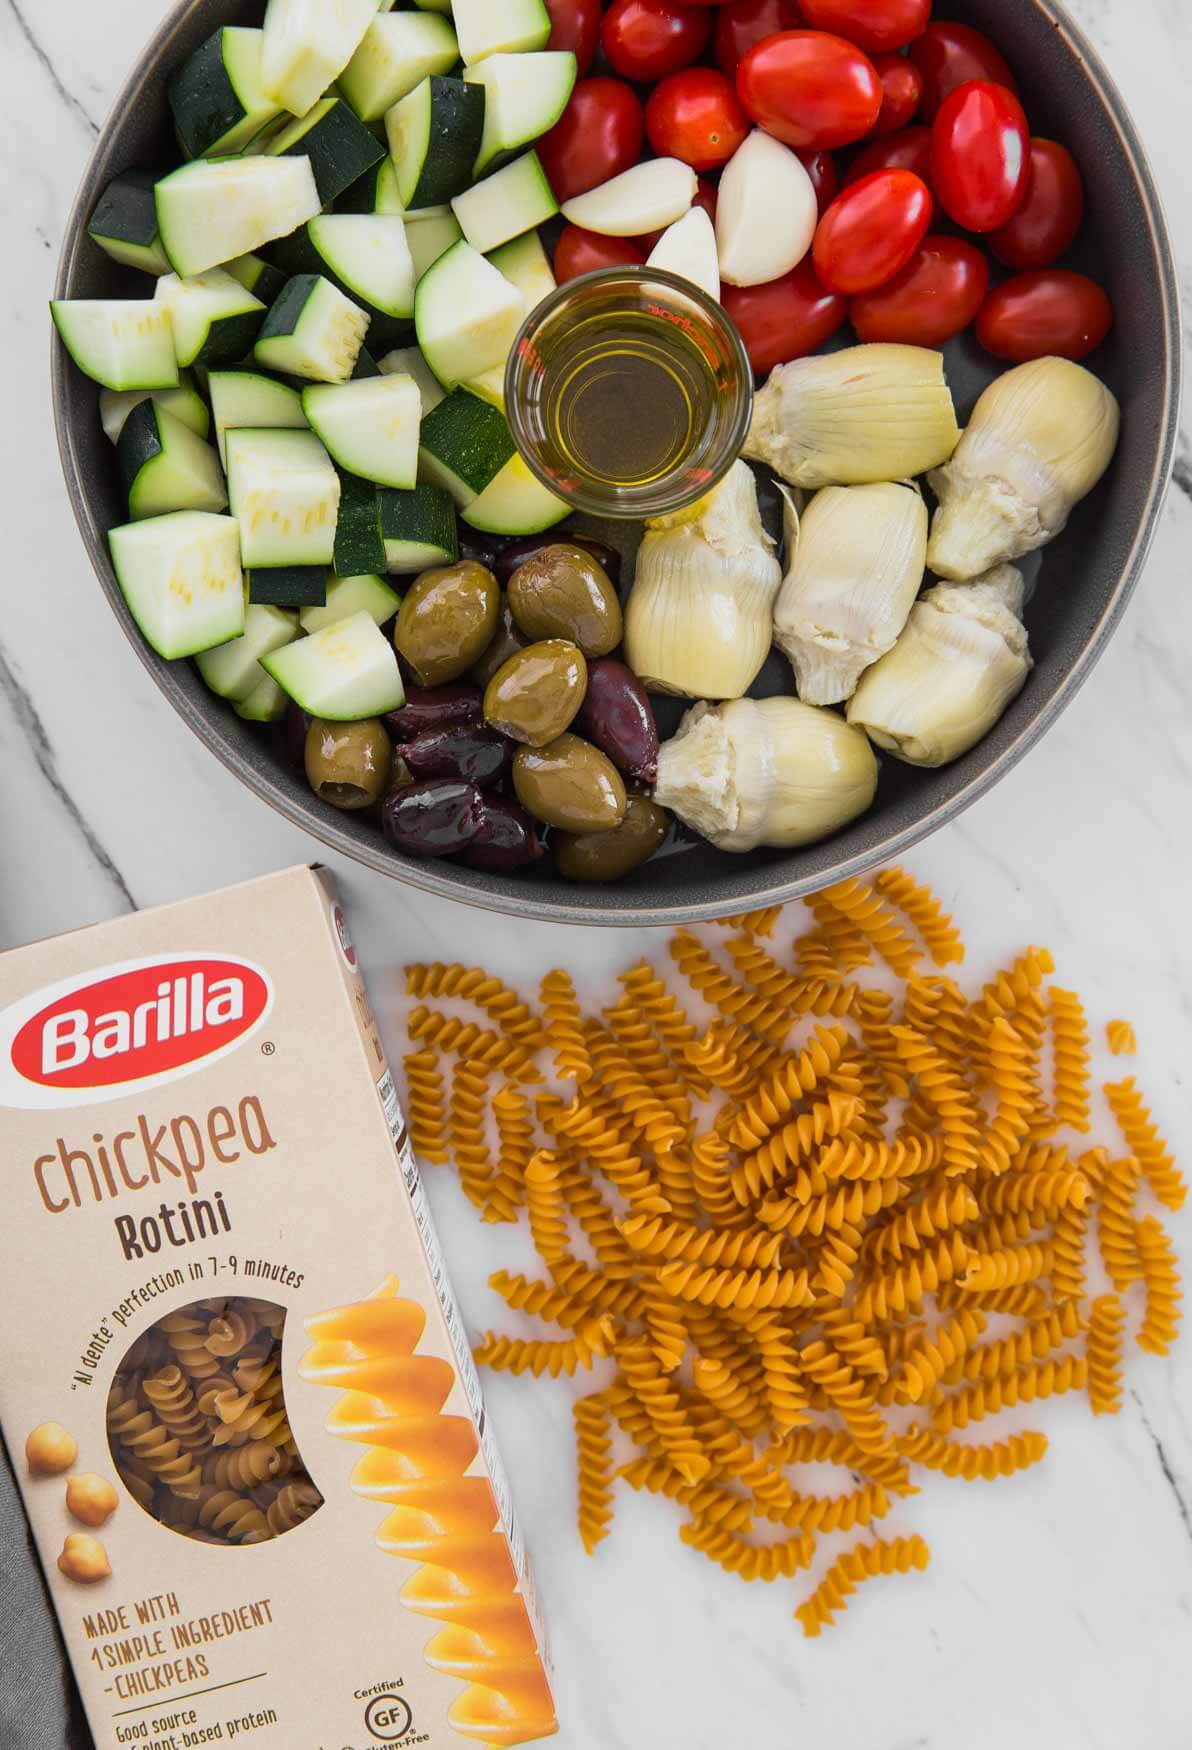
    Ingredients

    Ingredients for a shawarma chicken hummus bowl, including chicken, hummus, quinoa, and spices etc., neatly arranged on a flat surface.
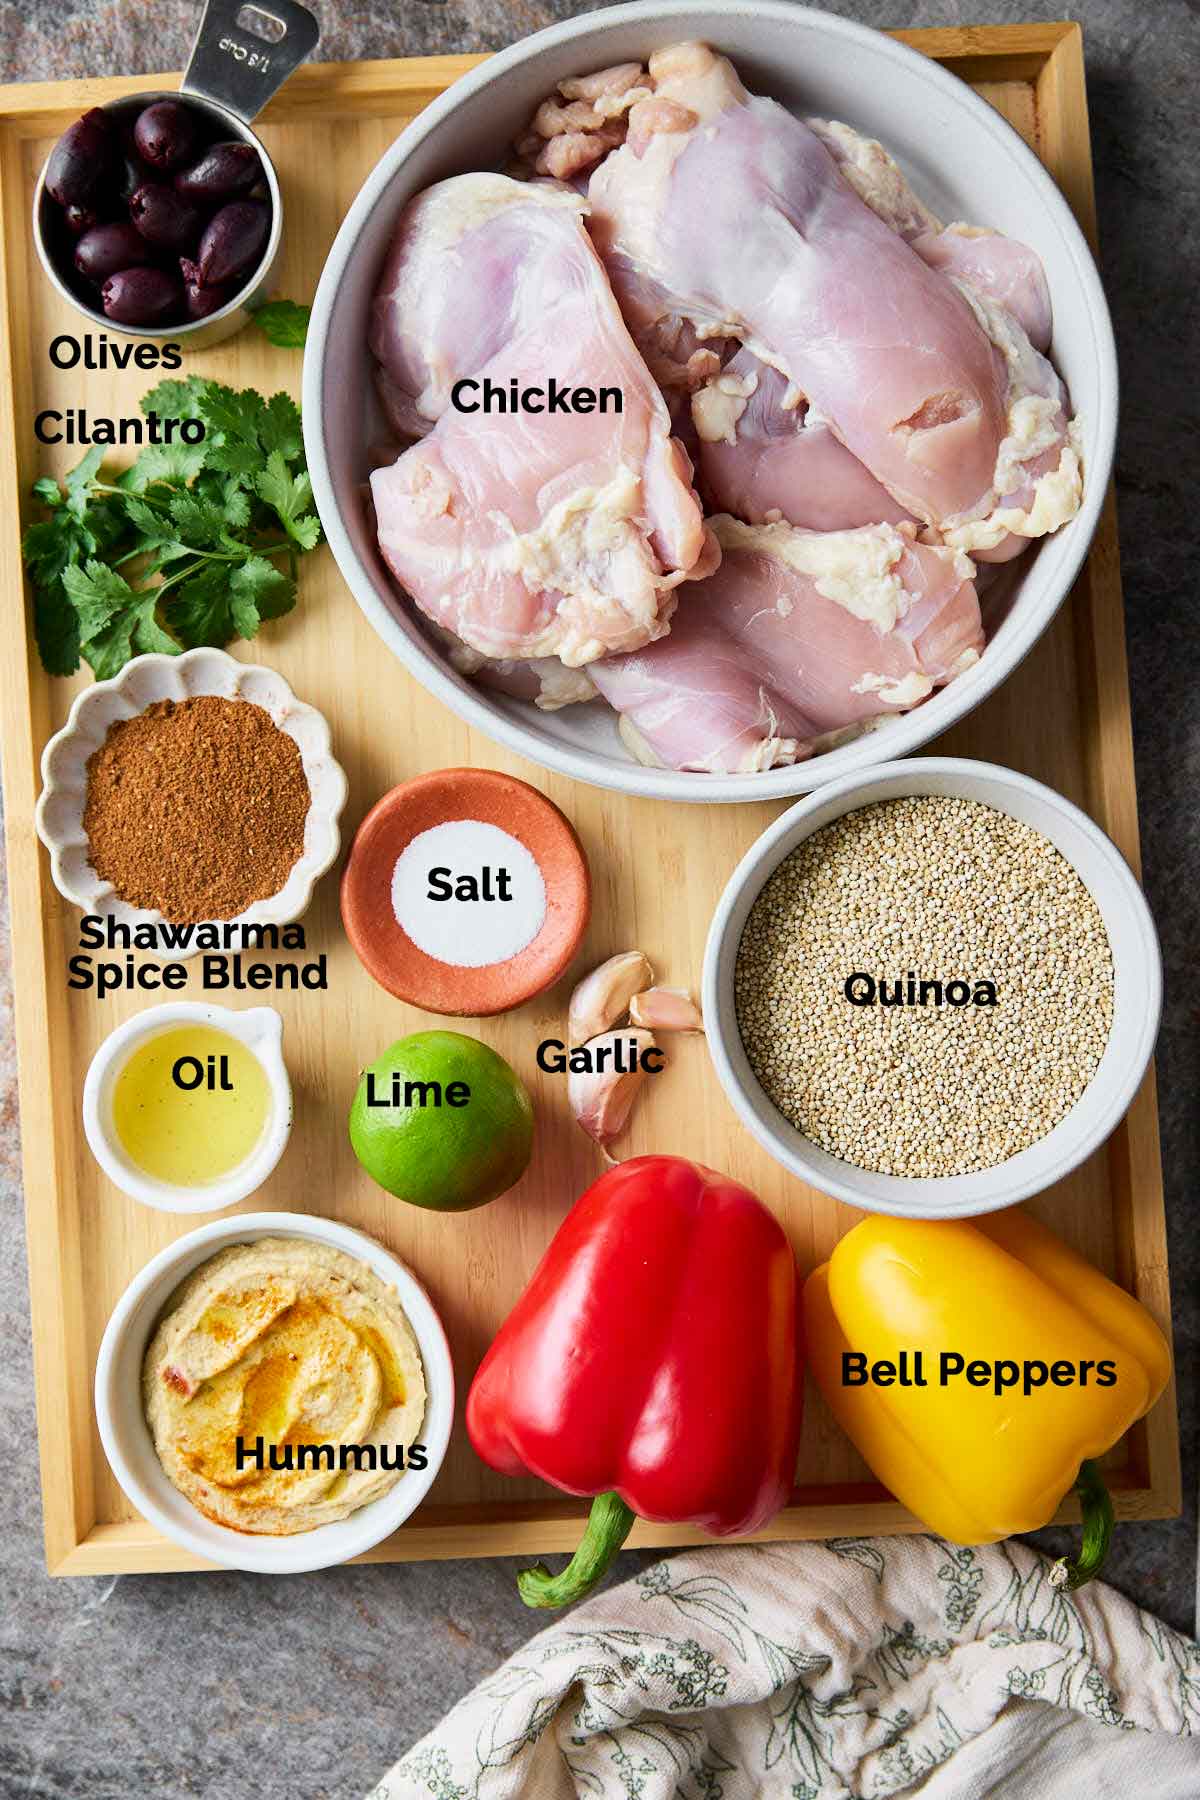
    • Chicken - I usually purchase boneless and skinless chicken thighs. For this recipe, I like to cut it into ½" stripes (like fajita style). However, you can dice it into bite-size pieces. Or keep it whole and cut after cooking to avoid handling raw meat. In our local meat shop, they cut it the way you want. You can use chicken breasts as well if you prefer it.
    • Hummus - most of the time, I prepare it at home. If you are busy and want to skip this step, buy good quality hummus from the store.
    • Shawarma marinade/spice blend - use a store-bought blend or make your special blend using ground cumin, coriander, paprika, nutmeg, turmeric, black pepper, and, of course, salt to get the shawarma flavors in the chicken and veggies.
    • Veggies - use different colored bell peppers to make a nutritious and inviting dish.
    • Quinoa - cook the quinoa according to package instructions. Use either broth or water to cook it.
    • Oil - any cooking oil like avocado or olive oil (made for sauteeing and grilling with a high smoke point) will work for making roasted veggies and shawarma chicken. You can also add some extra-virgin olive to the quinoa while cooking and drizzle some on the final dish.
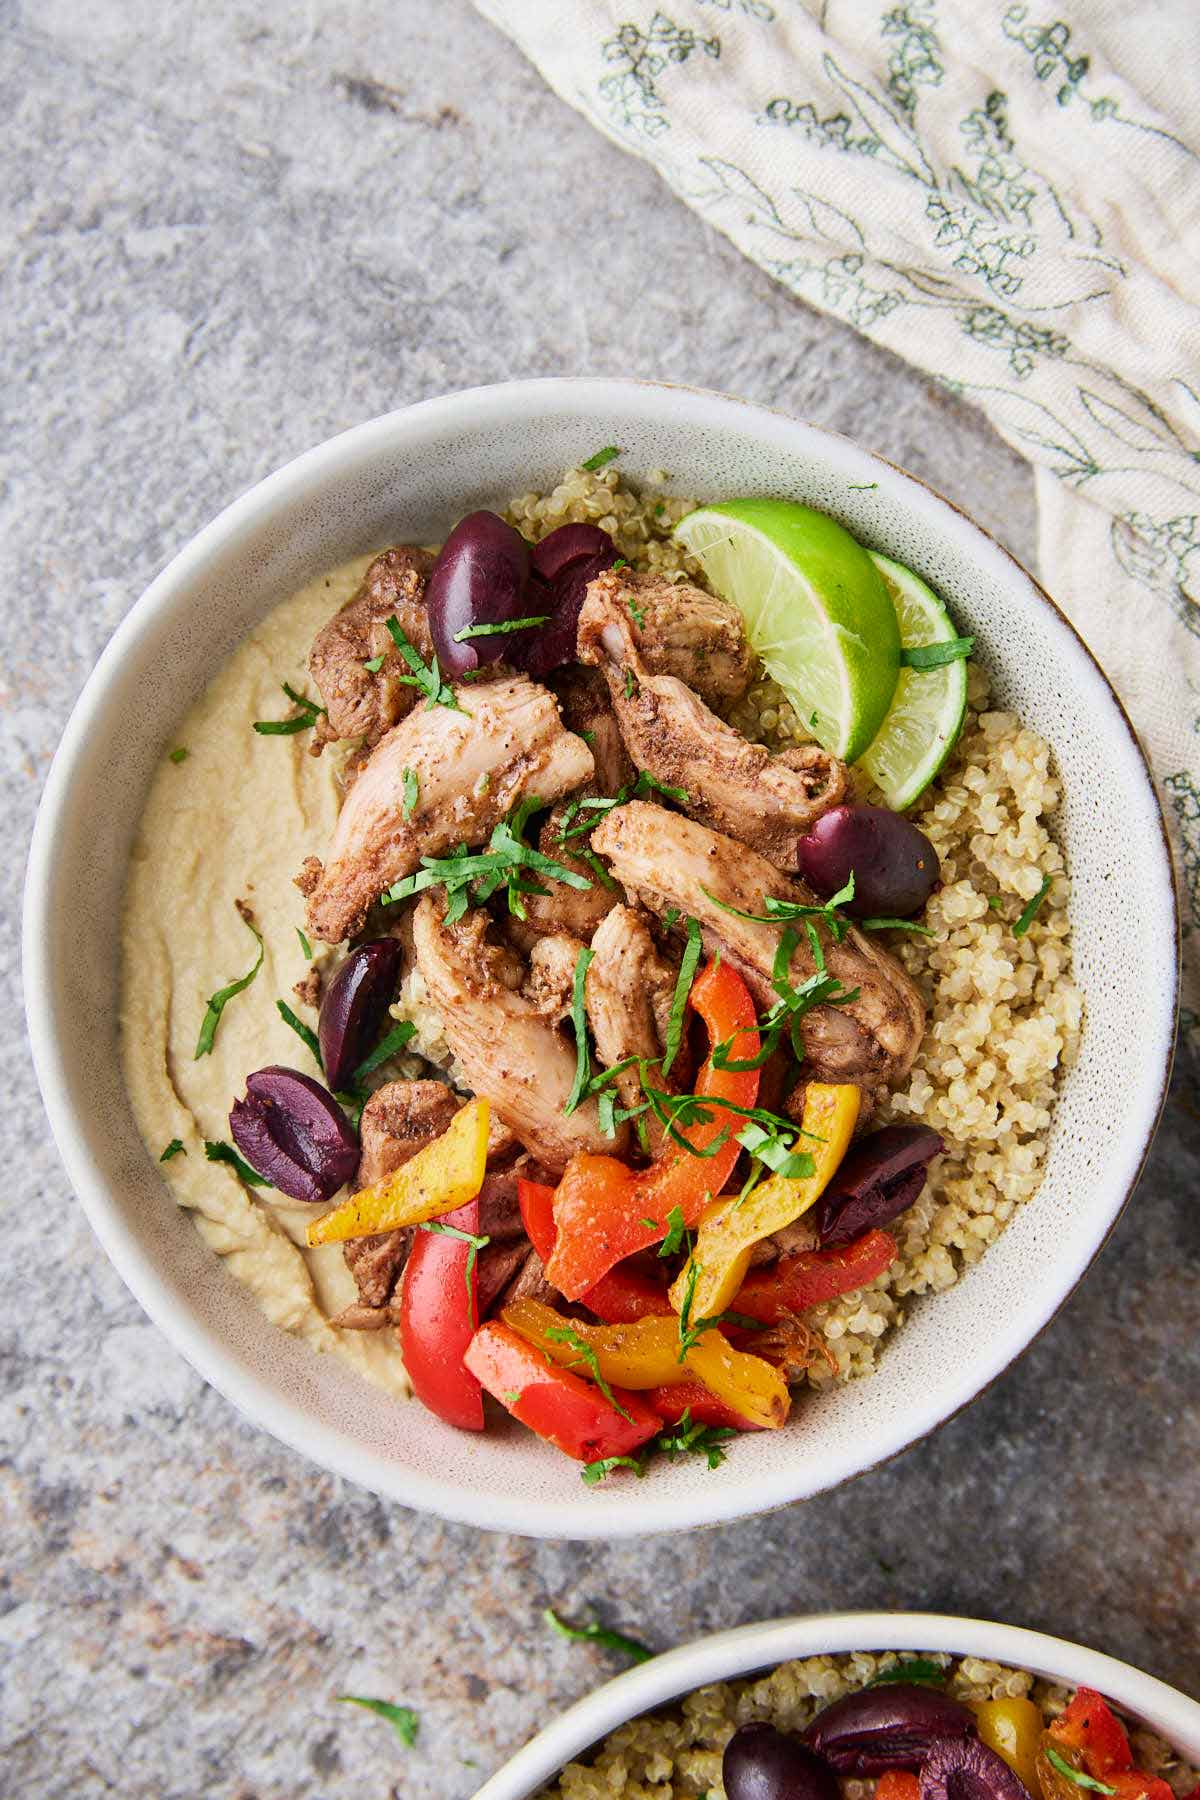
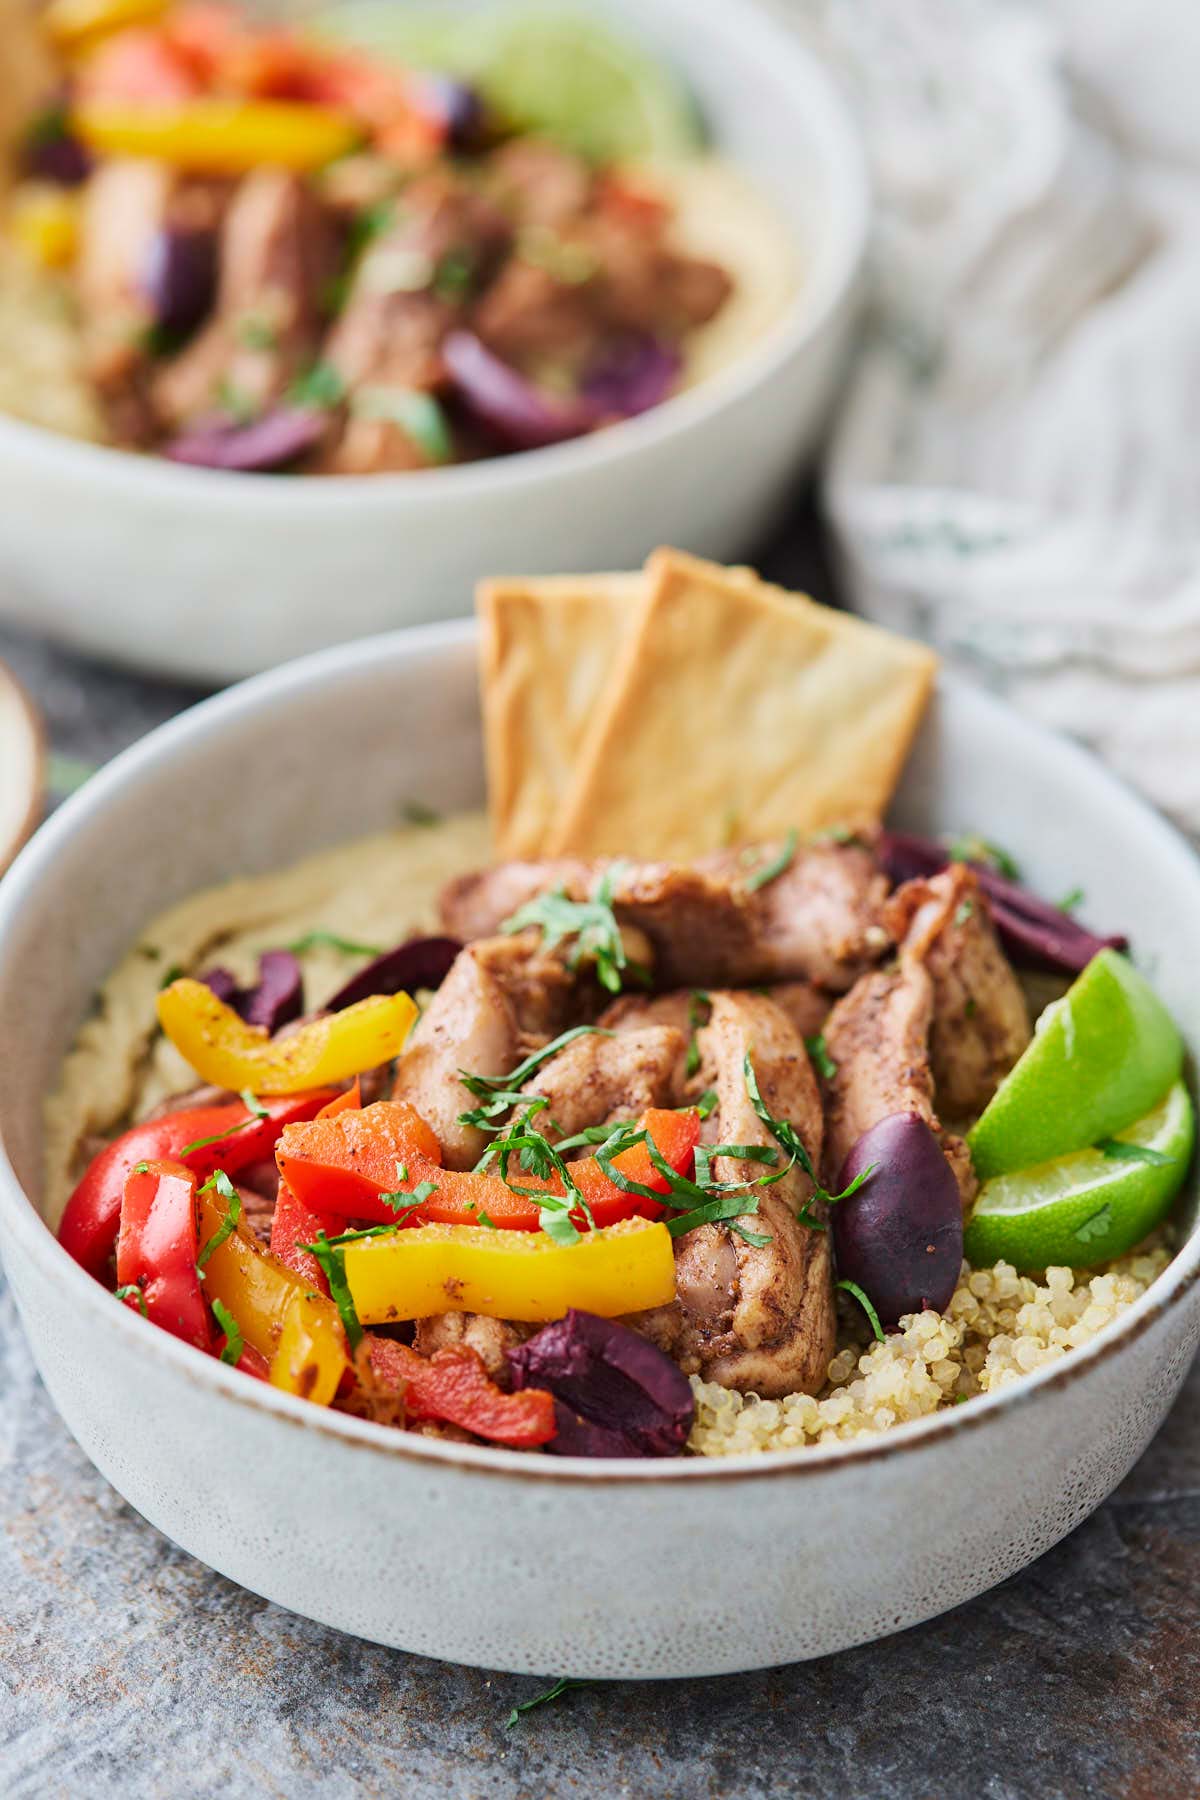
    • Toppings - you can use sliced olives, chopped cilantro or parsley, pita chips, lime wedges, etc., to garnish and as toppings on the quinoa and hummus bowl.

    See the recipe card below for more details and quantities.

    Best hummus for hummus bowl

    Buy good quality hummus without any unfamiliar ingredients. Even best if you make it at home using canned or chickpeas cooked at home.

    I use classic hummus in this recipe to enjoy the shawarma chicken flavors. However, you can make hummus with flavors like roasted red pepper hummus. Or, prepare pumpkin hummus to make this hummus bowl perfect for the fall season. Use seasonal spring green peas to prepare hummus with peas.

    Chicken breasts vs chicken thighs and what to use?

    I prefer using boneless chicken thighs over the breasts. A thigh cut is more juicy upon cooking. Chicken breast tends to dry out when cooking and can easily become tough and chewy if they are cooked at high temperatures for longer periods. Also, chicken breasts are the more expensive cut of the chicken.

    If you know how to cook chicken breasts perfectly, you can use them in this recipe.
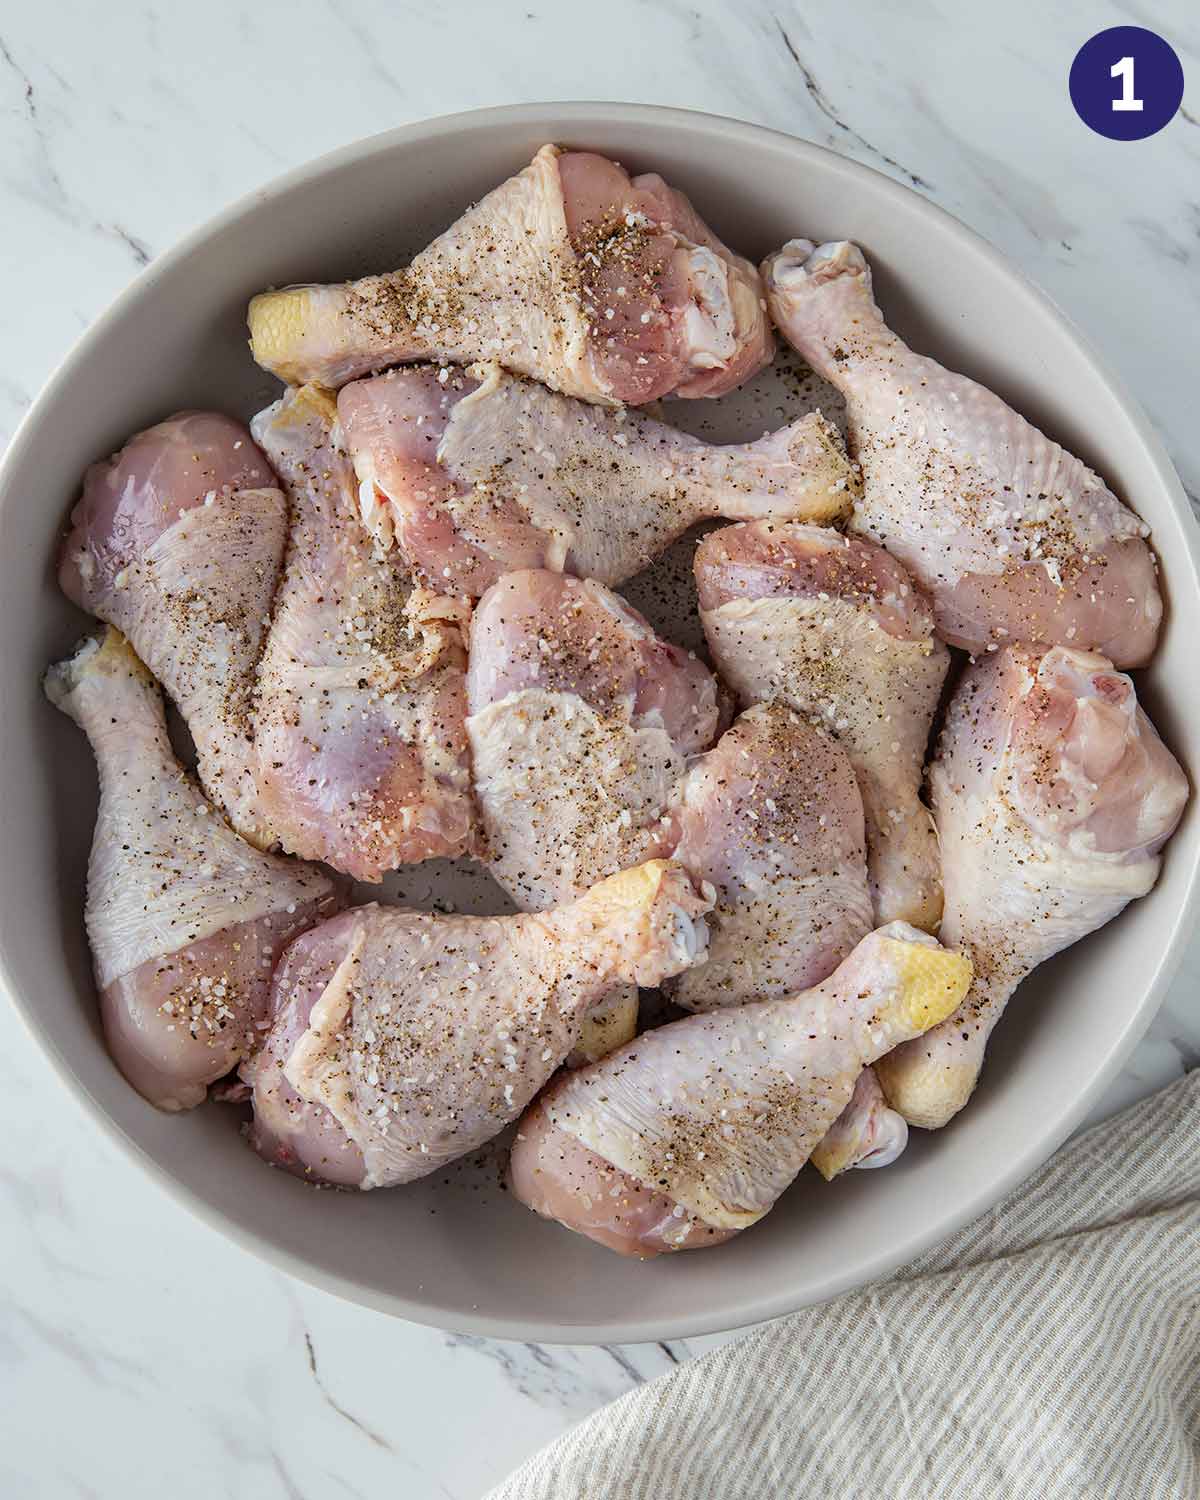
    Preparation tips!

    Sliced raw chicken, bell peppers, olives and chopped garlic in separate bowls on flat surface.
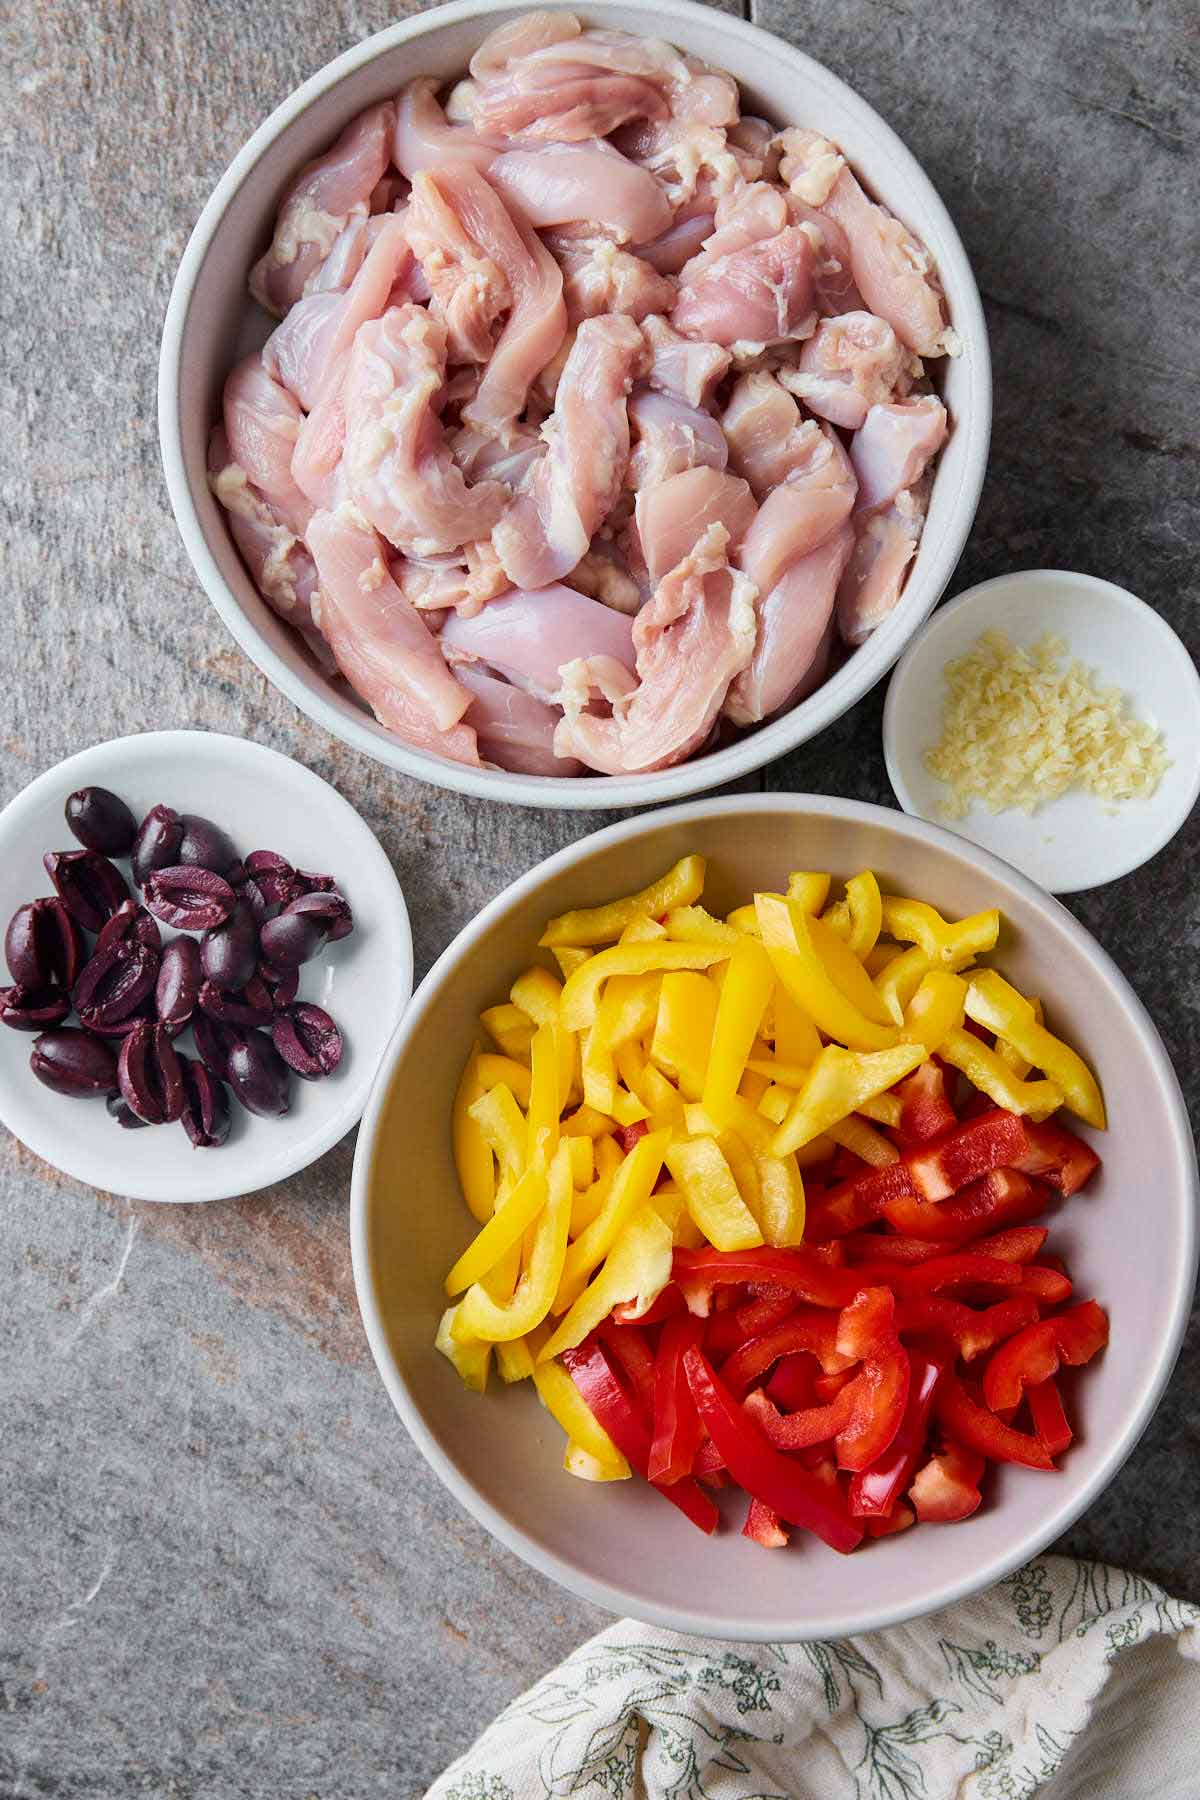
    • Cut chicken into strips - slice chicken thighs into thin ½" stripes. Or you can cook the marinated thighs and then cut them into strips.
    • Cut peppers - Trim the end, remove seeds, and slice bell peppers into ½" stripes.
    • Olives - cut them in half.
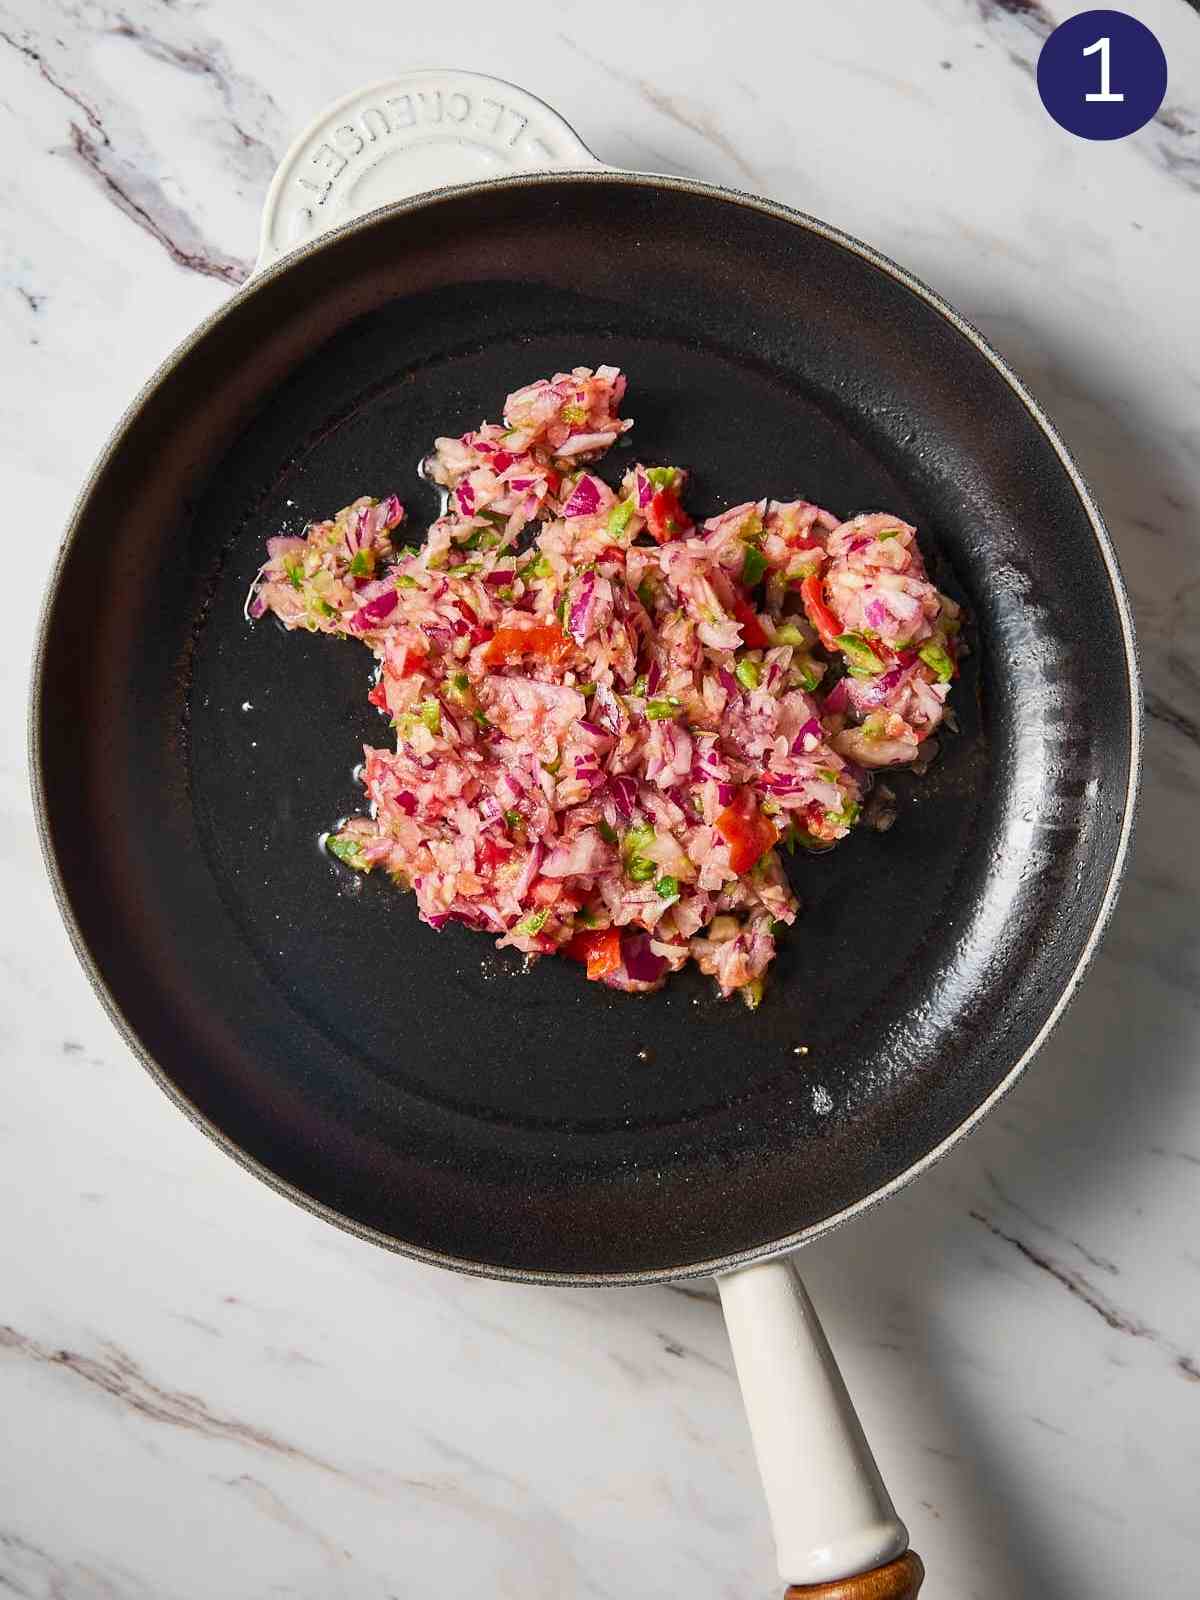
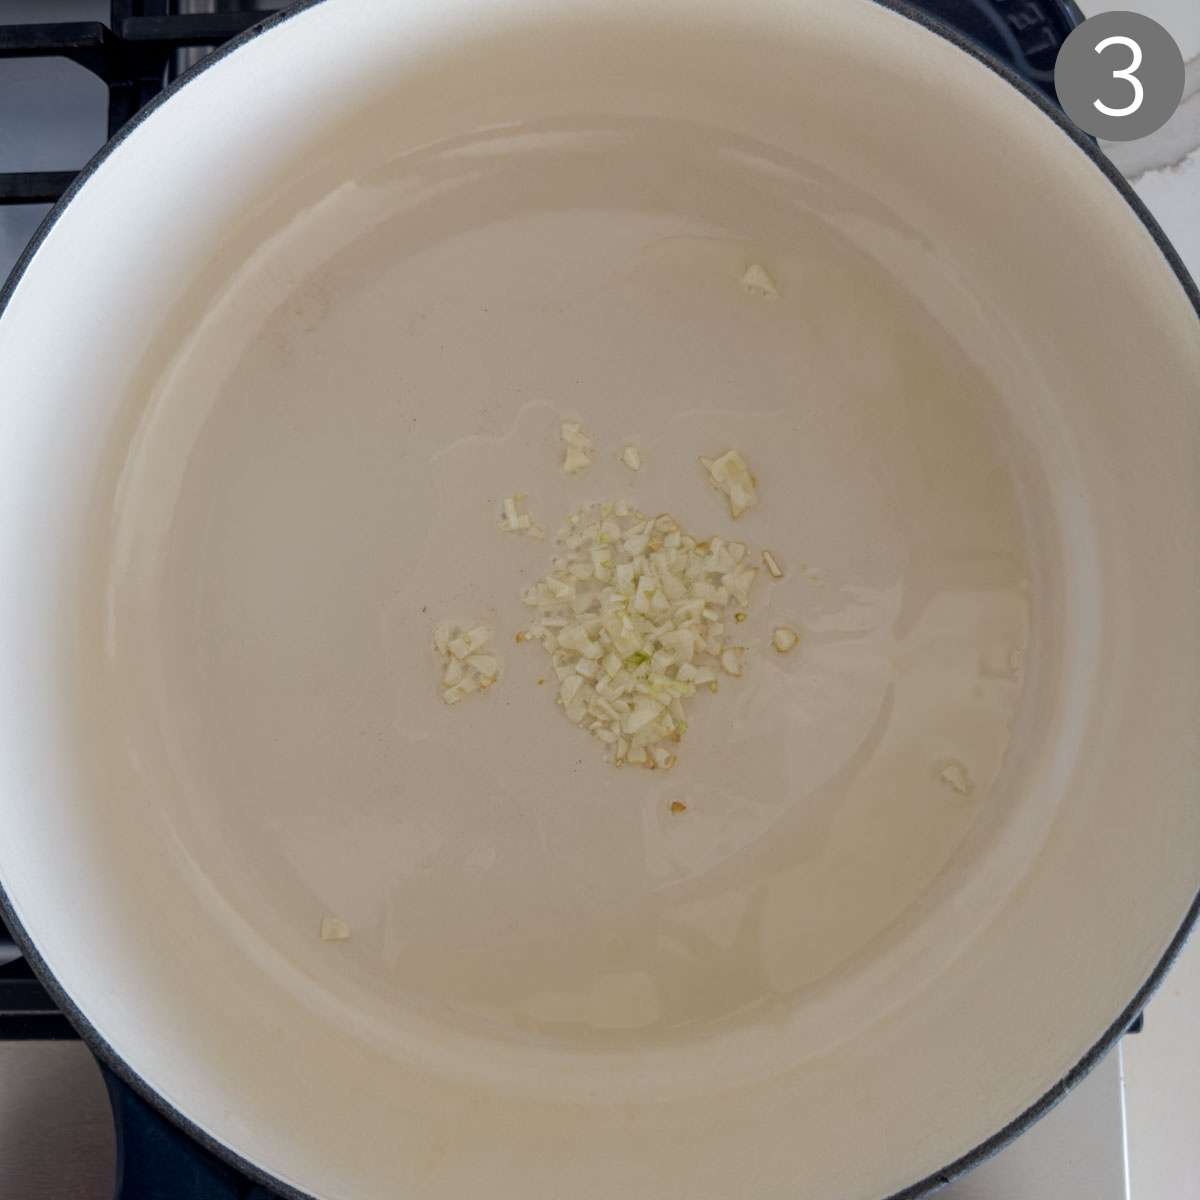
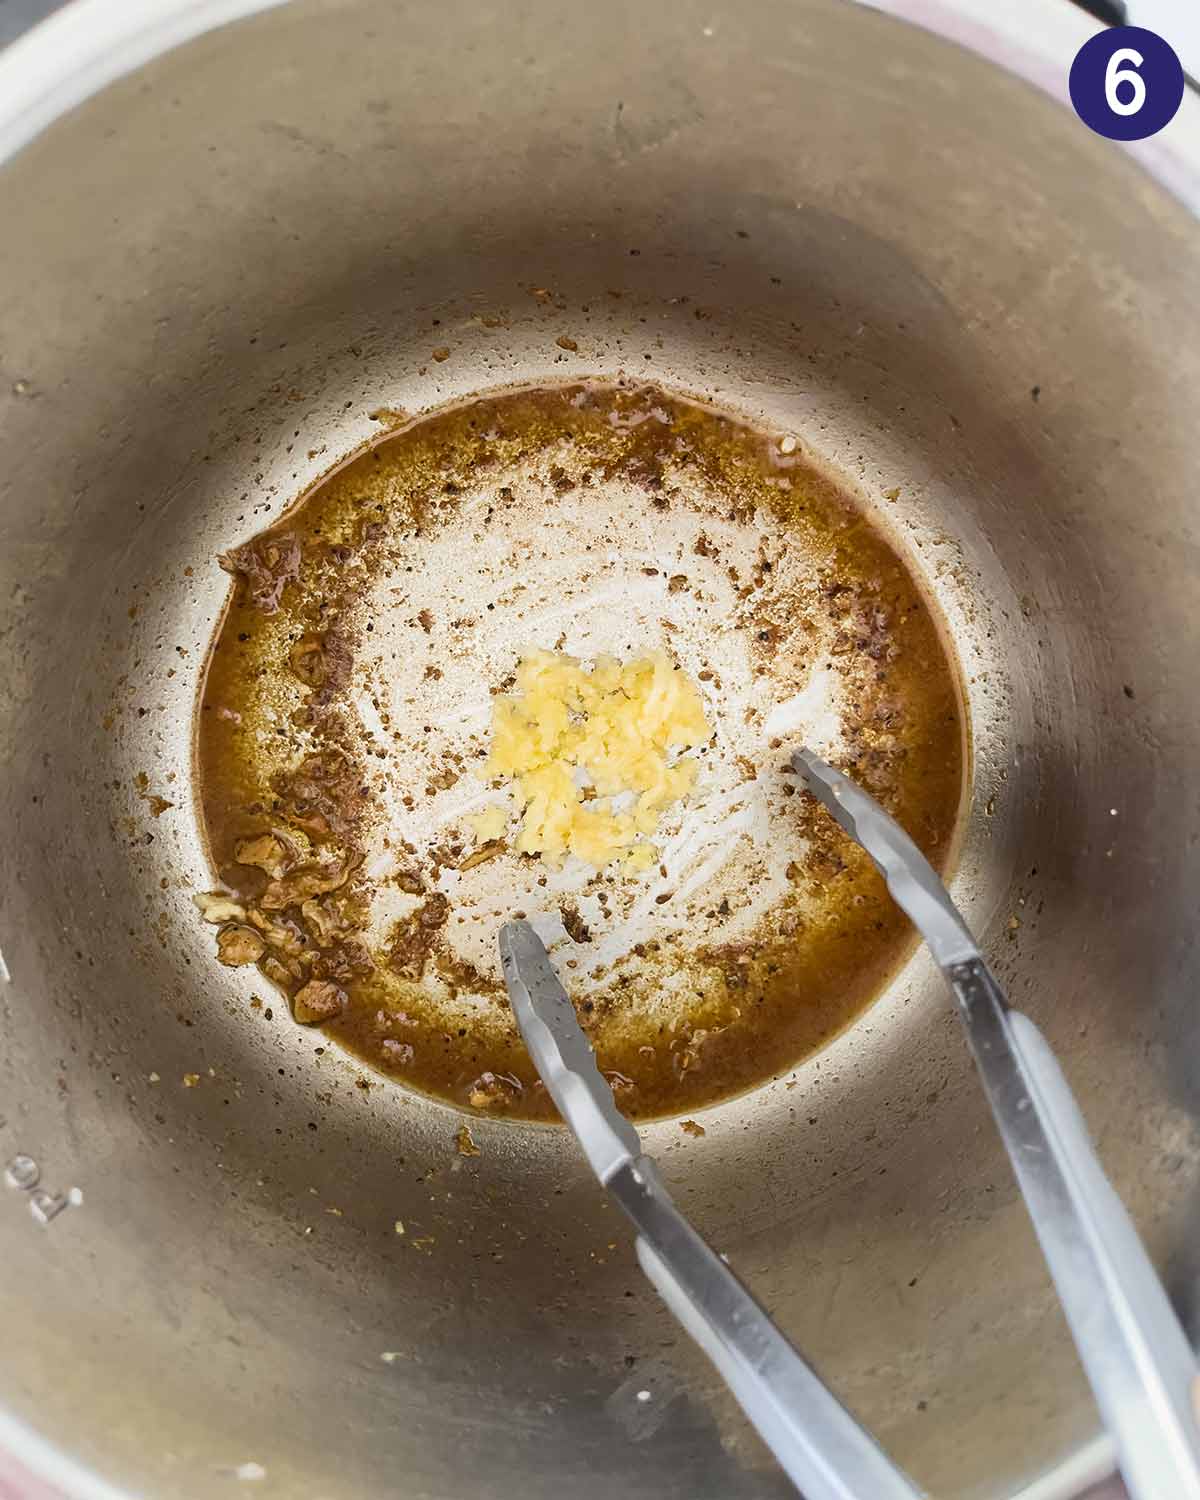
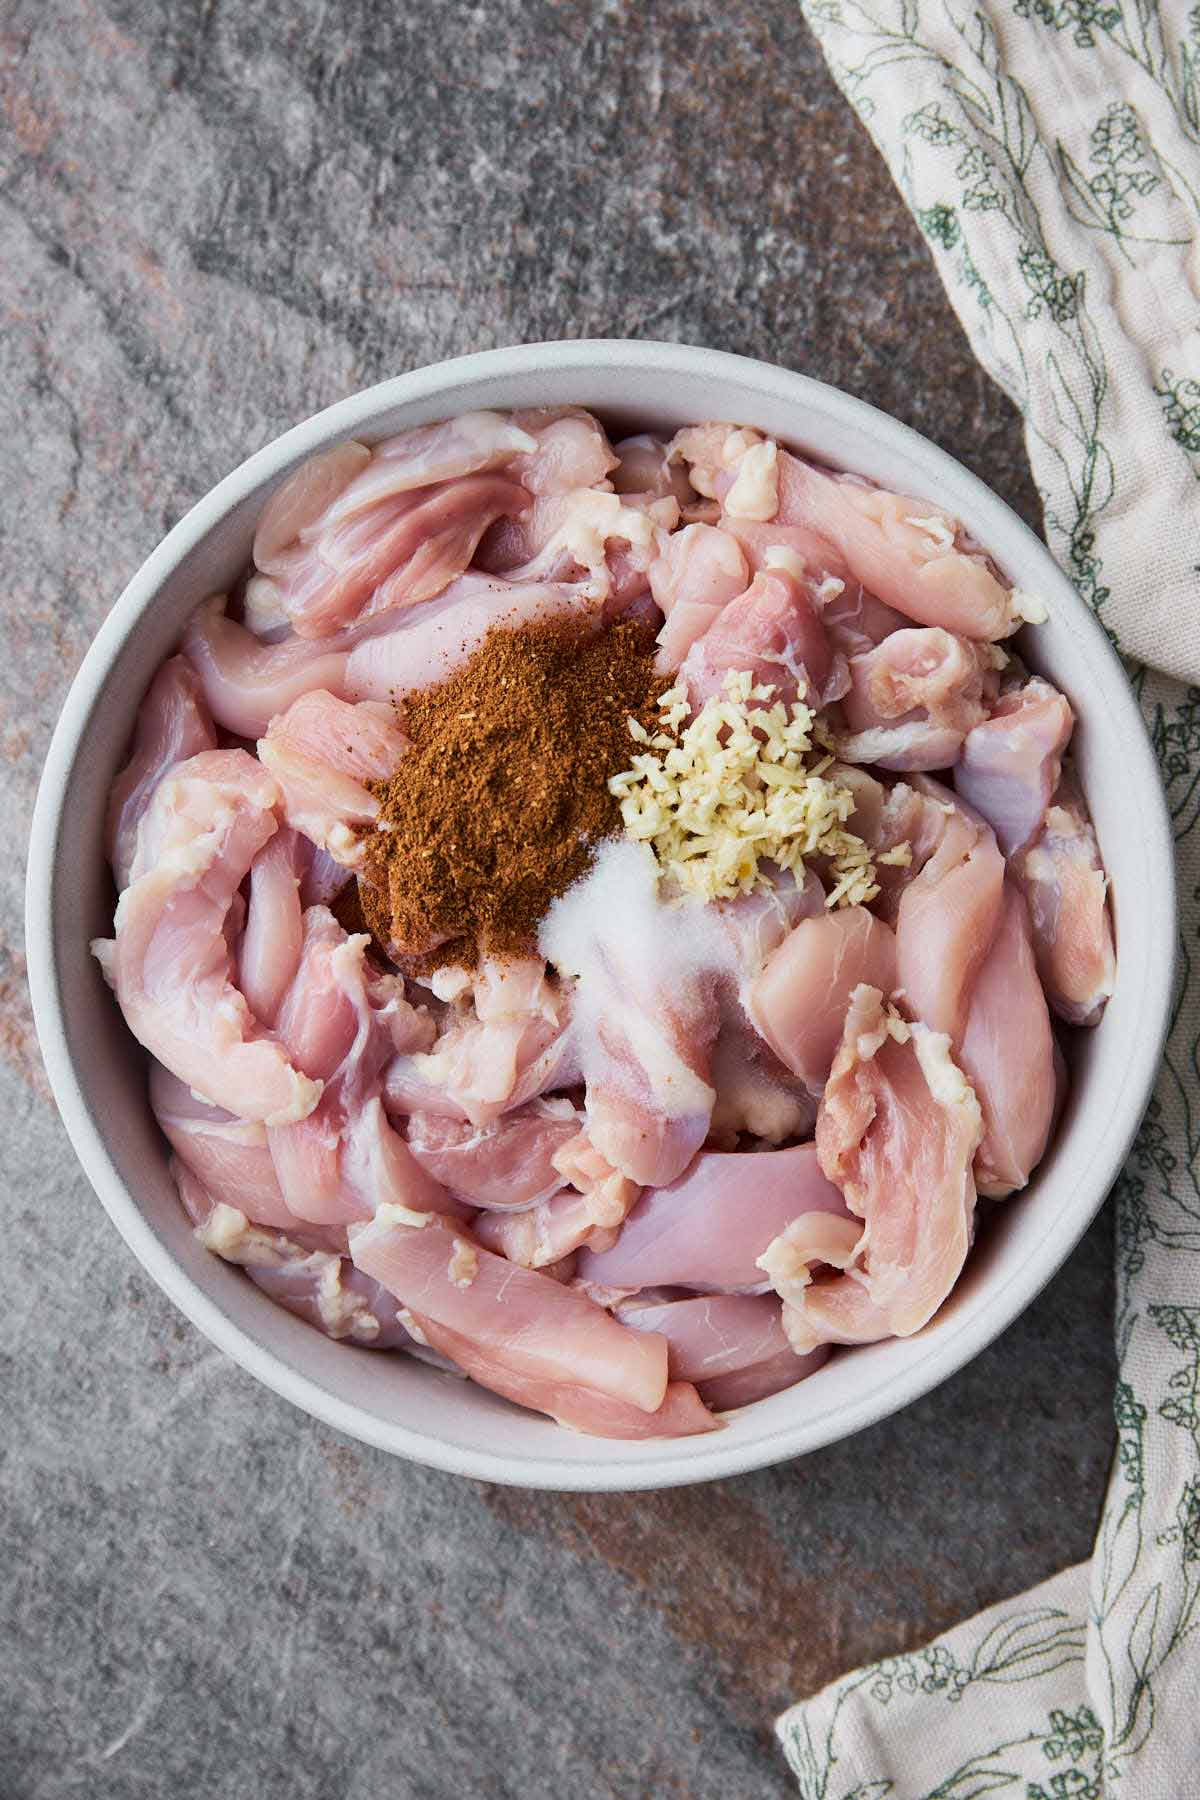
    • Garlic - finely mince or chop it to distribute in the shawarma chicken marinade evenly.

    Easy chicken shawarma marinade

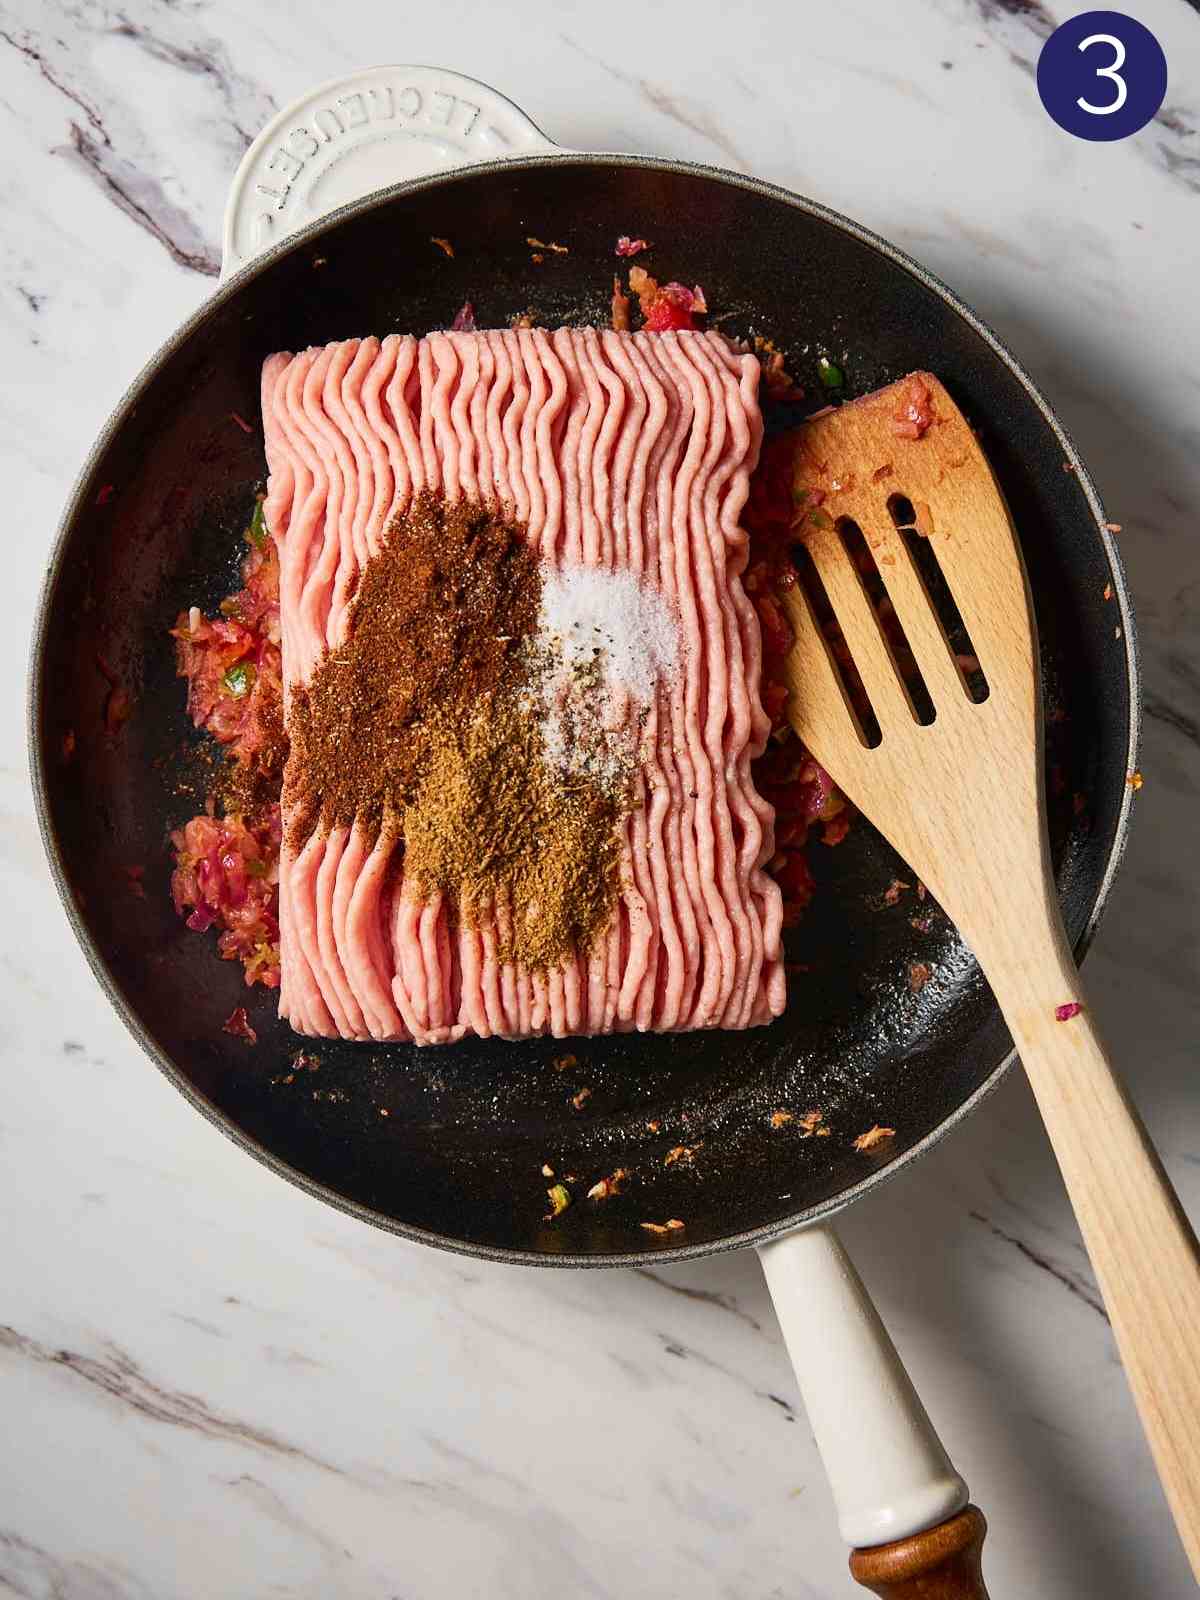
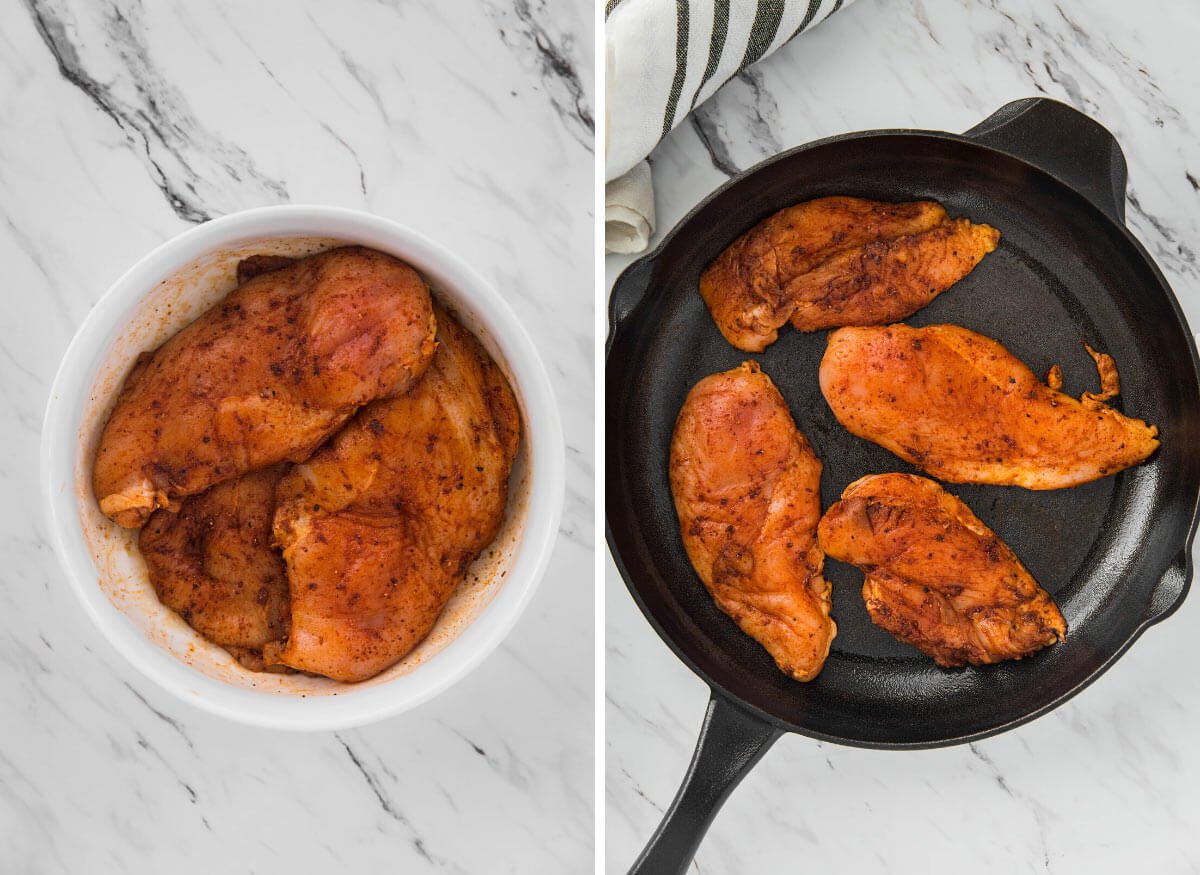
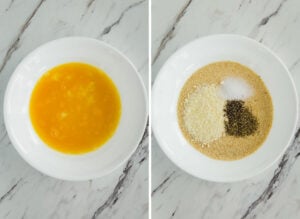
    In a large bowl, combine chicken with shawarma spice blend, minced garlic, oil, and some lime juice, and mix everything well to coat the chicken with the marinade evenly.

    Use store-bought shawarma spice blend or make it at home. To prepare a homemade blend, combine ground cumin, coriander, paprika, nutmeg, turmeric, black pepper, and salt; mix well (see the Notes section in the recipe card).

    Sliced raw chicken with shawarma spice mix, salt and garlic in a mixing bowl ready for marination.
    Raw chicken marinated with shawarma spices in a mixing bowl.

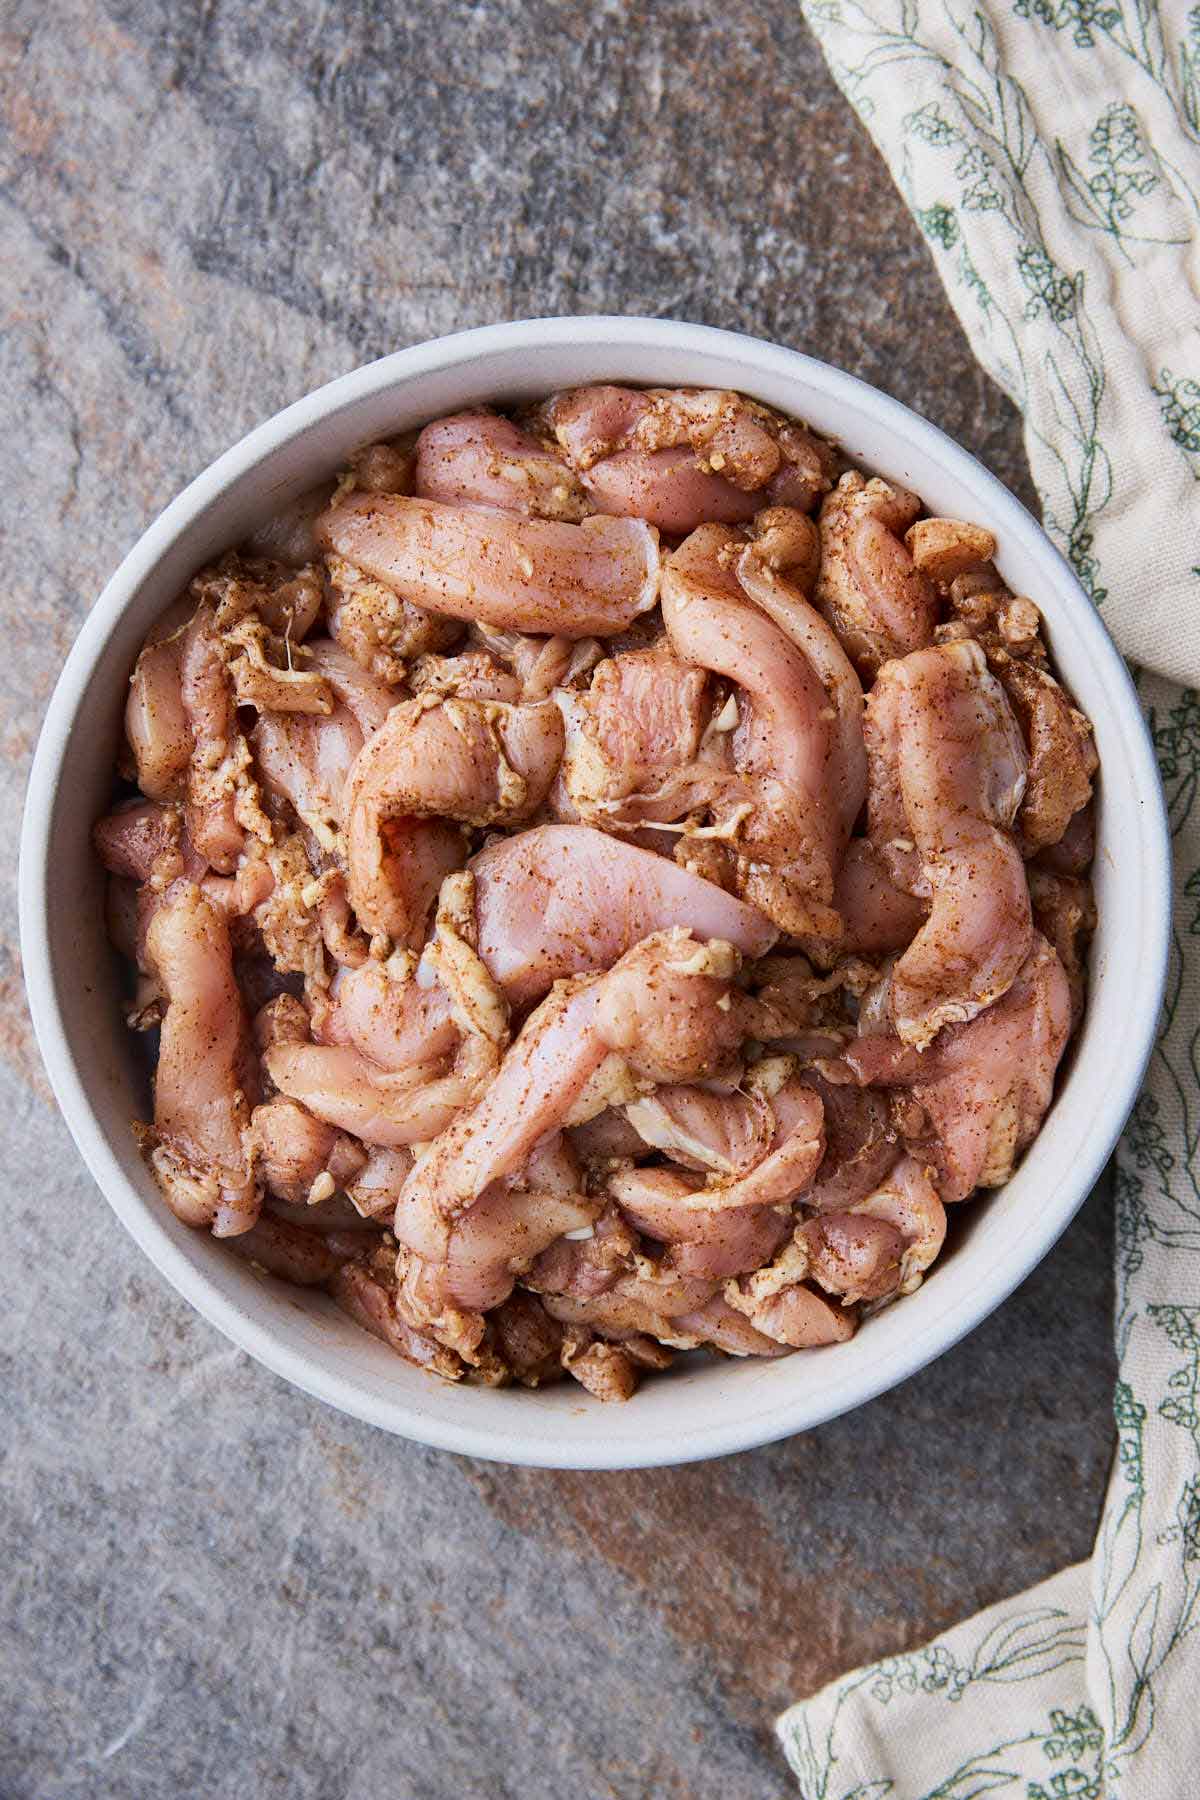
    Suggested marinating time - marinate the chicken with shawarma spice blend for at least 30 mins. Or do it a few hours before cooking for even better results.

    The longer you marinate the chicken, the more flavorful it will be. If you marinate the chicken for more than 1 hr, put it in the refrigerator to avoid going bad.

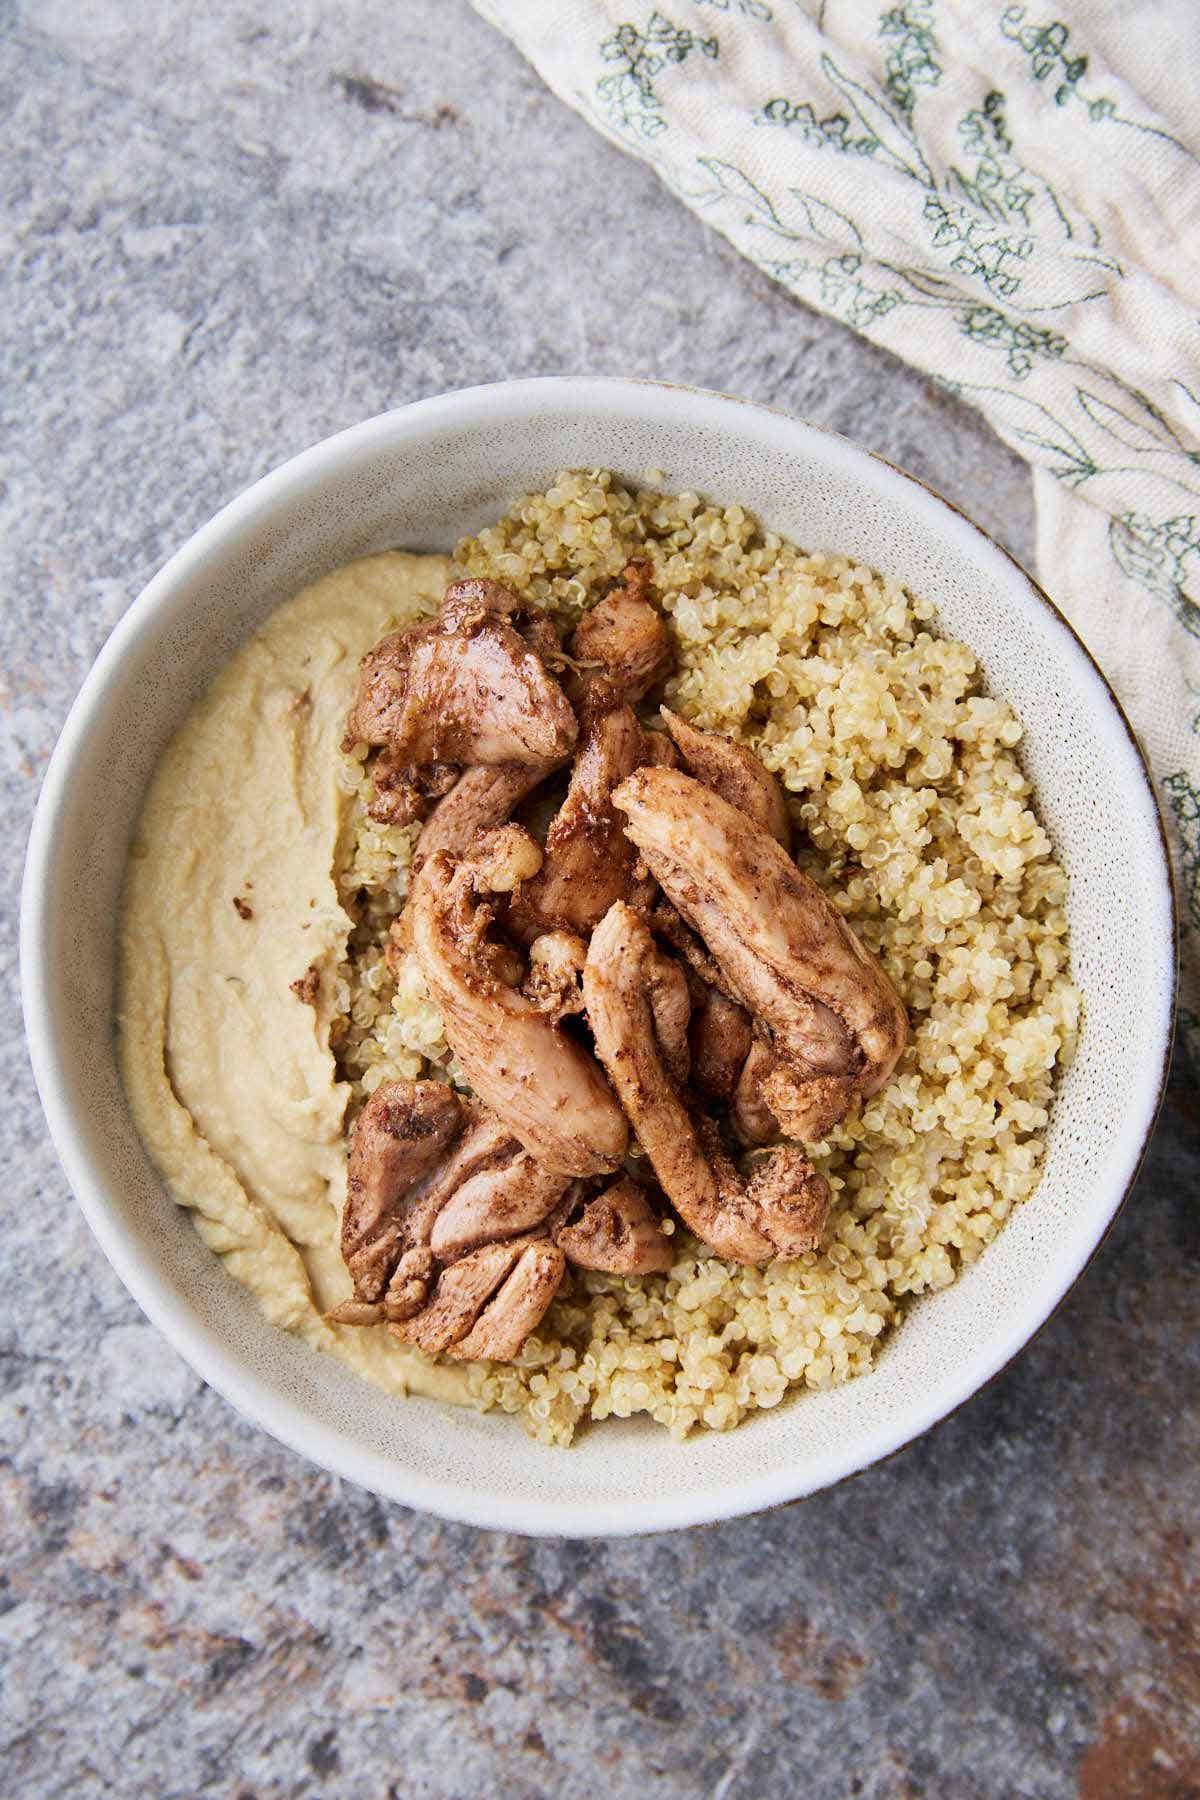
    How to make chicken hummus bowl

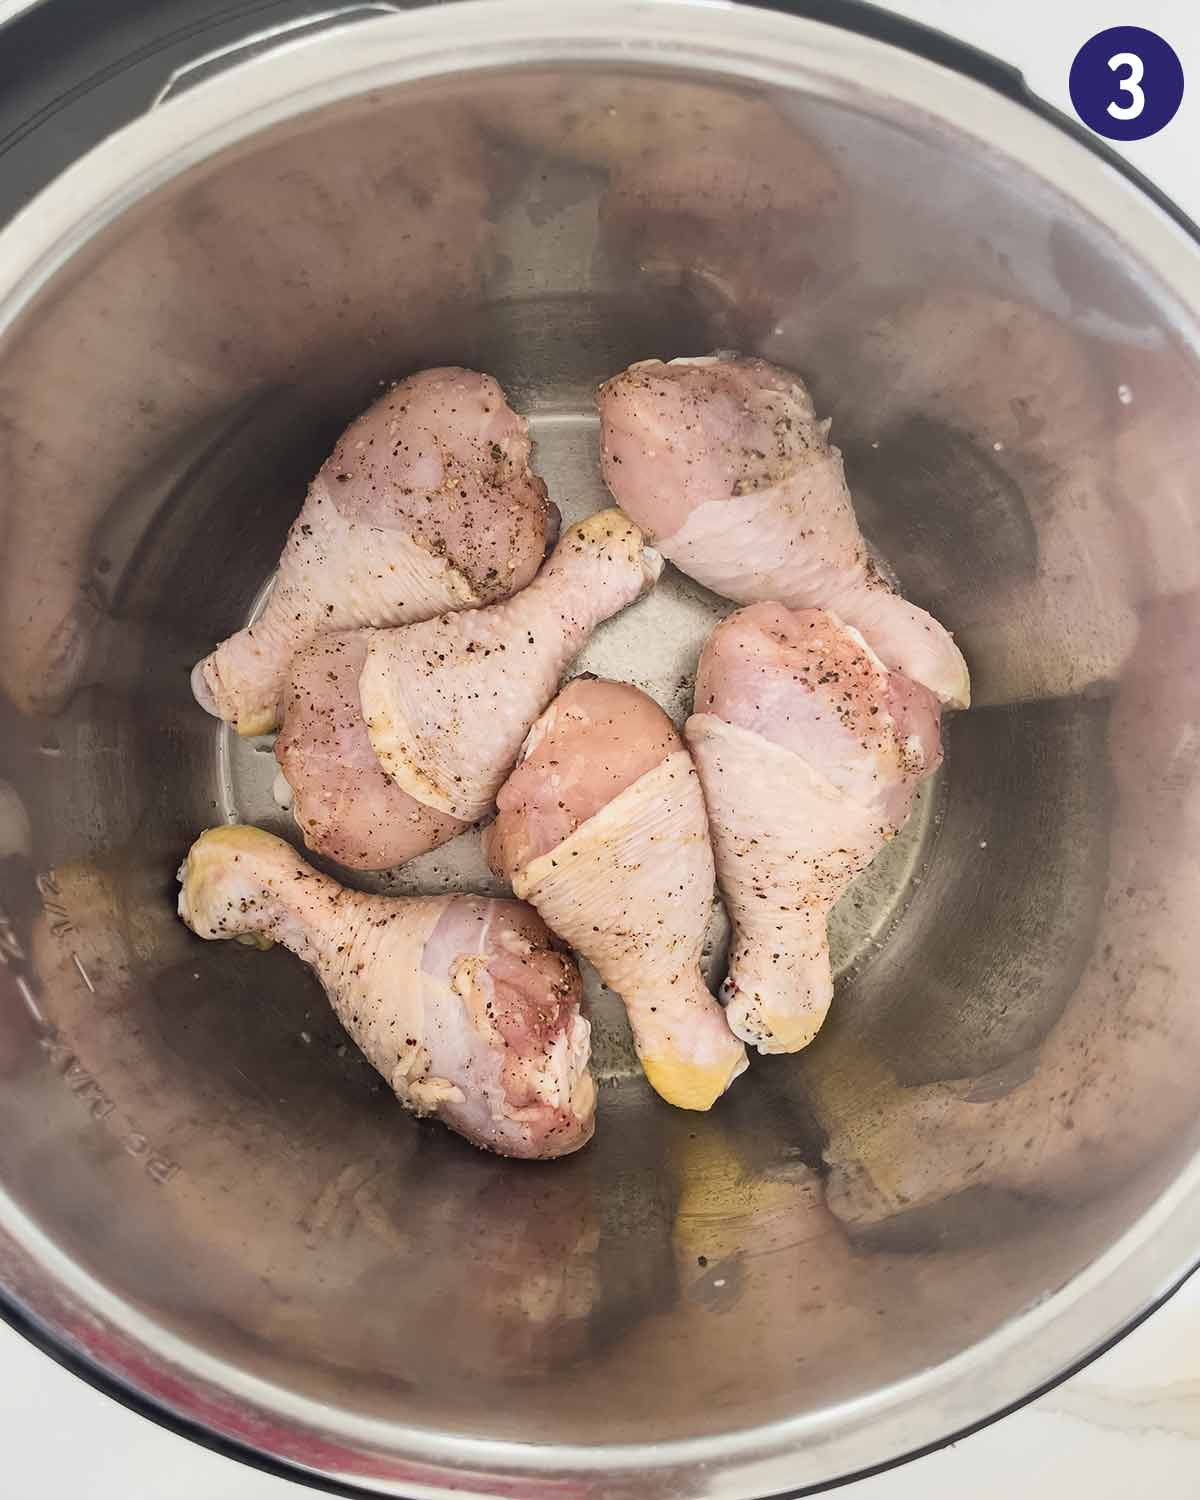
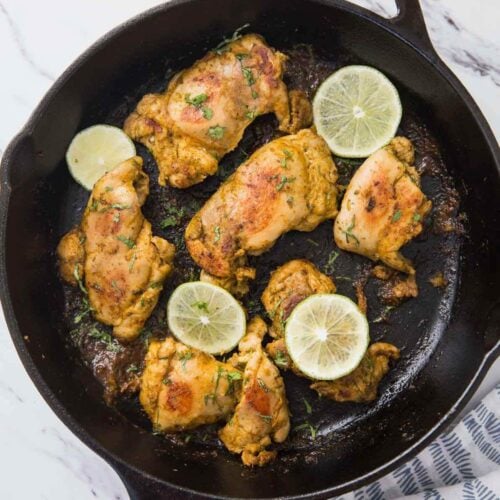
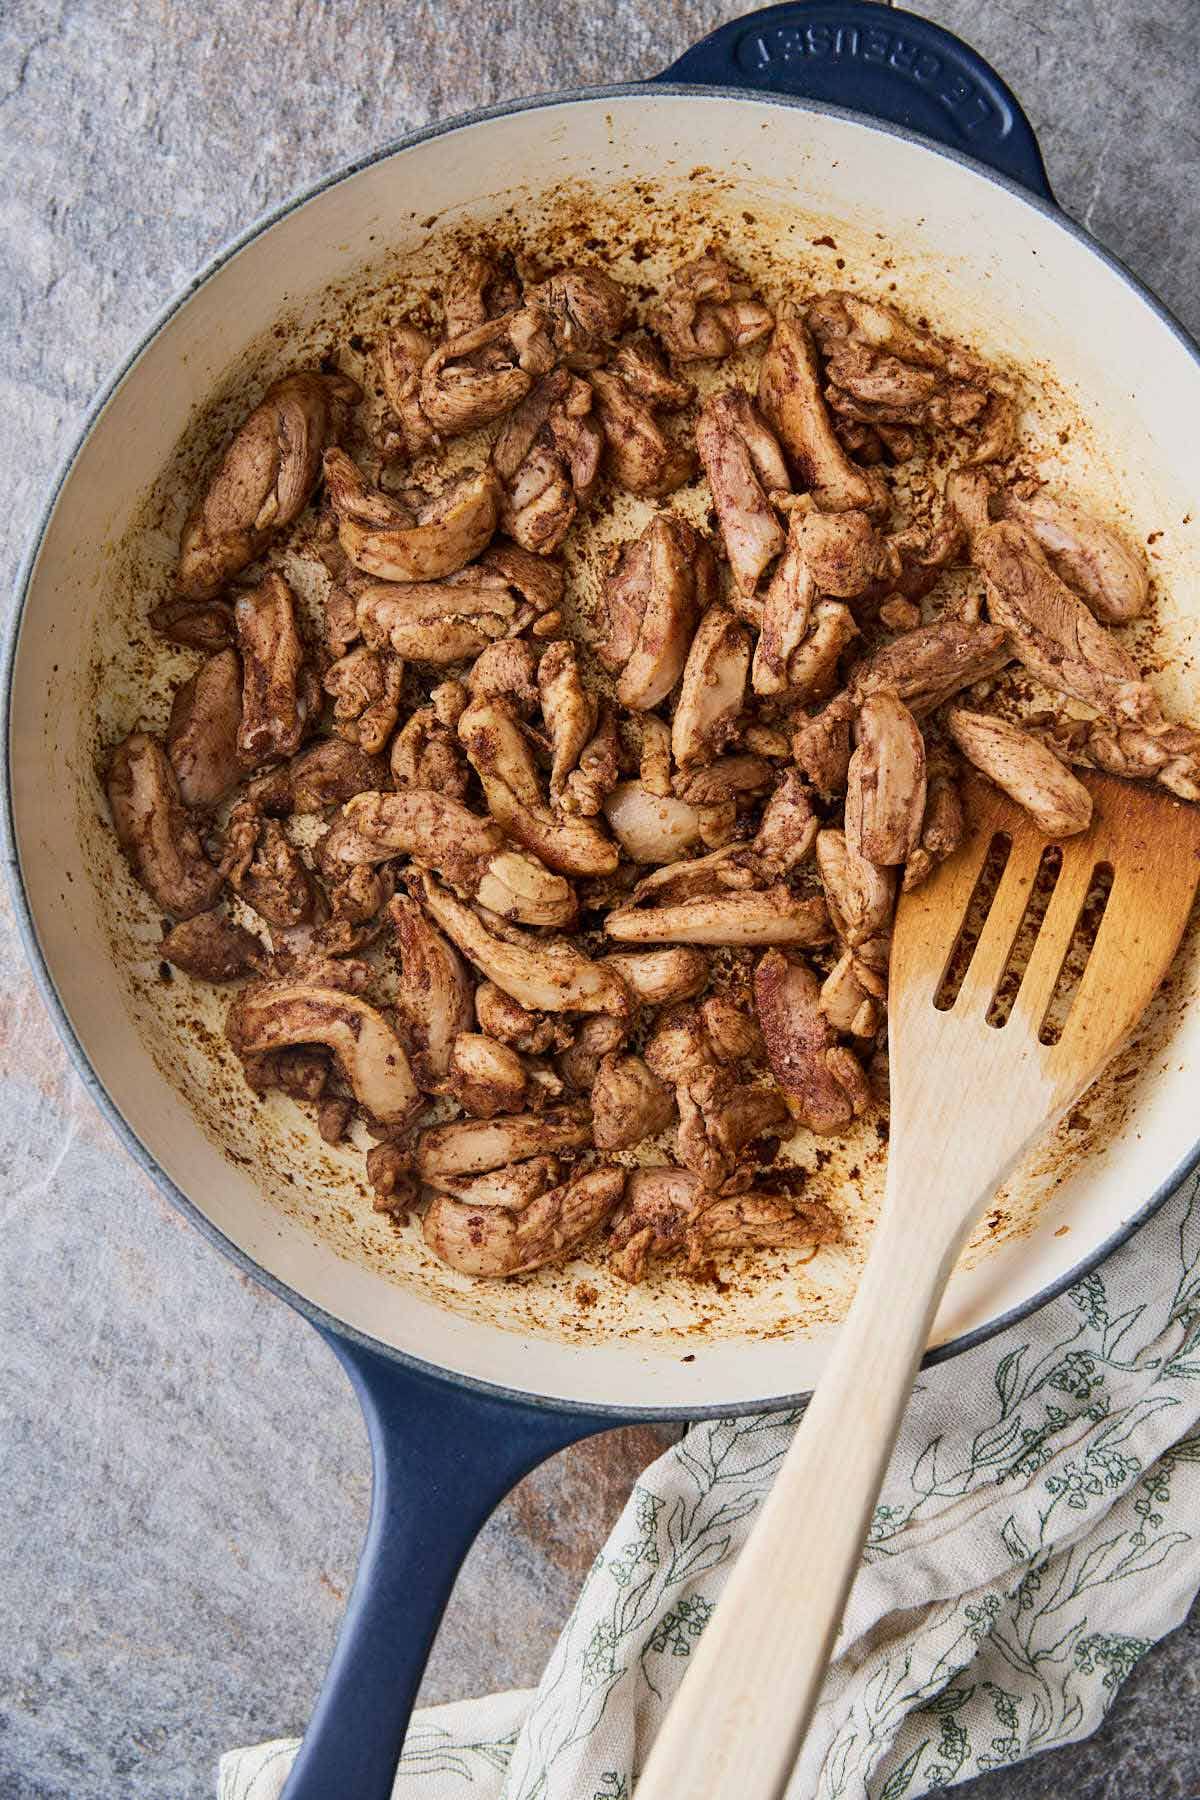
    Step 1: Pan-roasted shawarma chicken and peppers

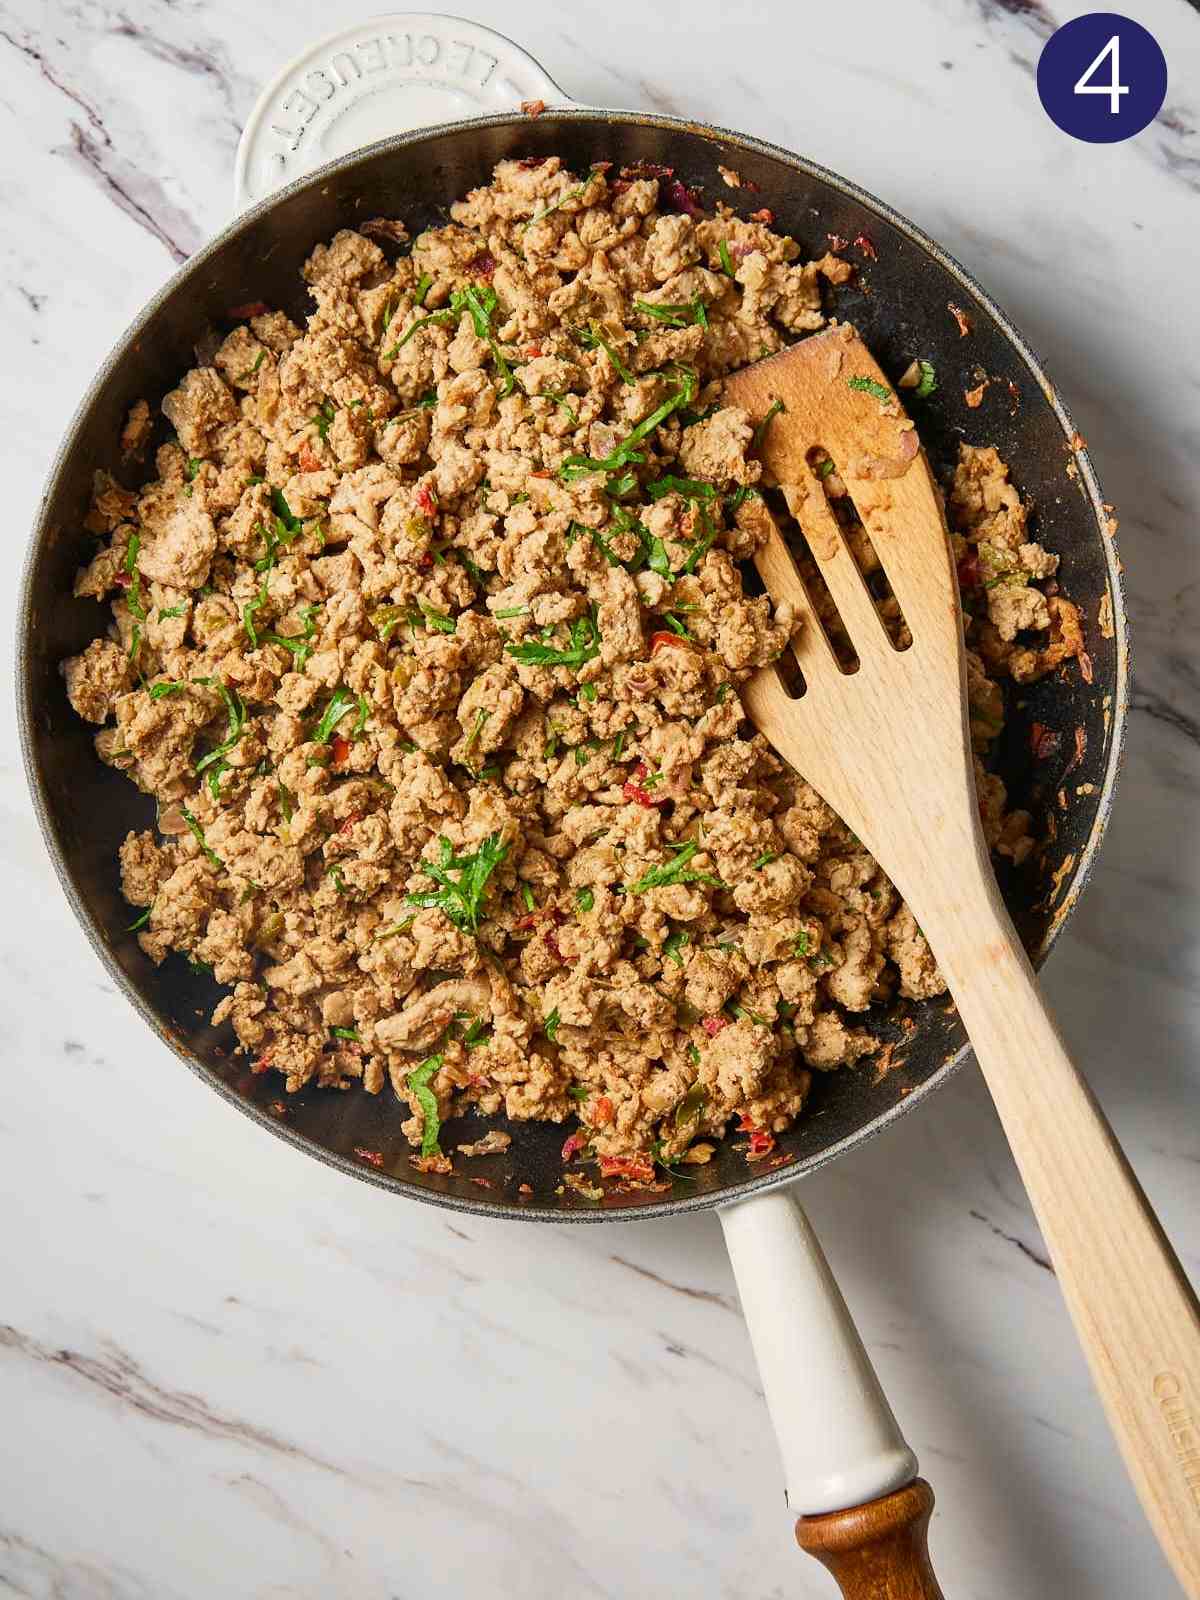
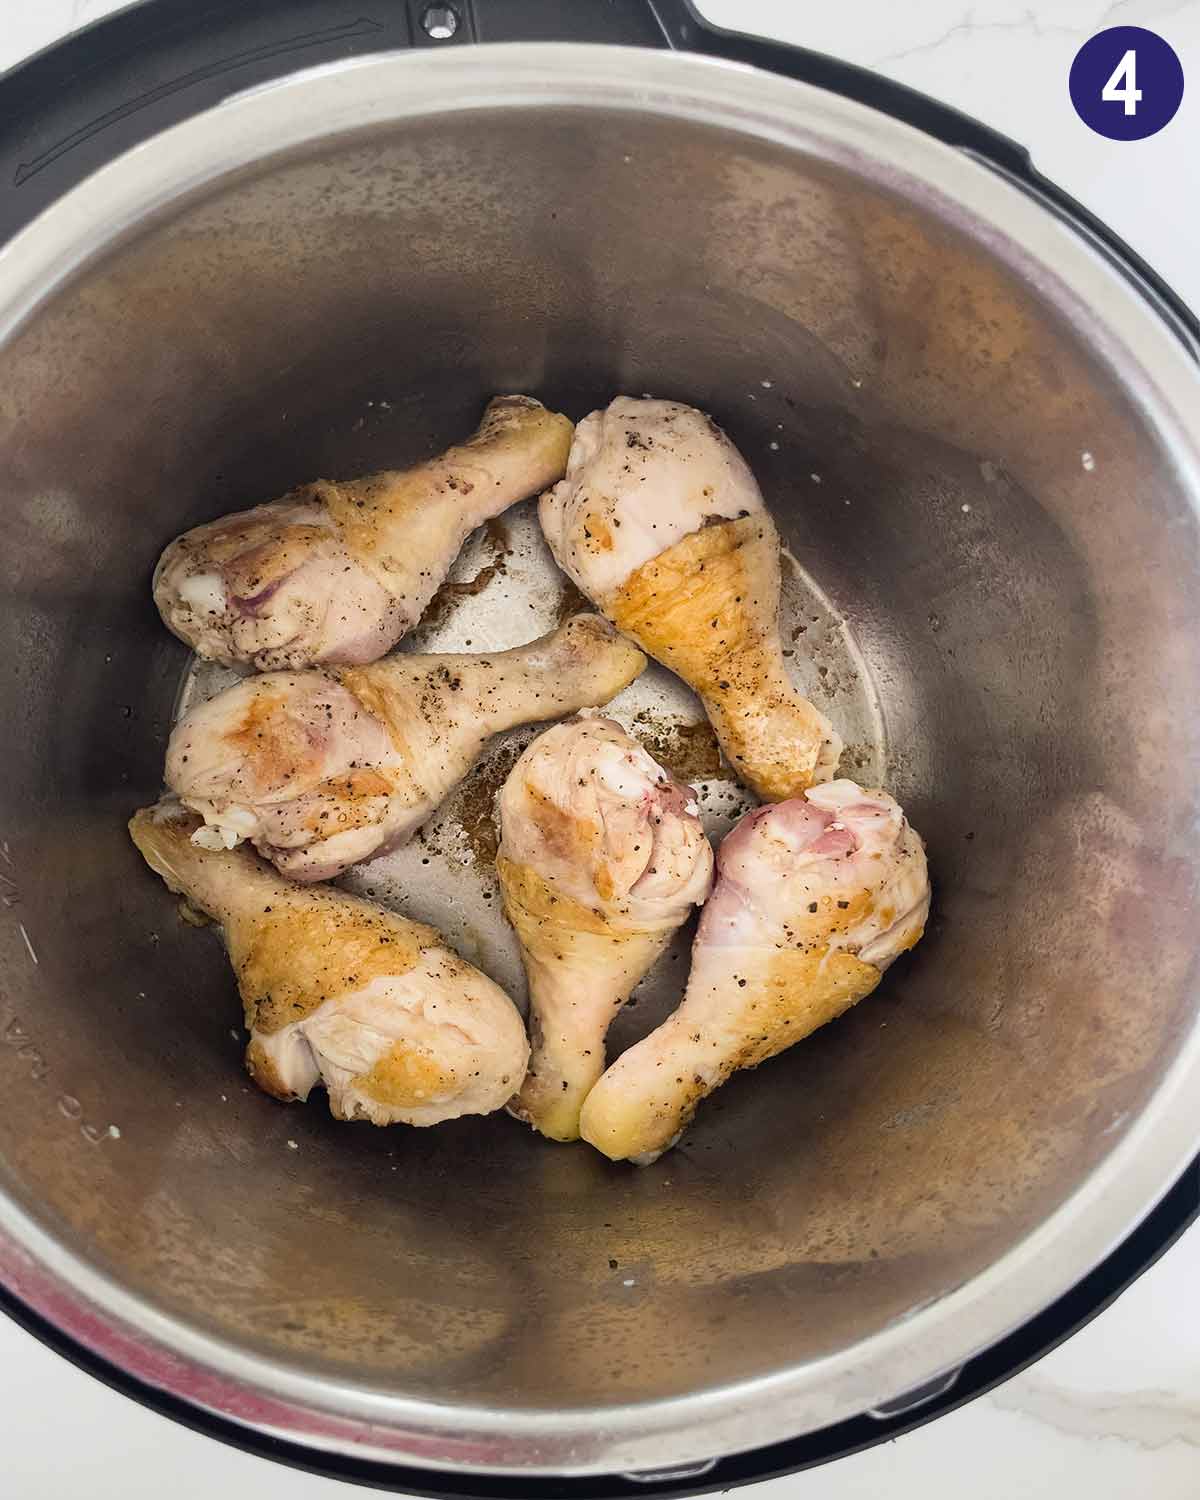
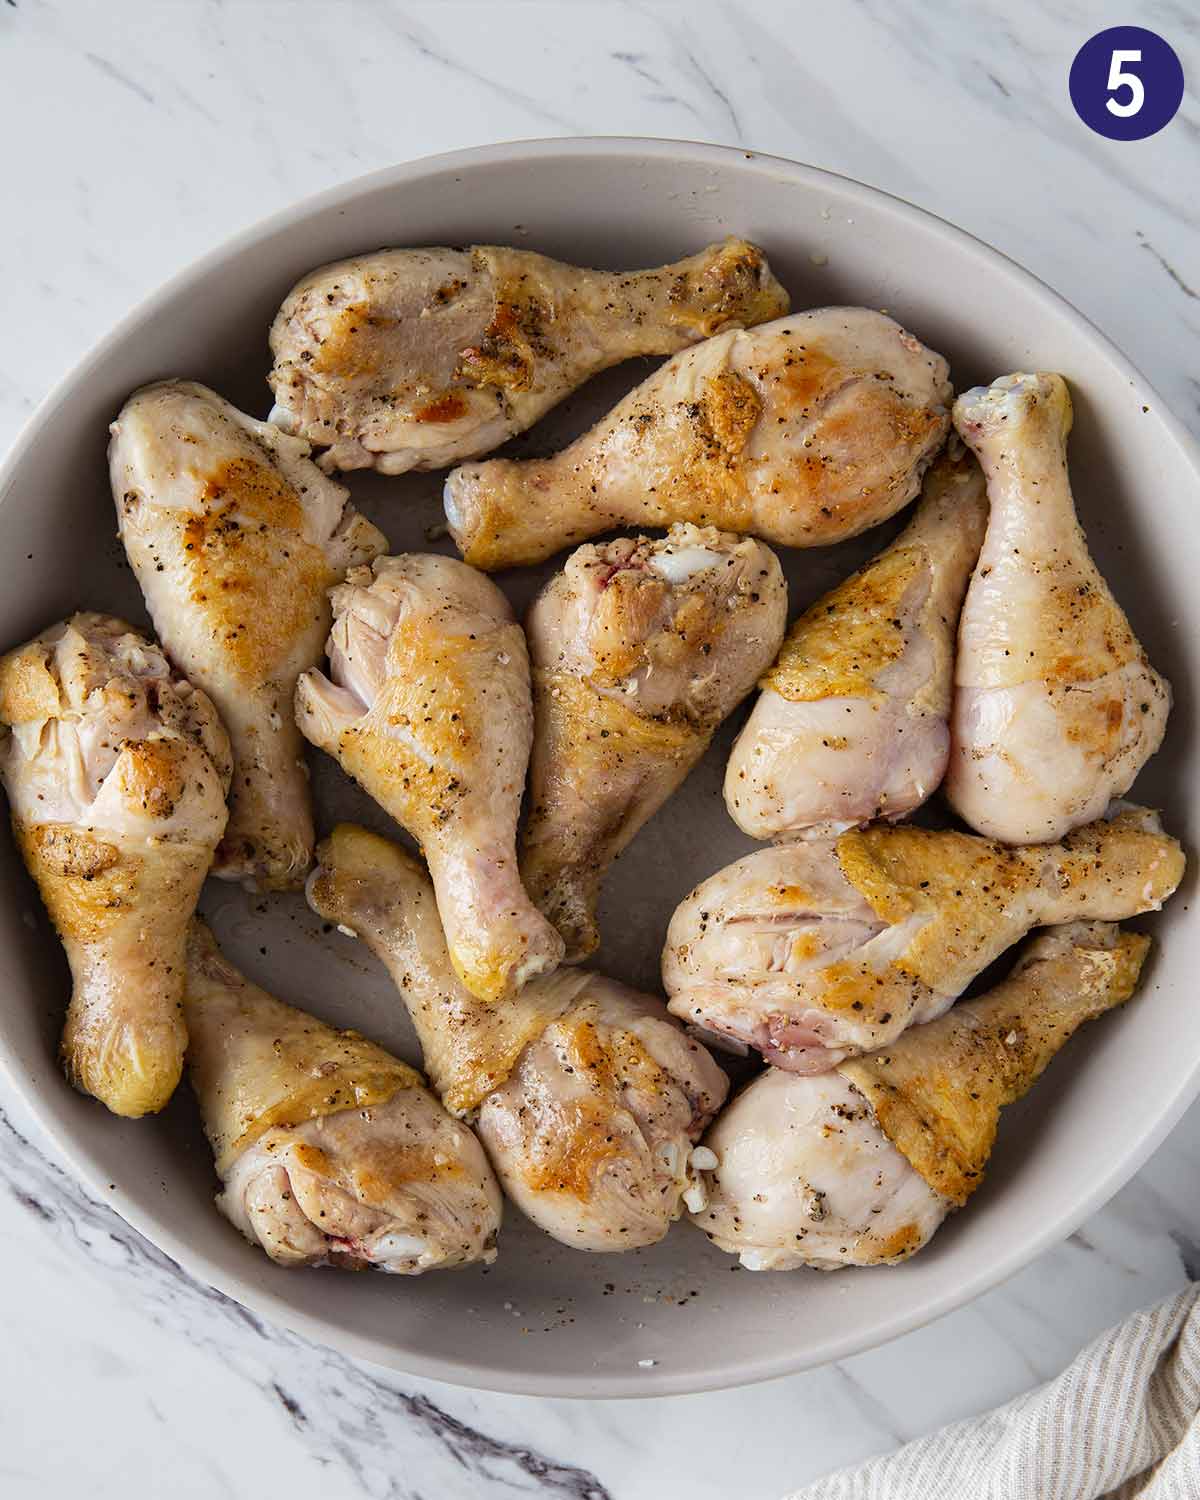
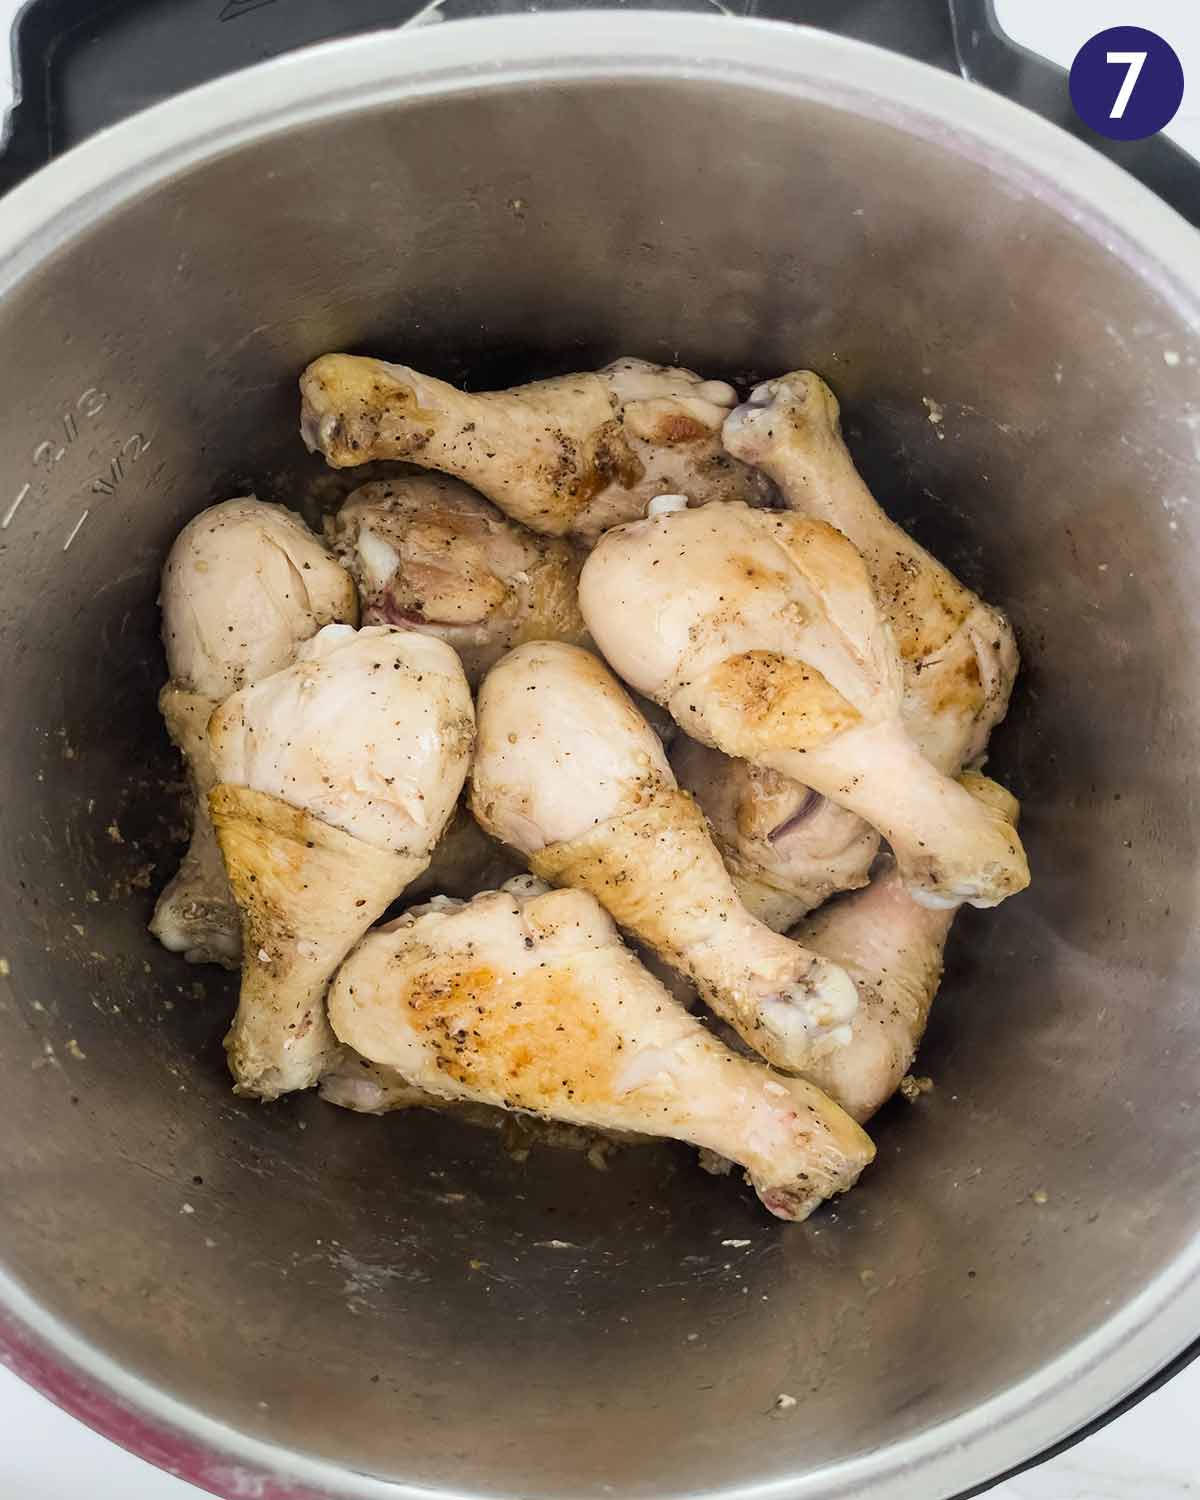
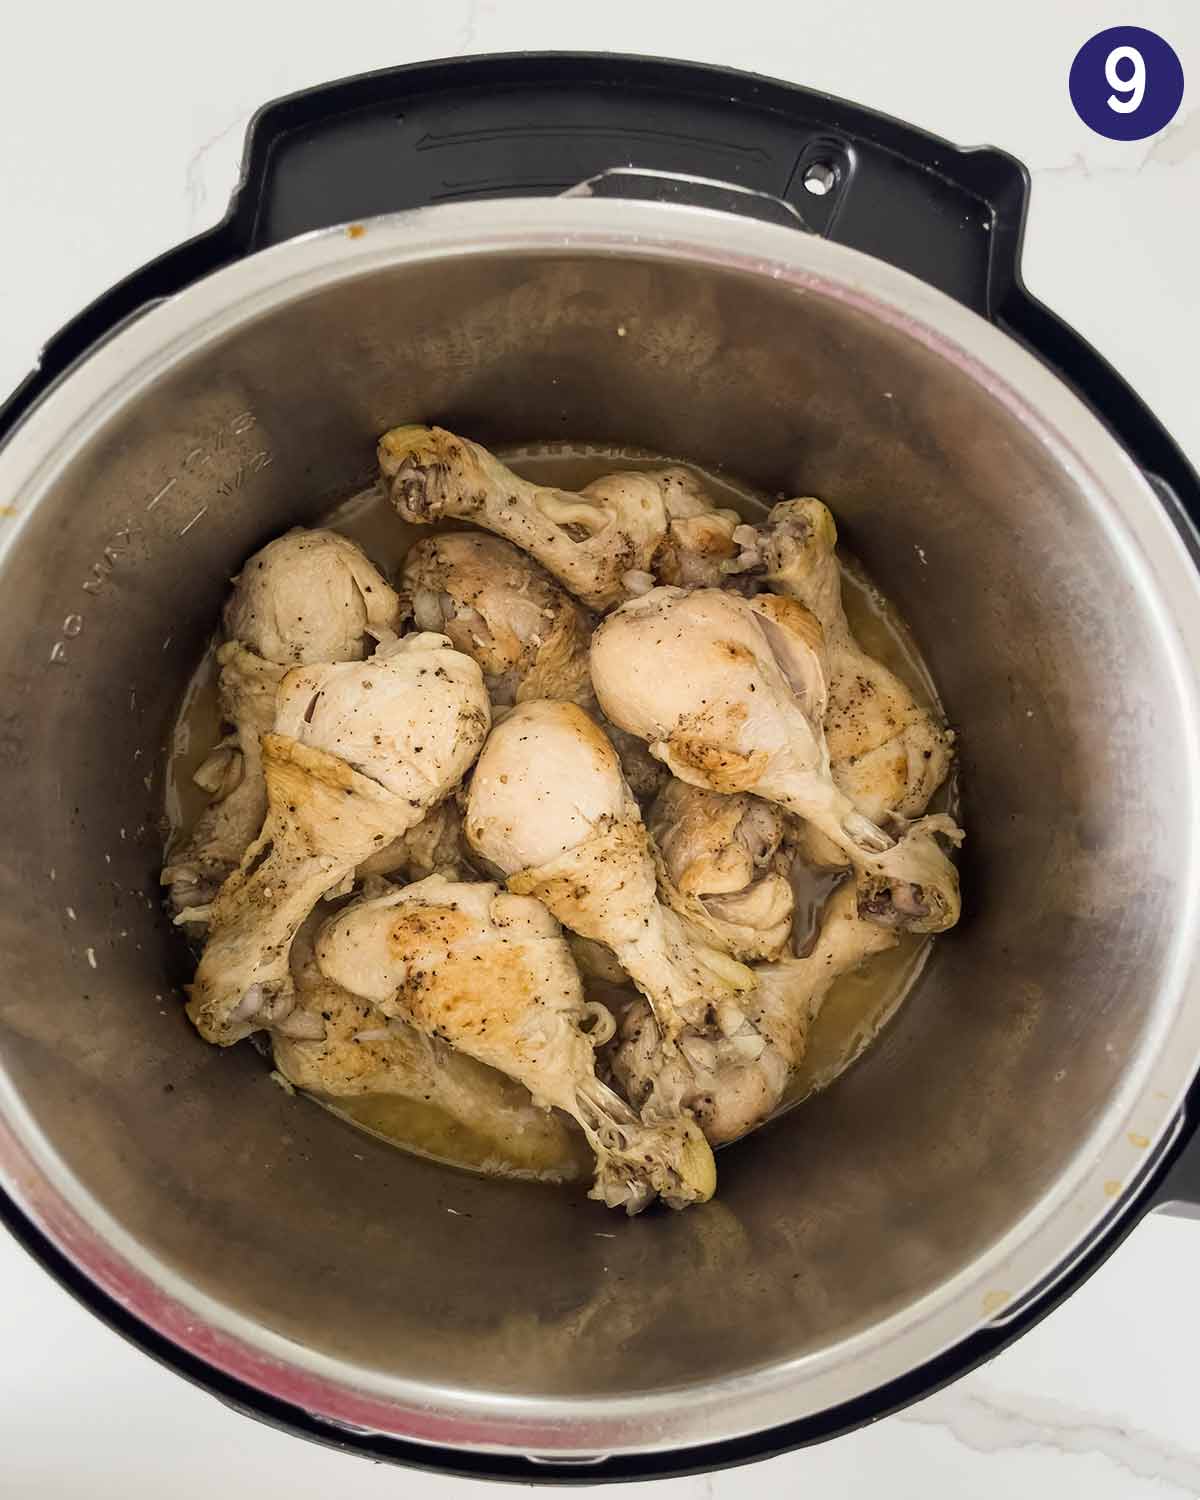
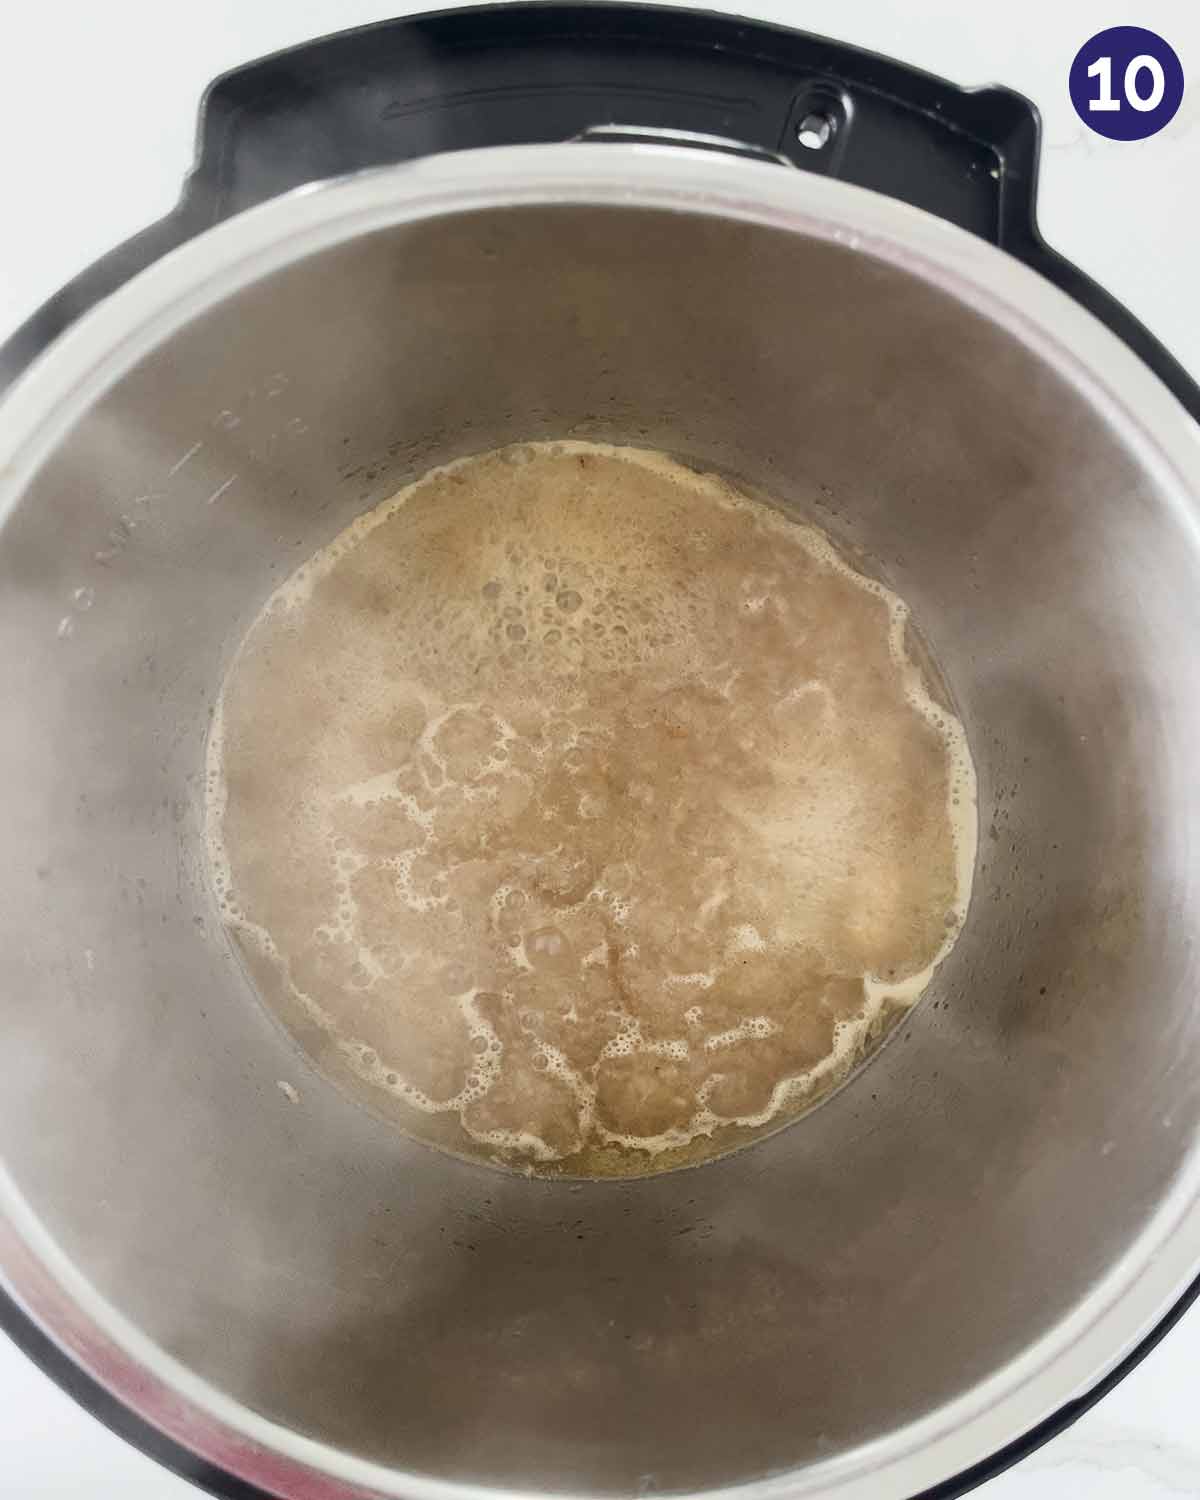
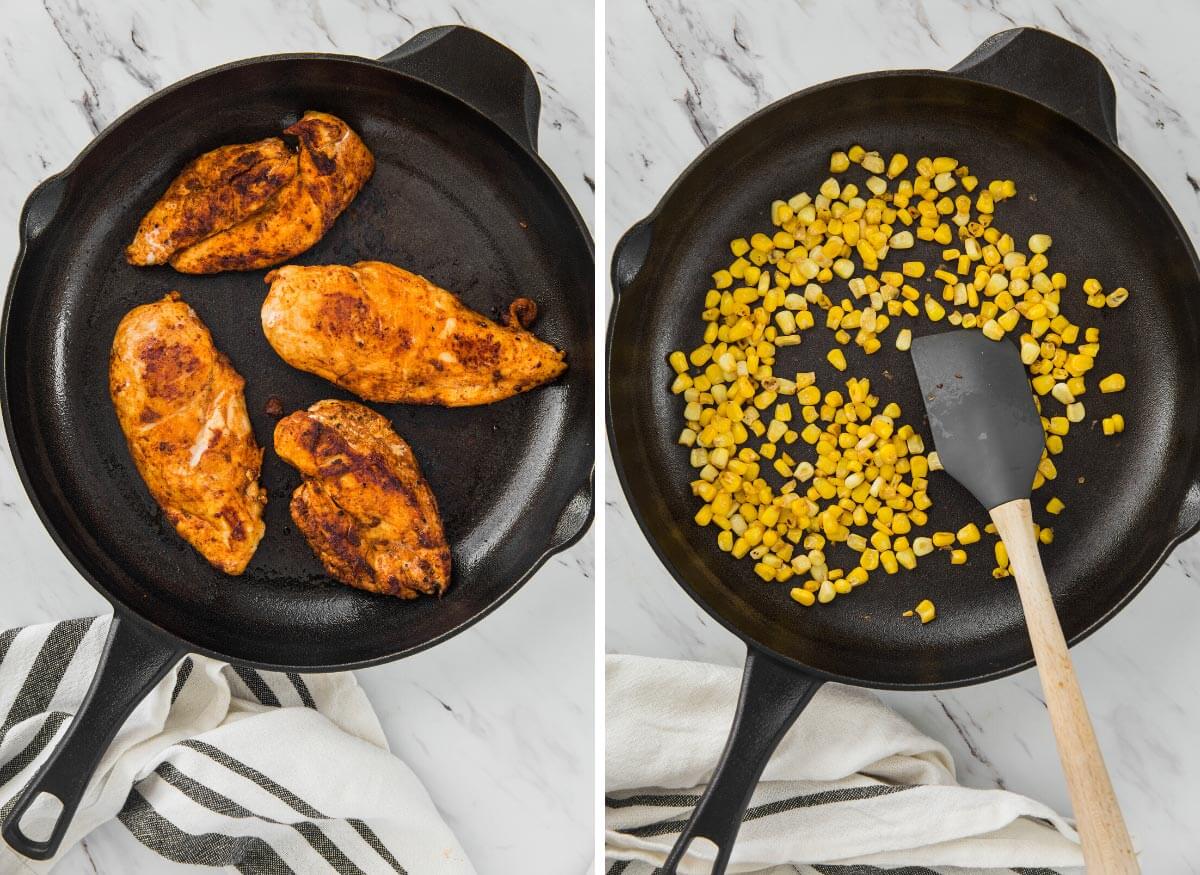
    Heat some cooking oil in a large cast iron skillet on medium heat. Add marinated chicken and cook until it is well done and all the water evaporates. Once done, take it out and keep it aside.

    Marinated chicken in a skillet is ready to cook.
    Roasted shawarma chicken in a skillet with wooden spatula.

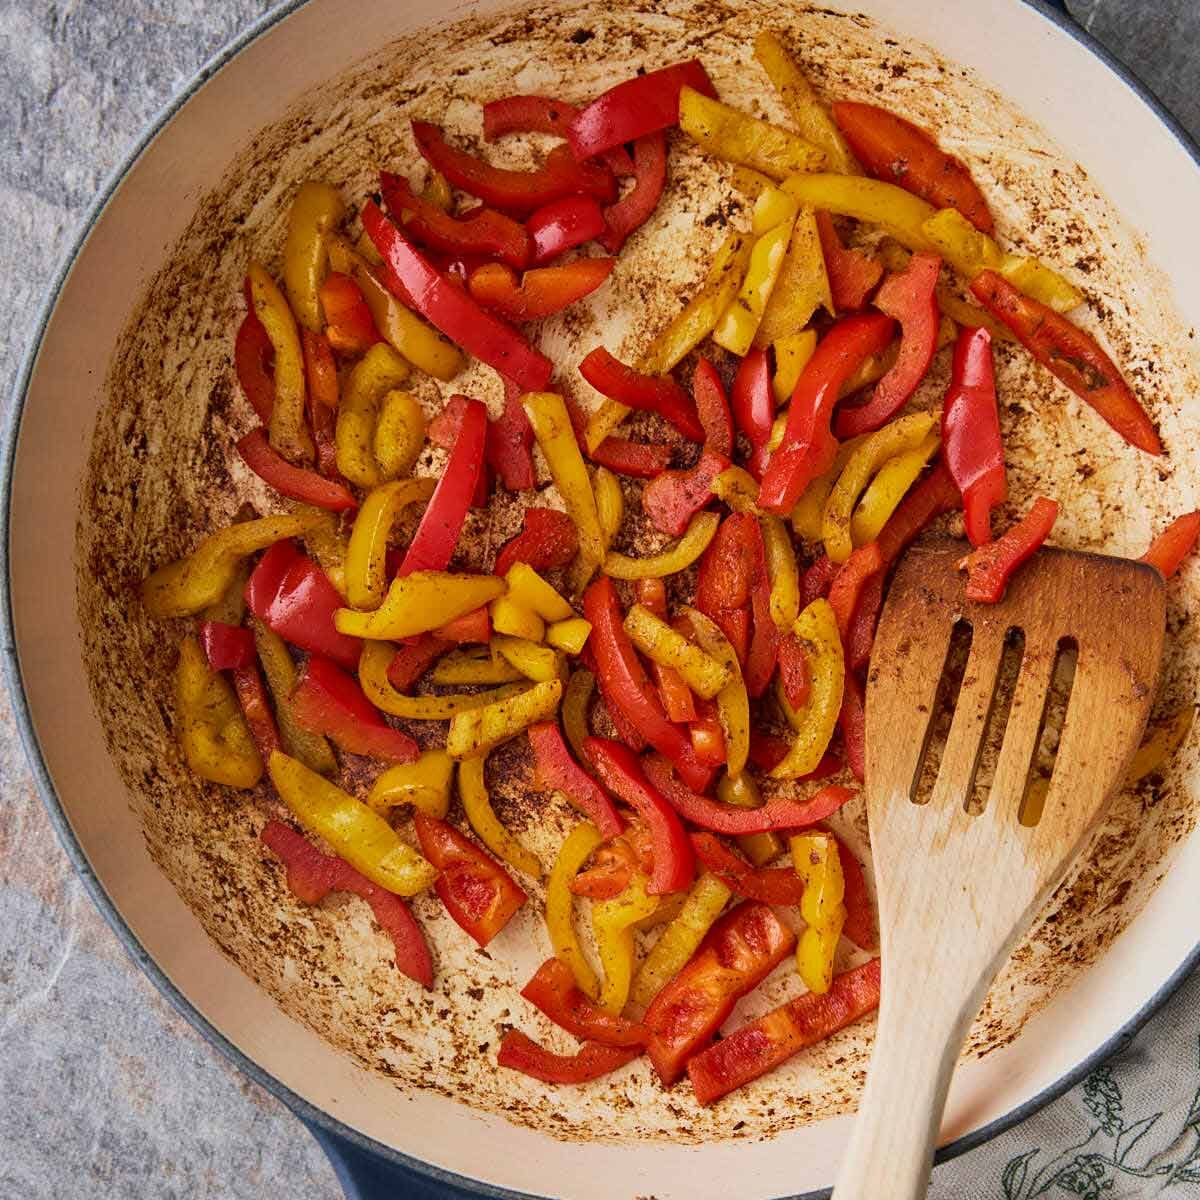
    Then, add sliced bell peppers in the same pan and saute for 3-4 mins. Or cook it until tender, as per your preference.

    Roasted red peppers in a skillet with wooden spatula.

    OR

    Oven-roasted shawarma chicken and peppers.

    Preheat oven to 400F. Place sliced bell peppers on a large baking sheet. Add some shawarma spice mix and rub on the bell peppers. Spread the peppers evenly on one side of the tray.

    Spread marinated chicken pieces on the other side of the tray. Place the tray in the preheated oven and bake for 18 mins. Finally, turn on the broiler mode and broil the peppers and chicken for 2-3 mins to get the roasted texture and colors.

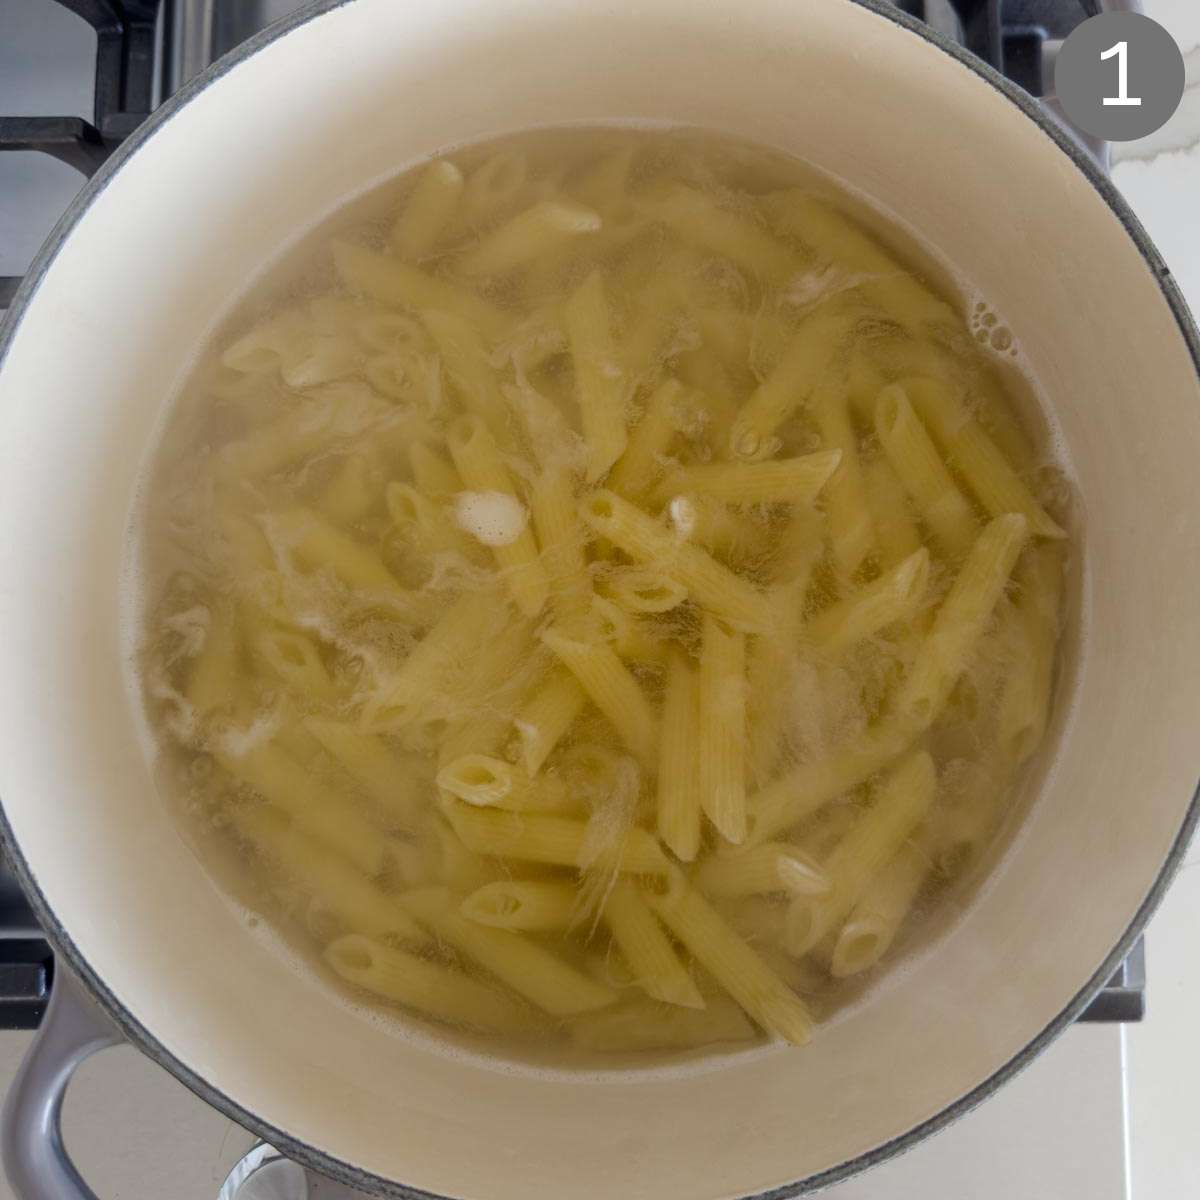
    Step 2: Prepare quinoa

    Meanwhile, cook the quinoa with broth or water and some salt. Generally, it takes 15-18 mins to cook it on the stovetop.

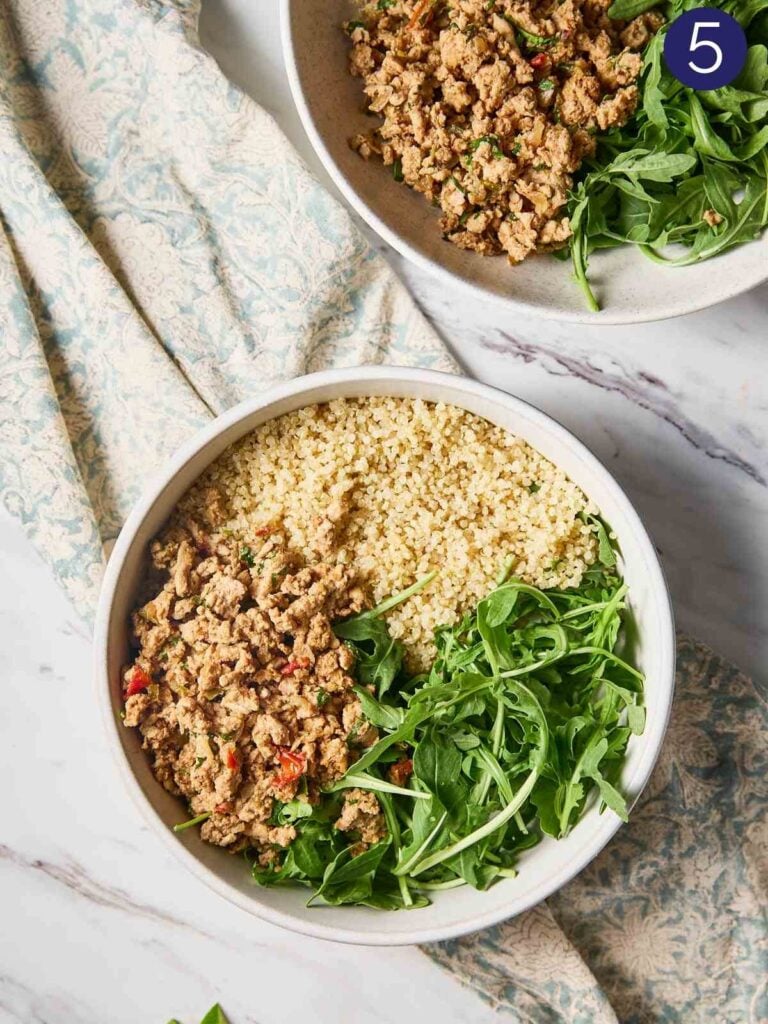
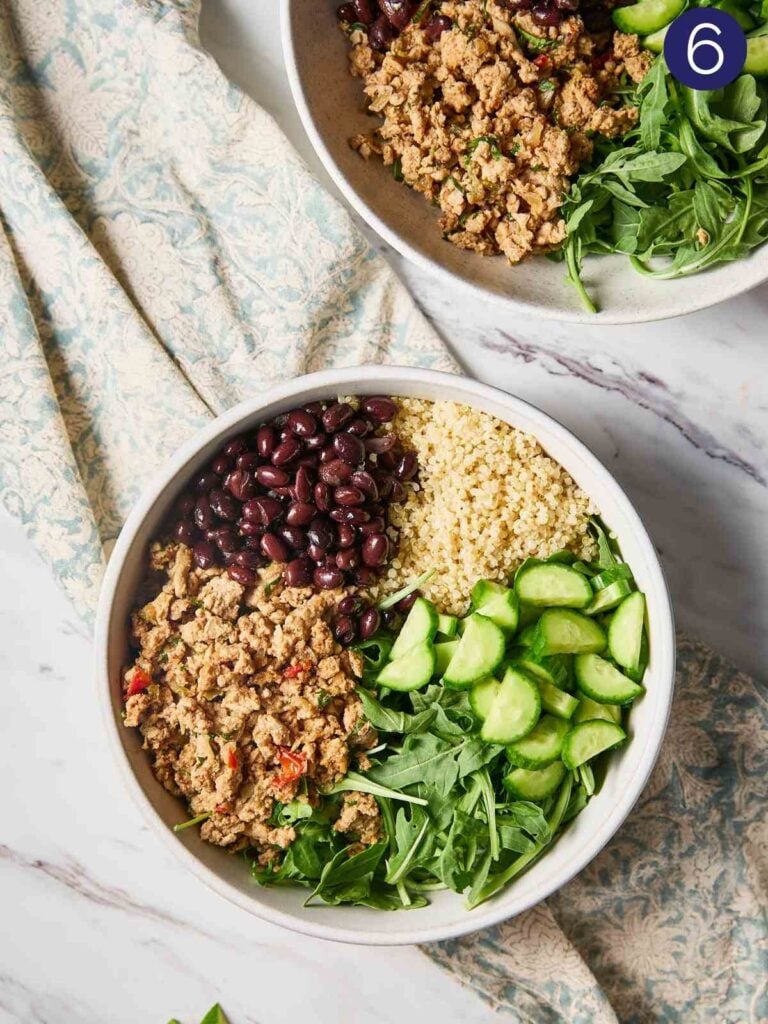
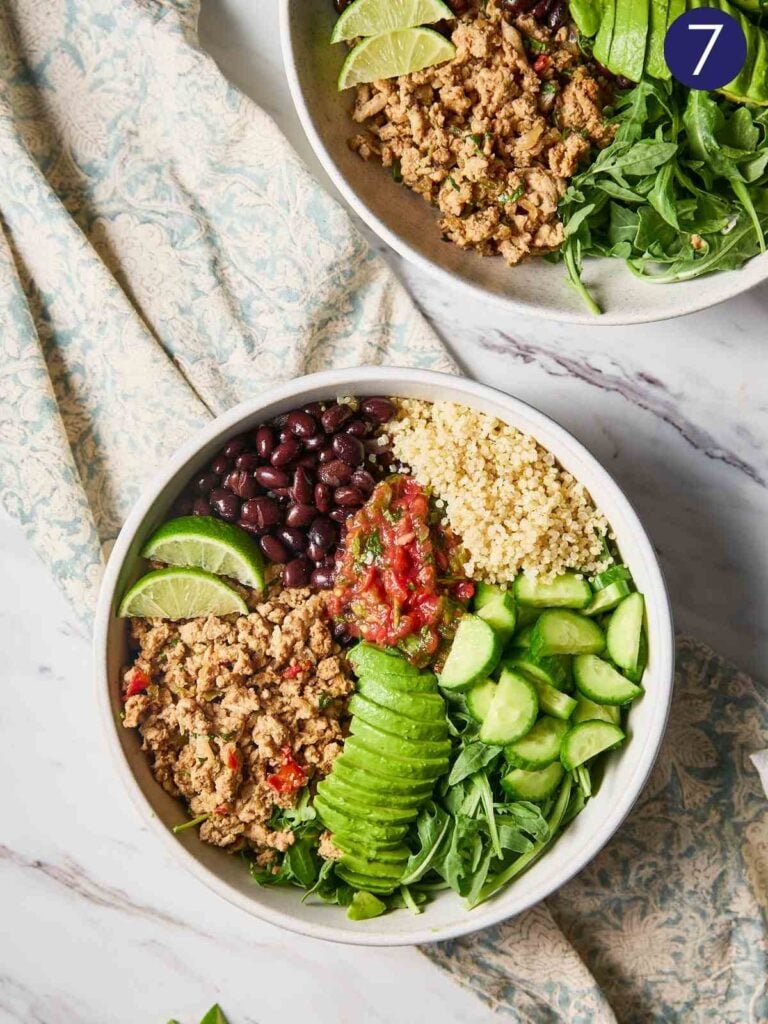
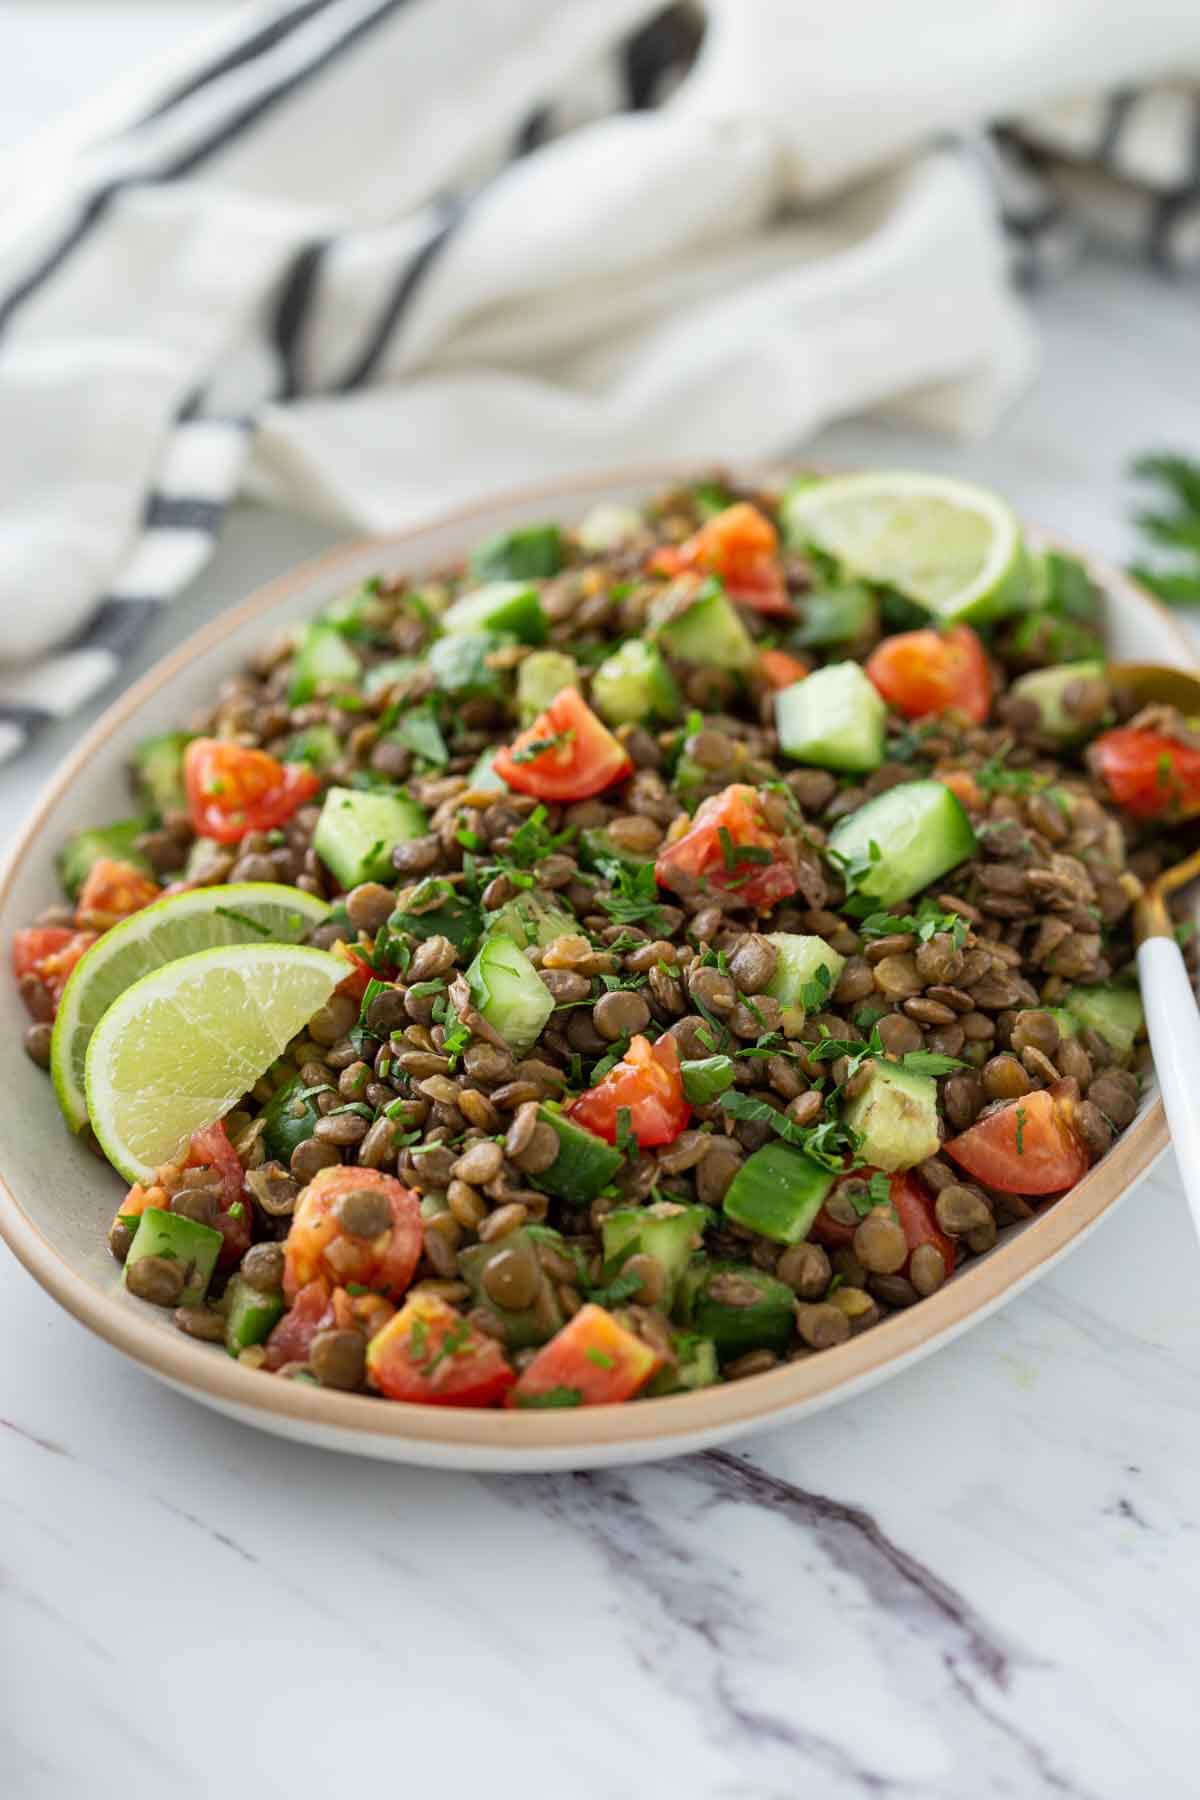
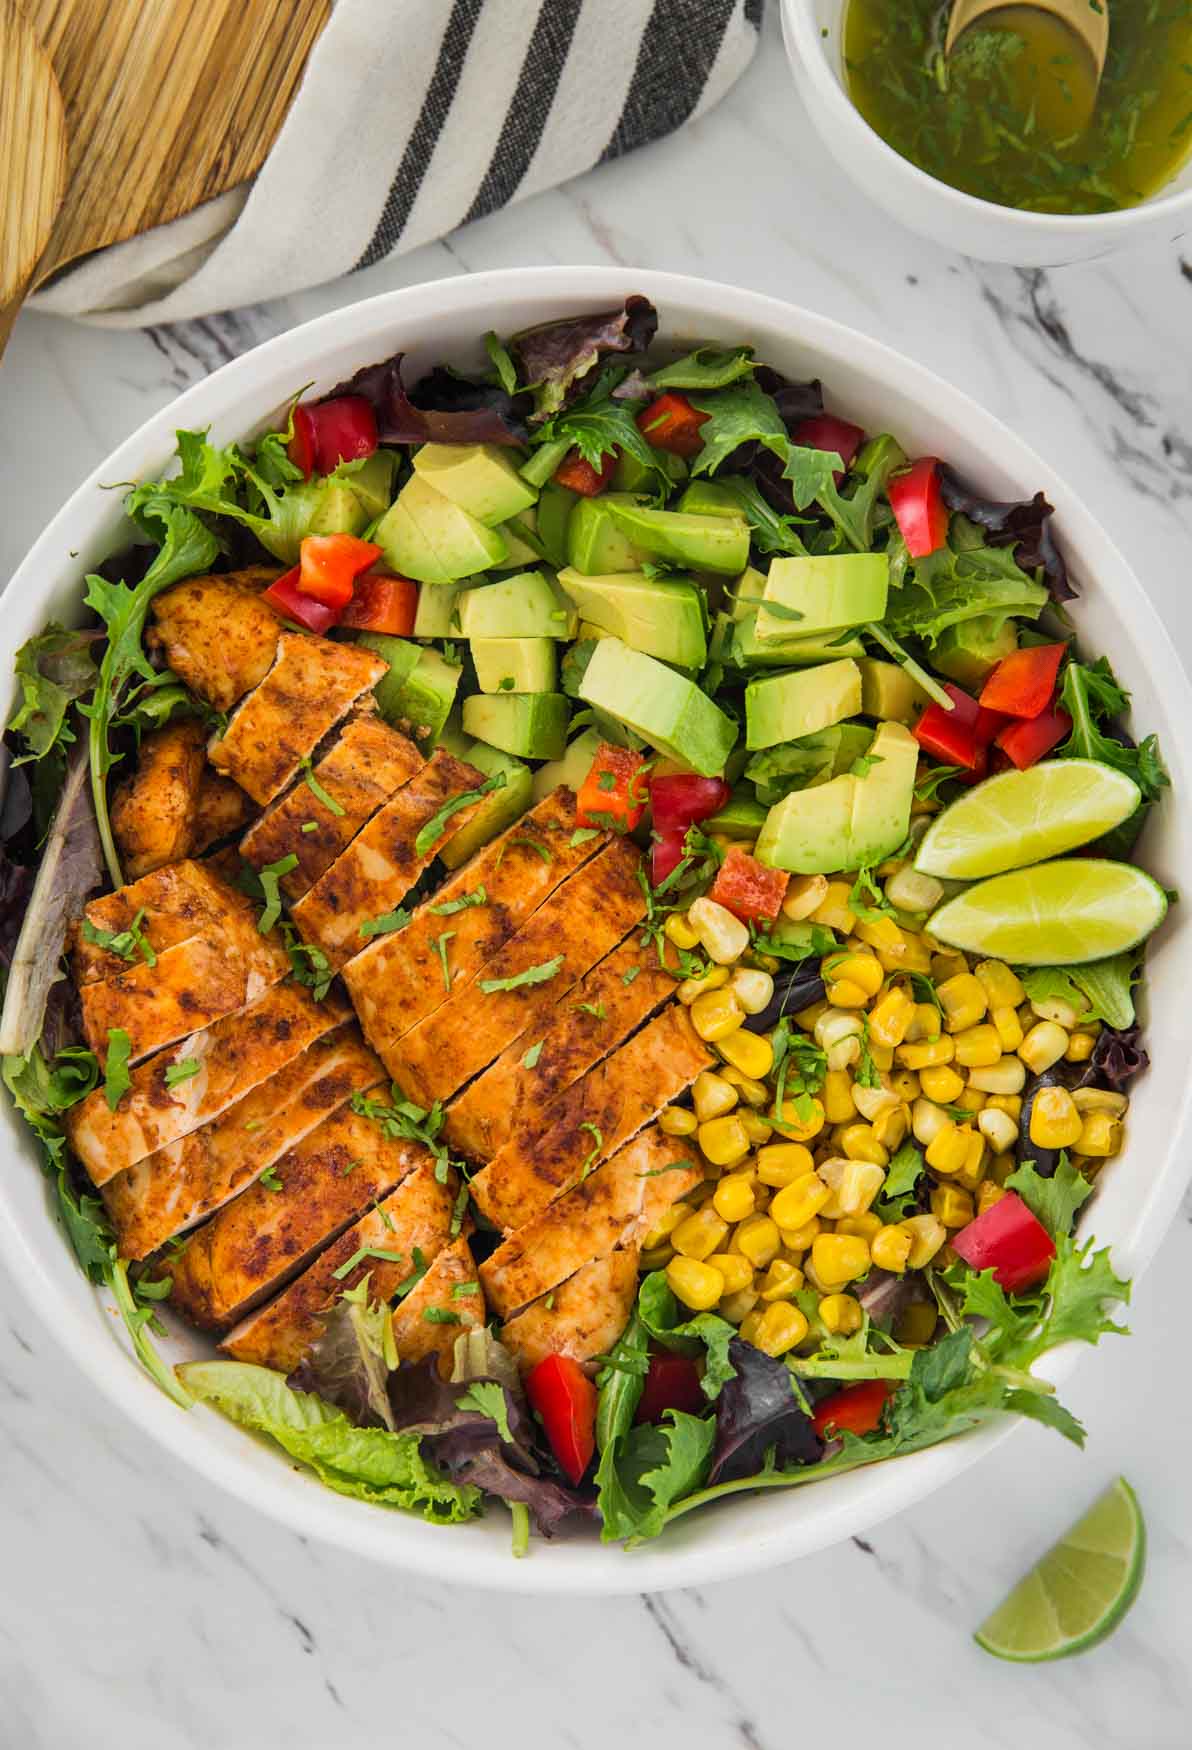
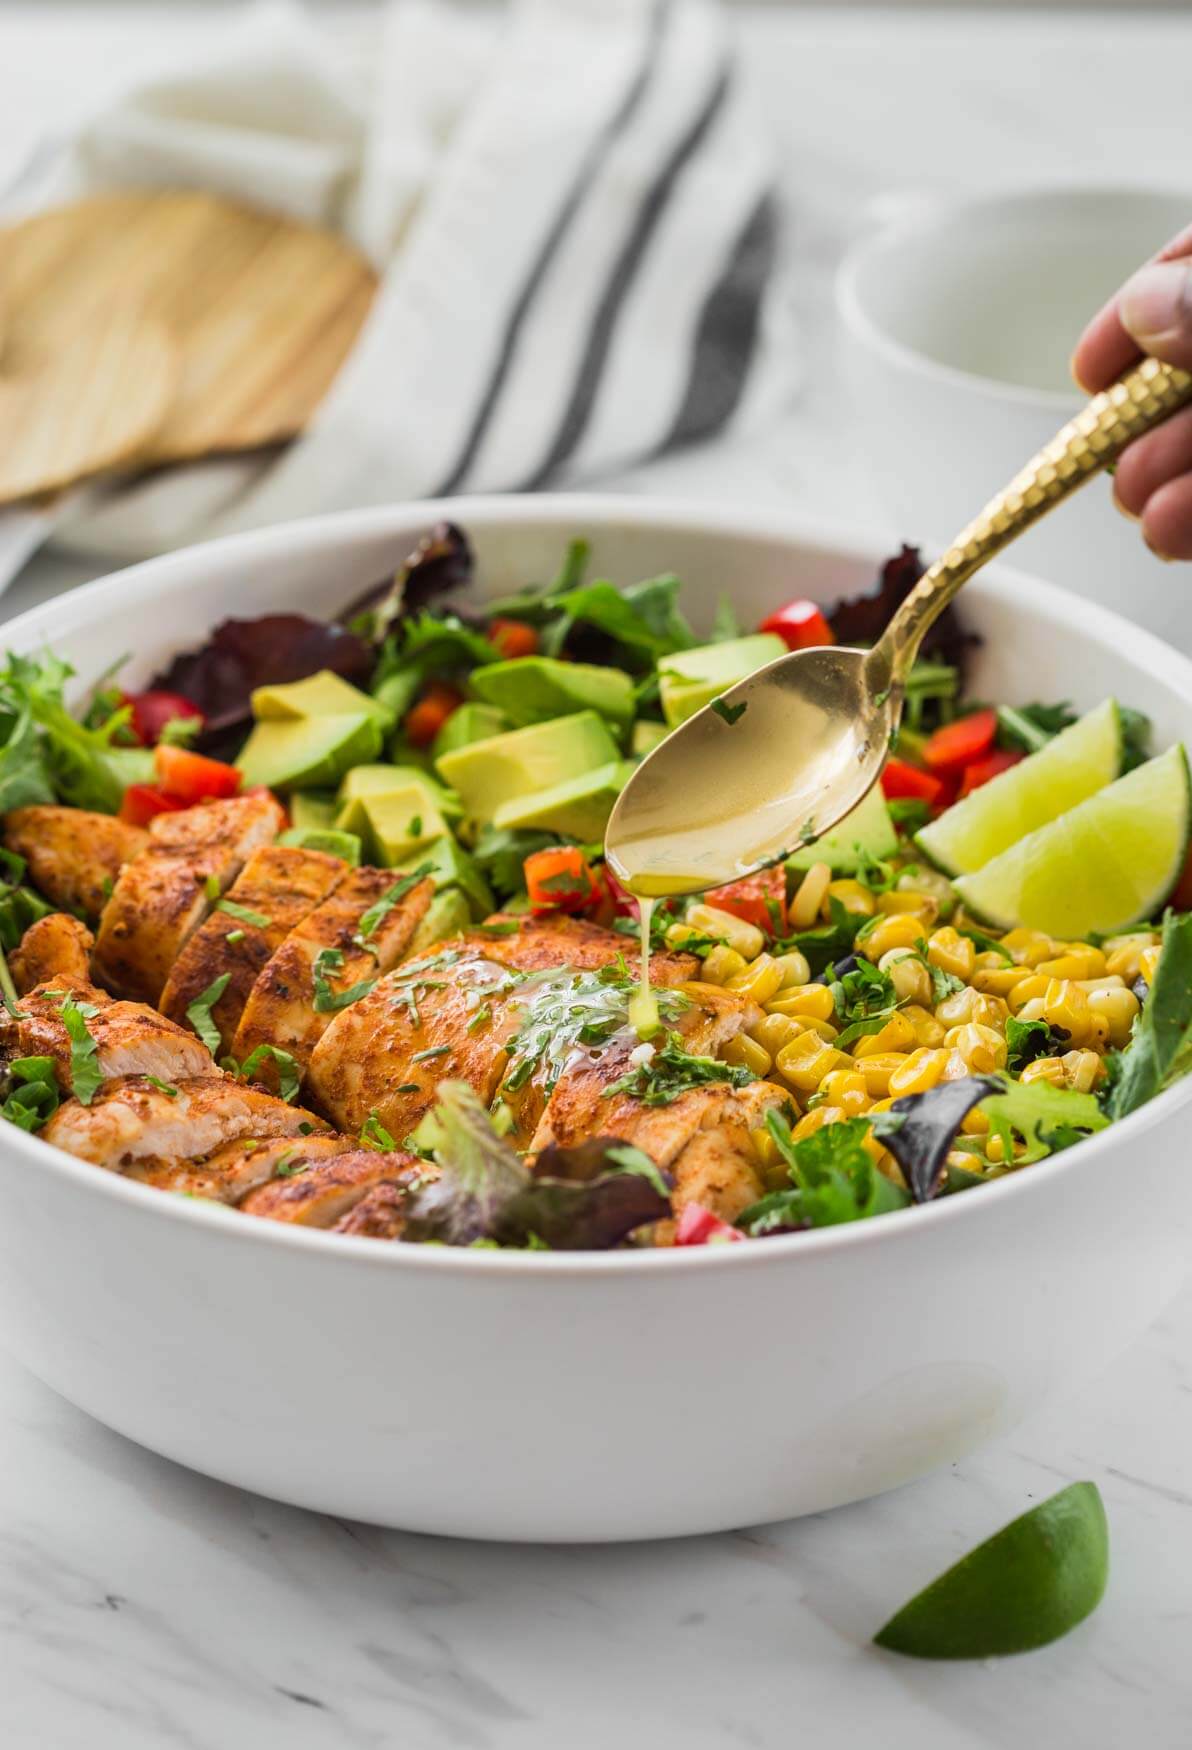
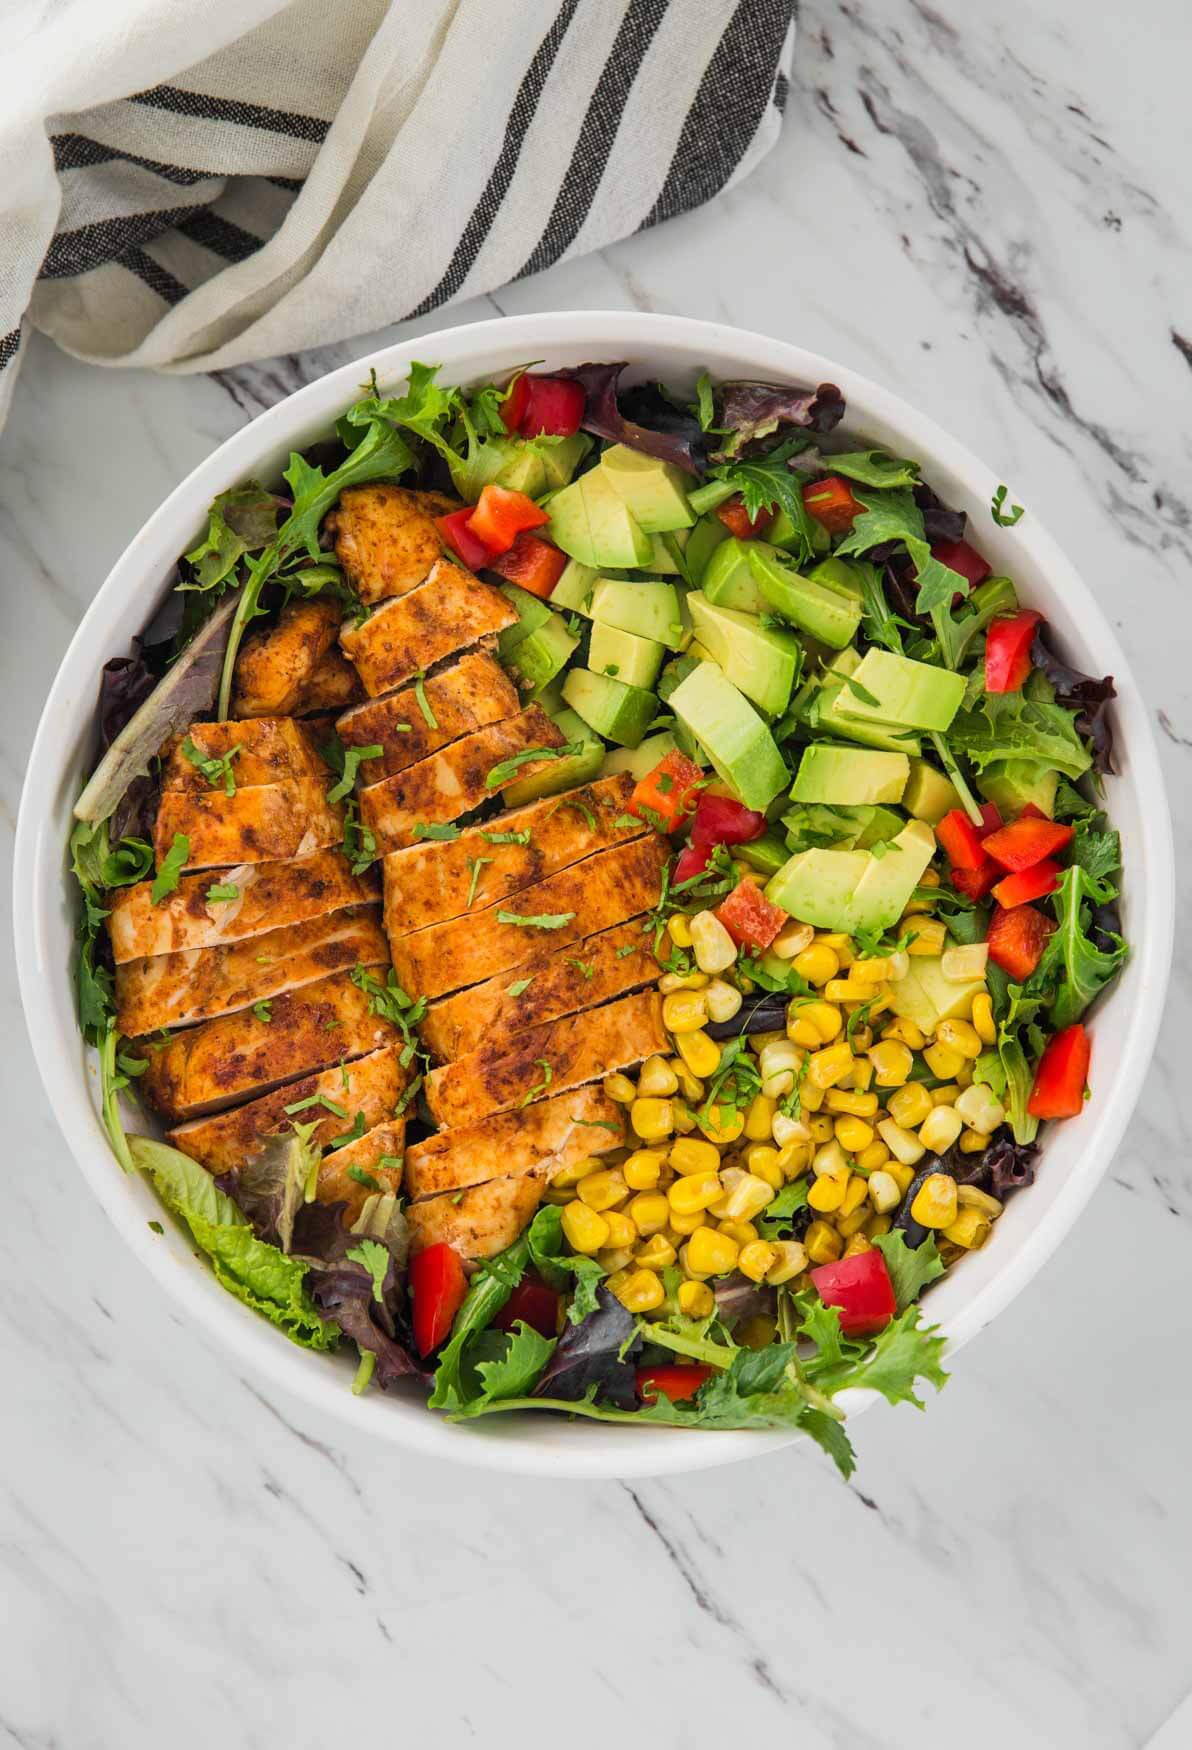
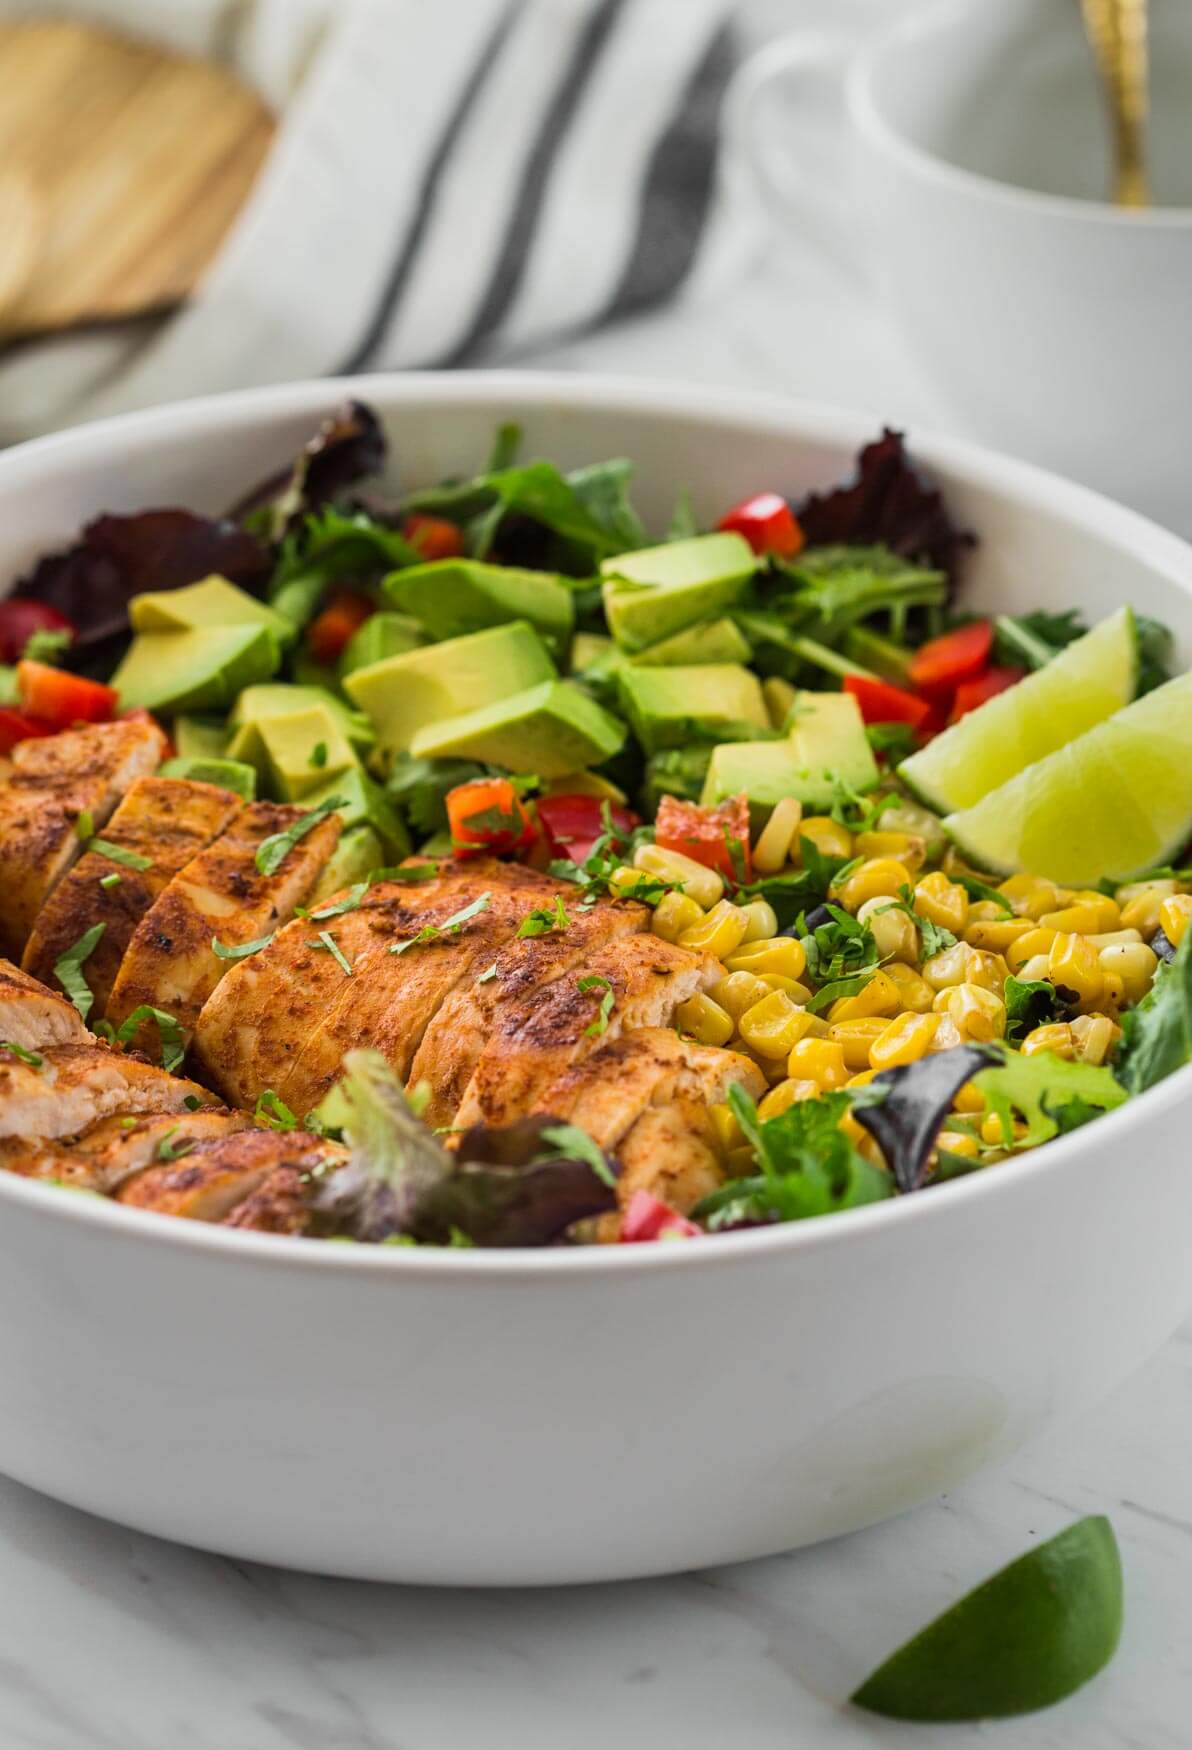
    Step 3: Assemble the chicken and hummus bowl

    In a medium to large serving bowl, layer the hummus. Place fluffed quinoa and top it with roasted shawarma chicken, peppers, olives, cilantro or parsley, lime wedges, pita chips, etc. Optionally drizzle extra virgin olive oil and serve warm.

    A bowl with creamy hummus shawarma chicken and fluffy quinoa
    A bowl filled with shawarma chicken, hummus, quinoa, and roasted peppers, topped with fresh cilantro, olives and lime for garnish.

    Serving suggestions

    • Serve this chicken hummus bowl for a filling and wholesome lunch or dinner.
    • Make homemade whole wheat pita to pair with it, or serve pita chips on the side.
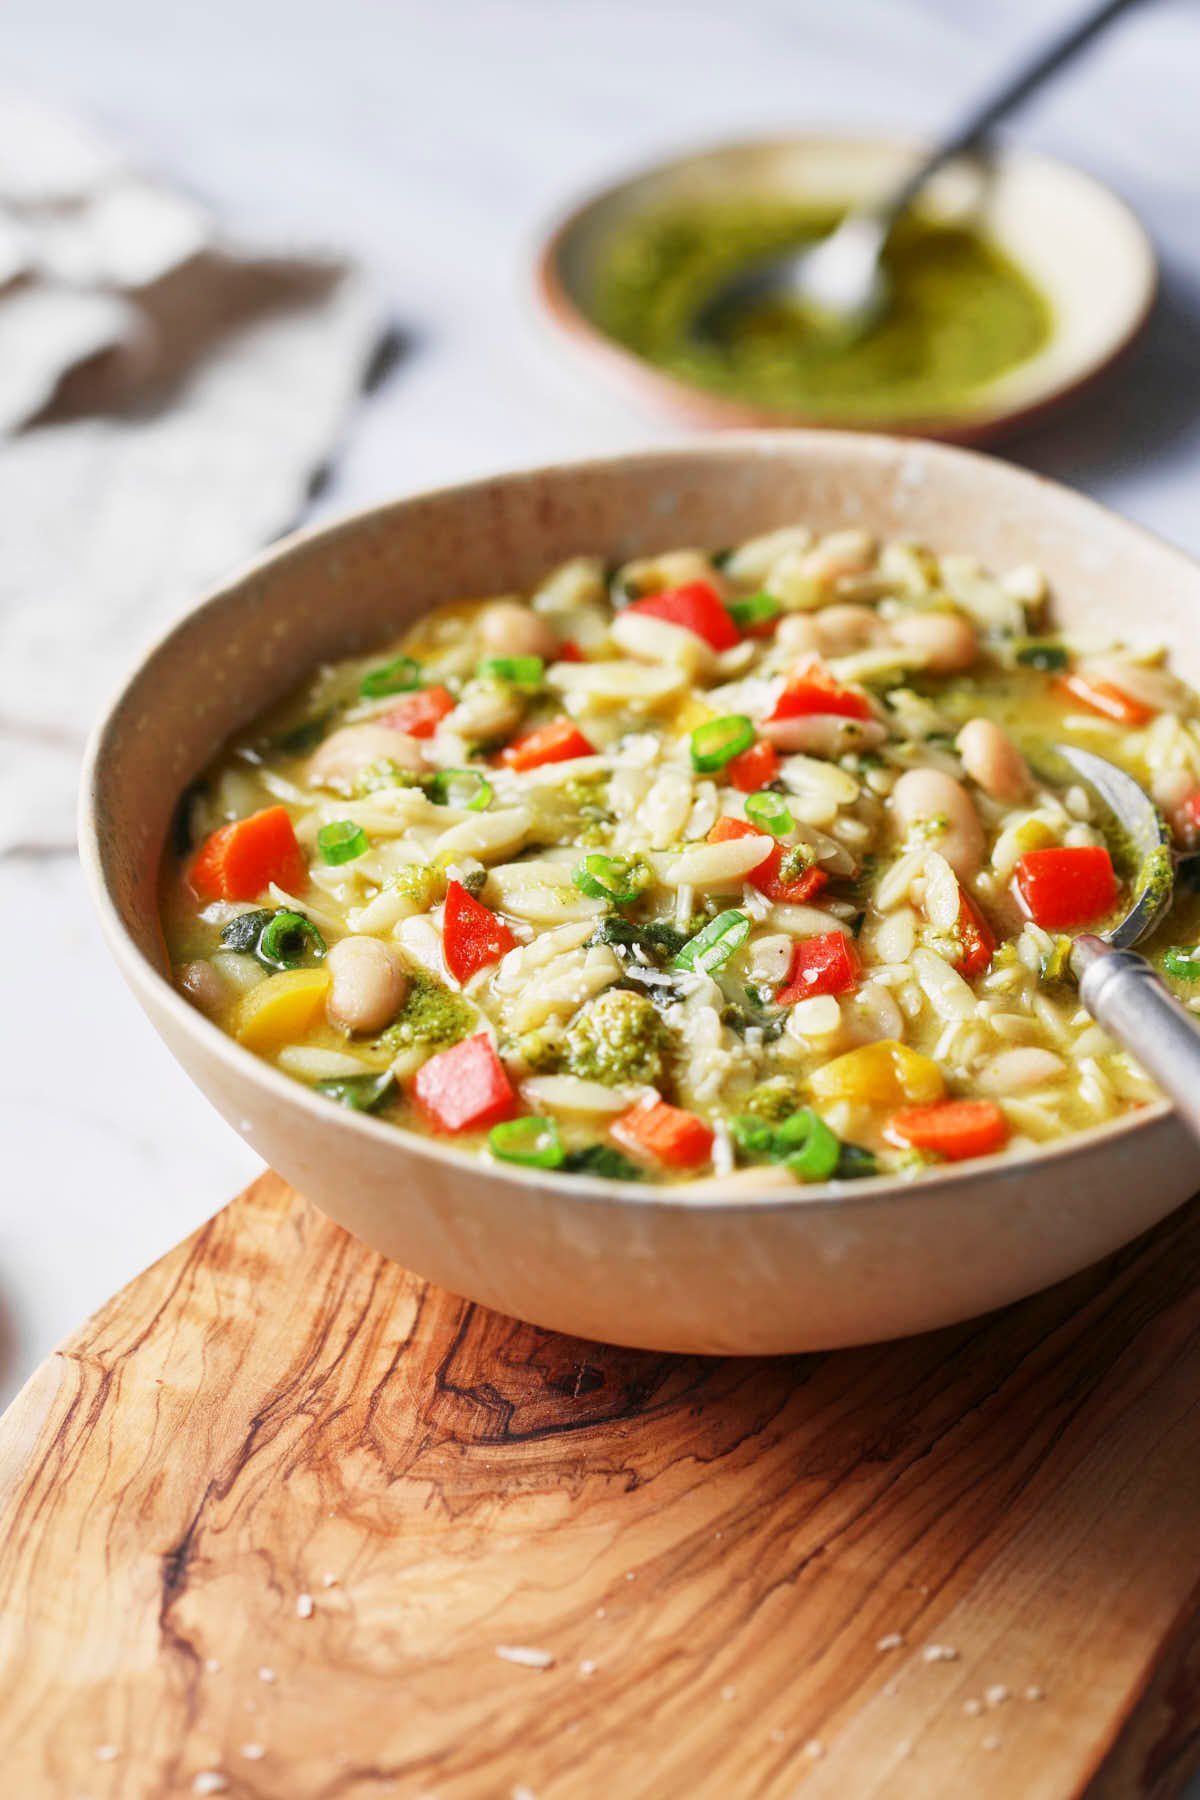
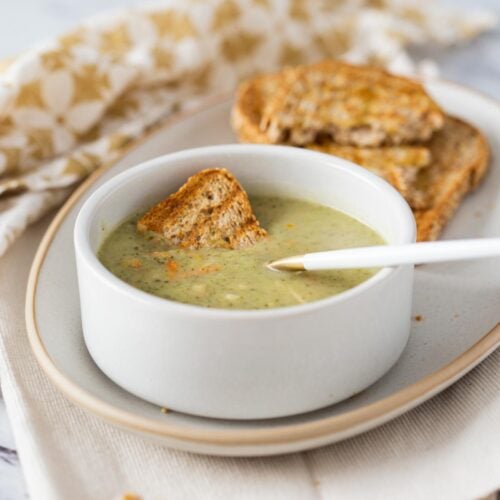
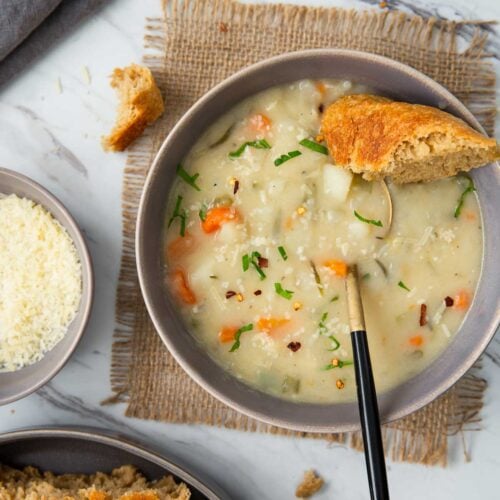
    • Prepare simple detox broccoli soup or healthy creamy potato soup with the hummus bowl. These are some nice combinations to make for the guests, family dinners, or party nights.
    • Prepare non-alcoholic drinks like refreshing mango lemonade or strawberry lime detox water to pair with it.
    Assembled roasted shawarma chicken hummus bowl with quinoa and peppers, garnished with fresh herbs, olives and lime wedges.

    Helpful tips

    • Use organic chicken whenever possible. If you use chicken breasts, do not follow the steps to broil the chicken after cooking. Breast cuts dry out easily and toughen at high temperatures.
    • To get the juicy, moist, and tender chicken, remove it from the heat as soon as the water in the pan evaporates. You may not get the roasted crust at this stage, but the chicken will be tender and moist.
    • Do not overcook bell peppers. Keep them slightly crunchy.
    • During summer, you can grill marinated chicken and bell peppers on the barbeque grill and enjoy a smokey taste in the dish.

    Recipe variations

    • Make it into shwarma chicken and hummus salad -- skip making quinoa and add a generous amount of greens like arugula or mixed salad greens to prepare a hummus salad bowl. Drizzle some extra virgin oil on the greens.
    • Make it vegetarian - make roasted cauliflower or chickpeas using a shawarma spice blend and serve it instead of chicken. Or prepare falafel at home from scratch or using a store-bought mix and prepare a hummus falafel bowl.
    • Use different toppings - Some options to consider are feta cheese, grilled zucchini, sliced cucumber, tzatziki, babaganoush, harissa, etc.

    FAQs

    Can you make a hummus bowl ahead of time?

    Yes. Prepare roasted chicken, bell peppers, and hummus ahead of time, and cook the quinoa fresh. Simply assemble and serve warm.
    I prefer cooking quinoa fresh, which I recommend for a happy stomach and fresh taste. However, you can also make it ahead of time.

    Can I skip the hummus?

    Yes, you can skip the hummus and use either tzatziki, babaganoush, or this creamy avocado sauce, etc.

    Can I use a different marinade to flavor the chicken?

    Yes. You can make it with your choice of flavors.
    For example, Indian spice blends used in this tandoori chicken or chicken tikka masala recipe will also work.

    More Chicken Recipes You Will Love

    • Cilantro Lime Chicken Thighs
    • Crispy Ground Chicken Nuggets
    • Easy Instant Pot Chicken Drumsticks
    • Chicken Taco Rice Casserole Skillet
    • Indian Healthy Butter Chicken Meatballs
    • Air Fryer Chicken Parmesan
    • Lemon Chicken Soup With Orzo

    More Wholesome Bowl Recipes

    • Ground turkey, beans, greens and quinoa topped with fresh cucumber, avocado and salsa in a serving bowl to serve as a burrito bowl.
      Black Bean Quinoa Turkey Burrito Bowls
    • Healthy and Delicious Vietnamese Summer Rolls Salad
      Vietnamese Summer Rolls Salad Bowl
    • Mexican Chicken Avocado Salad
    • Roasted Veggie & Quinoa Bowl
    Shawarma chicken hummus bowl - a bowl filled with shawarma chicken, creamy hummus, fluffy quinoa, and roasted peppers, topped with fresh cilantro, olives and lime for garnish.

    Love this recipe? Please leave a 5-star ⭐⭐⭐⭐⭐ rating in the recipe card below & a review in the comments if you REALLY like this recipe. Thank You!

    📖 Recipe

    A bowl filled with shawarma chicken, creamy hummus, fluffy quinoa, and roasted peppers, topped with fresh cilantro, olives and lime for garnish.
    Print Pin
    5 from 1 vote

    Shawarma Chicken Hummus Bowl With Quinoa

    Make this shawarma chicken hummus bowl with quinoa and roasted bell peppers—a healthy and satisfying meal packed with protein and Mediterranean flavors.
    Course: Lunch / Dinner
    Cuisine: Mediterranean Inspired
    Diet Gluten Free
    Prep Time 5 minutes minutes
    Cook Time 25 minutes minutes
    Servings :5
    Calories :427kcal
    Author:Swati Kadam Gulati

    Would you like to save this recipe?

    Email yourself a link to this post and come back to it later!

    Ingredients

    • 2 lb boneless skinless chicken thighs cut into bite-size pieces
    • 2 bell peppers sliced
    • ½ cup creamy hummus
    • 2-3 tablespoon fresh chopped cilantro/parsley
    • ¼ cup black olives halved
    • 2 teaspoon cooking oil

    Shawarma marinade

    • 1 ½ tablespoon shawarma spice blend store-bought or make your own (see notes)
    • 2-3 garlic cloves minced
    • 1-2 tablespoon lime juice
    • salt (divided)

    For quinoa

    • 1 cup quinoa
    • 2 cups water/chicken broth (or mix)

    Instructions

    Marinating the chicken

    • In a large mixing bowl, combine chicken with shawarma spice mix, minced garlic, lime juice, and salt. Mix everything well.

    Prepare quinoa

    • In a saucepan, add quinoa, water, or broth, bring it to a boil, season with salt, and cook it for 15 mins on low heat. Cover and let it rest.

    Cooking chicken

    • Meanwhile, heat the cooking oil in a large skillet. Add marinated chicken and saute it for about 15 mins or until well done. Once the chicken is cooked, remove it and keep it aside.

    Cooking peppers

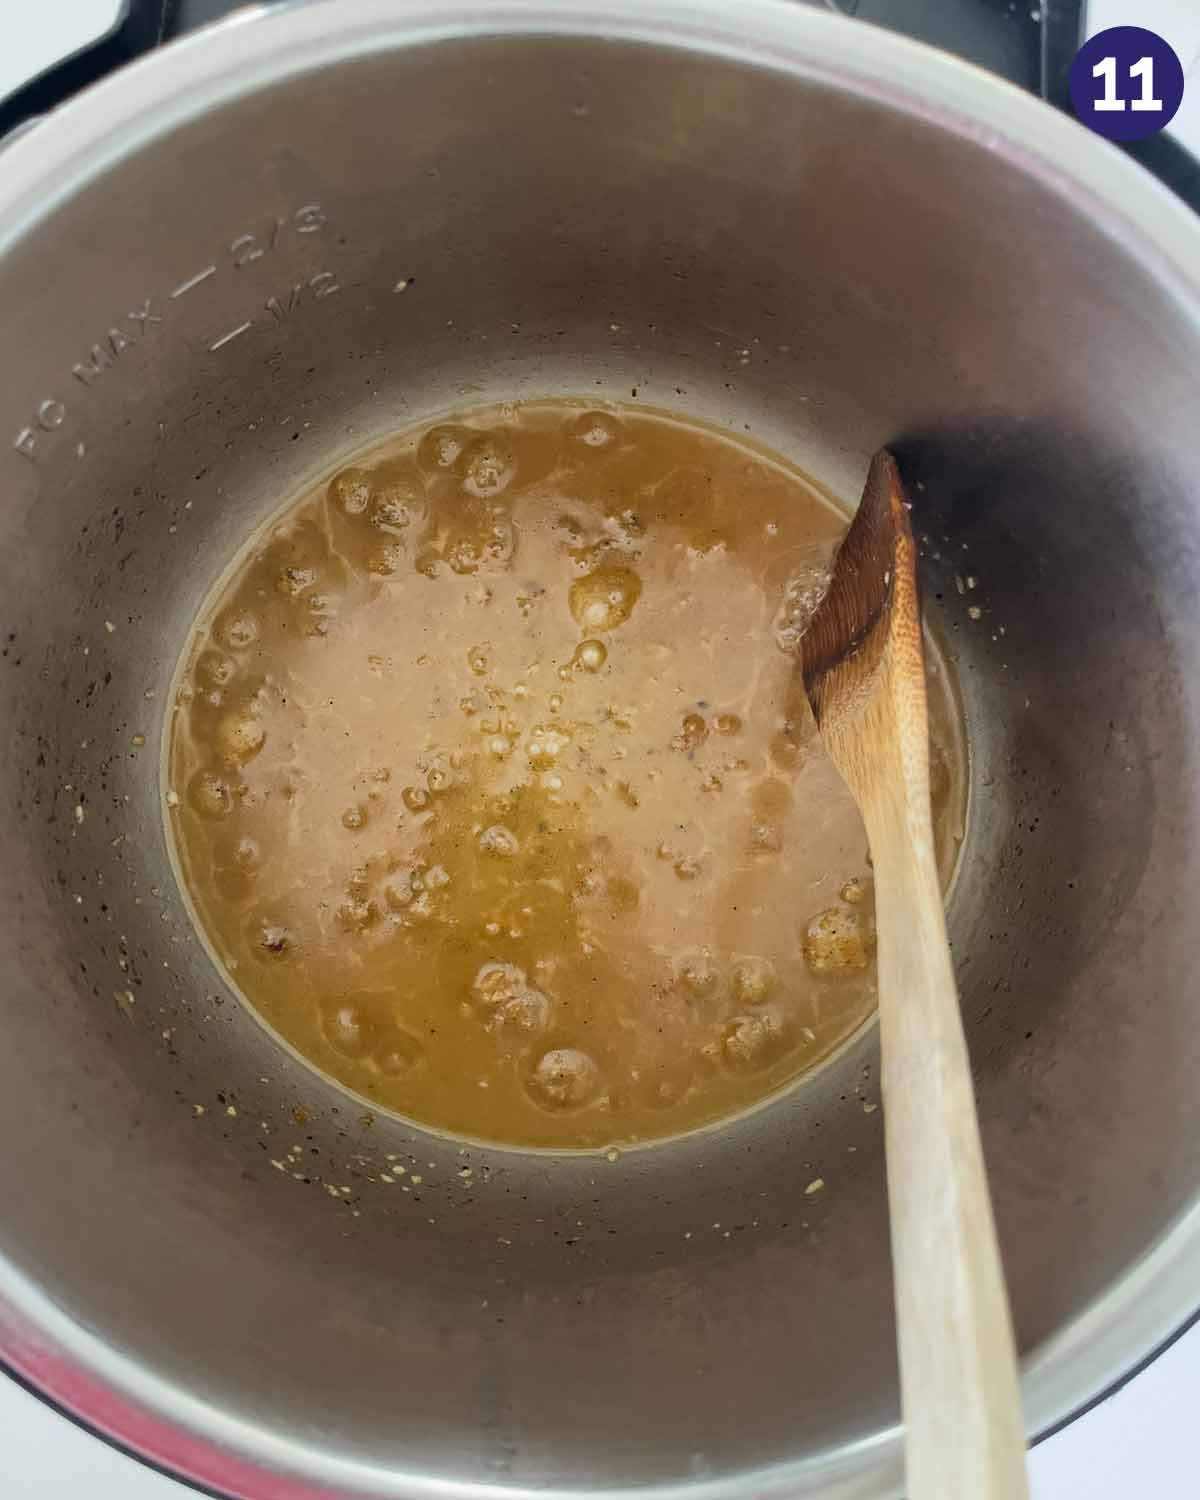
    • In the same pan, add 1-2 tablespoon of water and deglaze the pan after cooking the chicken. Add sliced bell peppers and stir fry for 3-4 mins.

    Assembling the hummus bowl

    • Layer creamy hummus in a shallow serving bowl. Add cooked quinoa, roasted chicken shawarma, and roasted bell peppers. Top it with olives and fresh cilantro/parsley. Optionally, add lime wedges and some pita chips. Serve warm.

    Notes

    1. Homemade shawarma spice blend: In a small bowl, mix 1 teaspoon cumin powder, ½ teaspoon turmeric, ½ teaspoon nutmeg powder, 2 teaspoon coriander powder, ½ teaspoon paprika, and ¼ teaspoon black pepper.
    2. Cook the bell peppers in the same pan using leftover spiced drippings after cooking the chicken.
    3. Quinoa options: use cooked rice, cauliflower rice, or mashed potatoes instead of quinoa.
    4. You can use chicken breasts instead of thighs. Make sure not to overcook them to avoid a rubbery and chewy texture.
    5. For the oven-bake marinated chicken and peppers version, see details in the article above.

    Nutrition

    Calories: 427kcal | Carbohydrates: 30g | Protein: 42g | Fat: 15g | Saturated Fat: 3g | Polyunsaturated Fat: 4g | Monounsaturated Fat: 6g | Cholesterol: 172mg | Sodium: 370mg | Potassium: 816mg | Fiber: 5g | Sugar: 2g | Vitamin A: 1590IU | Vitamin C: 63mg | Calcium: 66mg | Iron: 4mg
    Tried this recipe?Tag us on Instagram @watchwhatueat or tag #watchwhatueat! OR leave us a comment & rating below. Your feedback is very important to us.

    Leave a Comment

    Ground turkey, beans, greens and quinoa topped with fresh cucumber, avocado and salsa in a serving bowl to serve as a burrito bowl.

    Make these nourishing turkey burrito bowls full of nutrients, lean protein, and fresh salad greens for a wholesome lunch or dinner. It is super easy to prepare.

    Ground turkey, beans, greens and quinoa topped with fresh cucumber, avocado and salsa in a serving bowl to serve as a burrito bowl.

    If you are a fan of Mexican flavors, then you will enjoy these homemade black bean quinoa turkey burrito bowls. It is way better than eating burritos/bowls at restaurants/chains because this recipe is freshly made with handpicked fresh ingredients.

    To build the burrito bowl, use Mexican brown rice or quinoa, salad greens, and sauteed turkey with Mexican spices.

    Let's get started!

    [feast_advanced_jump_to]

    What is unique about this dish

    • Wholesome, healthy burrito bowl for lunch or dinner
    • Quick and easy to prepare
    • Customize what to add to the bowl as per your liking.
    • Prepare most of the ingredients ahead of time and assemble them just before serving.
    • It is a perfect dish to make for the party.

    Ingredients

    Ground turkey in a small plate, seasonings in small bowl, tomato, garlic cloves, onion, oil and jalepano placed on a flat surface for making ground turkey burrito bowl.
    Fresh arugula, black beans, cooked quinoa and salsa, cucumber and avocado placed on a flat surface for making ground turkey burrito bowl.
    • Ground turkey meat - buy organic meat whenever possible. Ground meat takes less cooking time, making it a perfect option for quick meals. For this recipe, you can also use boneless turkey thighs or breasts cut into bite-size pieces.
    • Seasonings - to flavor the turkey, use ground cumin, chipotle chili powder (or smoked paprika if you don't have it), salt, and pepper.
    • Cooked quinoa - to make the dish wholesome and filling, use cooked quinoa as a base. Or make this cilantro lime quinoa.
    • Avocado - it adds a nice creamy touch to the dish. Slice and use it, or make fresh guacamole.
    • Salsa - you can use homemade salsa (or make pica de gallo - a mixture of finely chopped onion, tomato, and cilantro). I prefer making fresh salsa or pica de gallo at home. However, you can use a store-bought one for a shortcut.
    • Greens - get organic salad greens whenever possible. I used fresh arugula as a base for this recipe.
    • Additional toppings - to make the dish even more interesting, add toppings like sliced cucumber, radish, crushed corn chips, etc.

    Preparation tips

    For cooking turkey

    Peel and cut onion into quarters. Peel the garlic cloves. Cut tomato into quarters. Add everything to a small food processor jar and chop them finely (optionally, add jalapeno). Keep the mixture chunky. This mixture will be used to cook ground turkey.

    Onion, tomato, jalapeno, pieces and garlic cloves in a food processor jar.
    Chopped onion, tomato, garlic and jalapeno mixture in a food processor jar.

    Do not have a food processor? Then, dice the onion and tomato into small pieces and finely chop the garlic cloves.

    For burrito bowl assembly

    • Quinoa - cook quinoa in water or chicken broth on low heat for about 15 minutes. Follow this recipe to prepare cilantro lime quinoa.
    • Avocado - peel, slice, or finely dice, or smash it. Or prepare homemade fresh guacamole.
    • Salsa - make quick salsa at home.
    • Cucumber - cut the cucumber in half and then slice it.
    • Greens - wash the greens thoroughly and remove excess water. If you have a salad spinner, use it for this.

    How to make turkey burrito bowls?

    If you have prepared quinoa or rice and salsa ahead of time, making this burrito bowl will take very little time.

    Step 1- Cooking ground turkey

    Heat oil in a frying pan on medium-low heat. Add chopped onion, tomato, and garlic mixture and saute for a few minutes.

    Chopped onion, tomato, garlic and jalapeno mixture in a hot pan.
    Cooked onion, tomato, garlic and jalapeno mixture in a hot pan with wooden spatula.

    Add ground turkey meat and all the seasonings; mix everything well. Simmer it for a few minutes or until the pink color disappears. Let it cool down slightly before using.

    Ground turkey with spices placed on cooked onion-tomato mixture in a hot pan with wooden spatula.
    Cooked ground turkey in pan with wooden spatula.

    Step 2 - Assembling burrito bowl with toppings

    Add arugula and cooked quinoa in a large bowl, followed by spiced ground turkey.

    Now add black beans and sliced cucumbers. Finally, top it with avocado slices and salsa. Optionally drizzle some olive oil and garnish with fresh lime wedges, crushed tortilla chips, and a wholesome turkey burrito bowls are ready to enjoy.

    Cooked quinoa, fresh arugula and cooked ground turkey arranged in a serving bowl.
    Cooked quinoa, fresh arugula and cooked ground turkey, black beans and sliced cucumber arranged in a serving bowl.
    Ground turkey, beans, greens and quinoa topped with fresh cucumber, avocado and salsa in a serving bowl to serve as a turkey burrito bowl.

    Burrito bowl toppings

    Here are some more topping options you can consider for this turkey bowl.

    • Roasted or sauteed bell peppers
    • Shredded cabbage
    • Sliced radishes
    • Mexican cheese blend
    • Sour cream

    Personally, I prefer not to mix dairy and meat these days; therefore, I did not include any dairy products in this recipe. But feel free to add them as per your liking.

    Serving suggestions

    • This burrito bowl is self-sufficient for a filling lunch/dinner.
    • Drinks - make any of these non-alcoholic drinks, such as pineapple mojito, strawberry detox water, or apple cider mimosa, to pair with it.
    • Make Air Fryer corn on the cob to serve on the side.
    • Wrap everything in large tortillas and make turkey burrito wraps.
    Ground turkey, beans, greens and quinoa topped with fresh cucumber, avocado and salsa in a serving bowl to serve as a turkey burrito bowl.

    Helpful tips

    • Cooking ground meat - after adding meat to the hot pan, break it into small pieces immediately. If it cooks in big pieces, breaking them into smaller pieces will be difficult. Also, reduce the heat to low before adding the ground meat and cook it on low heat or simmer. High temperatures will toughen the meat.
    • If you are cooking quinoa and turkey, just before serving, allow it to cool down before assembling the burrito bowl. Otherwise, salad greens and cucumber will wilt in hot temperatures.

    Recipe variations

    • Make it Spicy - add sliced jalapenos as toppings or add more chipotle chili powder.
    • Add veggies - add roasted bell peppers to make this bowl more nutritious.
    • Grain-free salad bowl - skip quinoa, add more greens, and make a salad bowl.
    • Chicken bowl - use ground or diced boneless skinless chicken instead of turkey.
    • Rice bowl - use cooked brown or white rice instead of quinoa. Mexican brown rice or cilantro lime rice will work perfectly in this recipe.
    • Vegetarian bowl - use cooked chickpeas instead of meat and avoid using chicken stock or broth to make quinoa or rice.

    Storage tips

    Store leftover sauteed ground turkey, cooked quinoa, and other toppings separately. Cut cucumbers and avocado, and assemble the burrito bowl fresh just before serving next time. Turkey and quinoa can last 2-3 days in the refrigerator.

    FAQs

    Can I use turkey/chicken cubes instead of ground meat?

    Yes! You can use diced turkey or chicken instead of ground one. Follow the instructions above to prepare and ensure the meat is well done.

    Can I make it ahead of time?

    Yes! Cook quinoa and turkey ahead of time. Prepare fresh tomato salsa and store it in an air-tight container. Store it in the refrigerator if you want to use it the next day. Just before serving, prepare the salad base and avocadoes.

    Don’t miss these Mexican-inspired meals

    • Whole lentil soup in bowl with bread
      30-min Instant Pot Vegetarian Lentil Soup
    • Prepare these cilantro lime grilled chicken thighs with delicious and healthy marinade. A quick and easy prep-ahead recipe perfect for a grilling party. Or just cook marinated chicken on the grill or frying pan for the weeknight dinner. | #watchwhatueat #grilledchicken #cilantrolime #grilling #chickenthighs
      Cilantro Lime Chicken Thighs
    • This Southwest flavored grilled chicken burger recipe is perfect for outdoor barbecue parties
      Southwest Grilled Chicken Burger
    • Healthy Mexican Chicken Rice made in one pot with tons of flavors and deliciousness. A perfect easy dish for busy weeknight dinner. Full of colors with nutritious veggies you will want to make this Mexican rice again and again. #onepot #Mexican #chicken #rice #healthyrecipes #watchwhatueat
      One-Pot Mexican Chicken Rice

    Love this recipe? Please leave a 5-star ⭐⭐⭐⭐⭐ rating in the recipe card below & a review in the comments if you REALLY like this recipe. Thank You!

    📖 Recipe

    Ground turkey, beans, greens and quinoa topped with fresh cucumber, avocado and salsa in a serving bowl to serve as a burrito bowl.
    Print Pin
    5 from 1 vote

    Black Bean Quinoa Turkey Burrito Bowls

    Make these easy chipotle-styled ground turkey burrito bowls with lean protein, quinoa or rice, and fresh salad greens for a healthy meal.
    Course: Lunch / Dinner
    Cuisine: Mexican Inspired
    Diet Gluten Free
    Prep Time 15 minutes minutes
    Cook Time 7 minutes minutes
    Servings :4
    Calories :480kcal
    Author:Swati Kadam Gulati

    Would you like to save this recipe?

    Email yourself a link to this post and come back to it later!

    Equipment

    • Food Processor

    Ingredients

    For cooking turkey

    • 1 lb ground turkey
    • 1 small onion peel and cut in quarters
    • 2-3 small garlic cloves
    • 1 small tomato cut in quarters
    • 1-2 teaspoon chipotle chili powder
    • 1 teaspoon cumin powder
    • salt and pepper
    • 1 tablespoon cooking oil

    Bowl assembly

    • 1 can black beans drained and rinsed
    • 2 avocados peel and slice (or prepare homemade guacamole)
    • 2 small cucumbers cut it in quarters and then thinly slice
    • 4 cup arugula or more
    • 2 cup cooked quinoa
    • 1 cup salsa

    Instructions

    Cooking ground turkey

    • In a food processor, combine onion, garlic, and tomato. Pulse chop everything finely. Do not over-blend; keep the mixture chunky.
    • Meanwhile, heat oil in a large skillet on low heat. Add the chopped mixture and saute for 3-5 minutes.
    • Then add ground turkey, chipotle chili powder, salt and pepper. Mix everything well. Using a spatula, break the turkey meat into small pieces.
    • Cover and simmer the meat for 5 minutes or until the pink color disappears and is fully cooked.
    • Let it cool down slightly

    Burrito bowl assembly

    • Spread arugula in a large serving bowl or deep plate, then add cooked quinoa, turkey, and black beans.
    • Then top it with sliced avocado, cucumbers, and salsa.
    • Finally, drizzle some olive oil, garnish with lime wedges, and serve immediately to enjoy fresh.

    Notes

    1. Add one jalapeno to the onion and tomato mixture for added taste and heat.
    2. Read the preparation and helpful tips sections above for more details. 
    3. Skip quinoa and use this Mexican brown rice or cilantro lime brown rice instead.
    4. You can customize the toppings to your liking.

    Nutrition

    Calories: 480kcal | Carbohydrates: 41.8g | Protein: 27.8g | Fat: 23.2g | Saturated Fat: 6.3g | Cholesterol: 100mg | Potassium: 541mg | Fiber: 8.2g | Sugar: 6g | Calcium: 170mg | Iron: 12mg
    Tried this recipe?Tag us on Instagram @watchwhatueat or tag #watchwhatueat! OR leave us a comment & rating below. Your feedback is very important to us.

    Leave a Comment

    Pesto and vegetable orzo soup in large pot with a wooden laddle.

    Prepare this healthy one-pot vegetable orzo soup for an easy, comforting meal to warm up on chilly days. It takes just 30 minutes to prepare, and it is loaded with delicious flavors.

    Pesto and vegetable orzo soup in large pot with a wooden laddle.

    In our home, December to April is the season of soups because of the cold weather here in North-East America. As a recipe developer, the creativity inside of me makes me try a variety of soups at home during this time. Whether it is cheesy broccoli soup in Instant Pot or oven roasted tomato soup, or slow-cooked barley soup, you will find a variety of soups on the website. Here, you will learn to prepare quick and easy vegetable orzo soup with pesto.

    Let's get started!

    [feast_advanced_jump_to]

    What is special about this dish

    • A warm bowl of this healthy orzo soup is perfect for a comforting meal.
    • Prepared with healthy and clean ingredients and loaded with fresh veggies.
    • It is quick and easy to prepare. Perfect one-pot soup recipe for busy days.
    • Add some mozzarella and parmesan cheese, and kids will love it.

    Ingredients

    Ingredients to prepare vegetable orzo soup with pesto are laid on a flat surface.
    • Orzo - Use your choice of orzo. I use both whole wheat and regular semolina orzo, depending on availability at our grocery store.
    • Vegetables - diced bell peppers, carrots, and spinach are the fresh vegetables in this soup. Use different colored bell peppers to get a nice color in the soup and for added nutrition.
    • Beans - boost the protein content in the soup by adding white cannellini beans. It makes the soup filling. Or use your choice of beans, like pinto or kidney beans. Use precooked beans to make this soup. Sometimes, I soak and cook them in Instant Pot at home. When I don't have time, I use canned ones.
    • Onion - I used green spring onions in this soup. However, you can use an onion bulb instead, dice it finely, and then use it.
    • Garlic - I always prefer using fresh garlic in my recipes. Even a little bit of fresh garlic enhances the flavors of the soup.
    • Pesto - If it is freshly made at home, then it's even better. But I am guilty of this as I buy it from a store sometimes, especially during wintertime when fresh basil is not available in my garden.
    • Seasonings - Add black pepper and salt to season the dish. Always taste test and season the soup according to your liking.
    • Toppings - Before serving, sprinkle some parmesan cheese, fresh chopped parsley or basil, and green onion to garnish the bowl of soup.

    See the recipe card for quantities and more details.

    Preparation tips

    Diced vegetables, sliced garlic, and smashed and whole cannellini beans are placed in different white bowls on a flat surface.
    • Dice bell pepper into ½" pieces
    • Peel, rinse and then dice carrots into ½" pieces.
    • Trim the ends of green spring onion and thinly slice it into small pieces. Save some green parts to garnish the soup before serving.
    • Roughly chop baby spinach leaves.
    • Peel and slice the garlic cloves. Or you can finely chop it or even mince it using a garlic press. I just try to save some effort here by slicing it.
    • Rinse and drain white beans if you are using canned ones. Divide the beans into two equal parts. Then, smash half of the beans using a potato masher or the bottom of a drinking glass. These smashed beans will help the soup to thicken and get a creamy texture.

    How to make pesto vegetable orzo soup?

    Step 1. Heat some cooking oil in a large pot on medium heat. Add garlic and cook it until golden brown and fragrant.

    Sautéing garlic in a cast iron pot.
    Sautéed garlic in a cast iron pot.

    Step 2. Add spring onions, diced celery, carrot, and bell pepper and sauté for a couple of mins. Then add water and chicken or vegetable broth. Bring the mixture to a boil.

    Sautéing vegetables in a cast iron pot.
    Cooking vegetables with broth in a cast iron pot.

    Step 3. Now add orzo, salt, and black pepper, mix, cover, and cook for 4 mins.

    Adding orzo to the vegetable soup base.
    Cooking orzo soup in cast iron pan with lid on.

    Step 4. Remove the lid, add chopped spinach and whole as well as smashed cannellini beans, mix, and cook for a couple more minutes.

    Adding Smashed and whole cannellini beans to the veggie orzo soup in a cast iron pot.
    Adding spinach to the veggie orzo soup in a cast iron pot.

    Step 5. Turn off the heat, then add basil pesto and mix well to distribute it evenly. Cover and let it rest for a few minutes. Garnish with fresh green onion and some parmesan cheese. Serve warm.

    Adding pesto to the veggie orzo soup in a cast iron pot.
    Mixing pesto in the veggie orzo soup in a cast iron pot.

    Serving suggestions

    • A large soup bowl of this veggie orzo soup is sufficient for a filling meal.
    • Serve warm soup with freshly baked whole wheat dinner rolls or homemade focaccia bread.
    • Pair it with healthy ground chicken nuggets, crispy potato fritters, or these chicken drumsticks in Instant Pot for a wholesome and satisfying meal.
    • Or make simple and easy lentil salad or avocado cucumber salad to serve with the soup.
    White beans, pesto, and vegetable orzo soup are served in a bowl with a metal spoon on a wooden riser and some parmesan cheese and pesto in mini dishes on the side.

    Helpful tips

    • Add extra broth - add more broth to get the consistency of your liking. Also, when you make the orzo soup way before serving, the orzo keeps soaking up the broth. Therefore, add extra broth when reheating the soup before serving to get the desired consistency.
    • Taste test - at the end of cooking, taste the soup and add more seasonings and basil pesto if necessary.
    • Do not overcook - orzo can get mushy and lose its texture if you overcook it in the soup. Therefore, slightly undercook it in the soup. The hot liquid will keep it cooking further once you turn off the heat.
    • Add toppings - while serving, add toppings like parmesan cheese, crispy croutons, and some chili flakes to garnish the soup and make it look more appetizing.

    Recipe variations

    • Use different types of pasta - you can use any small-sized pasta to prepare this soup instead of orzo. Adjust the cooking time as given on the package. Or follow this vegetable pasta soup recipe, where I used smaller pasta and made it with tomato.
    • Make it protein-rich - add leftover shredded chicken to the soup. Or cook boneless skinless chicken on the grill or the pan over the stovetop, cut it into bite-size pieces, and then add it to the soup towards the end of cooking orzo. Or make this lemon chicken orzo soup.
    • More veggies - make this soup more nutritious by adding one or more veggies like diced zucchini, yellow squash, green peas, eggplant, etc.
    • Choice of greens - use baby kale leaves instead of spinach or add both.
    • Choice of beans - You can replace the white beans with pinto or kidney beans.
    • Gluten-free soup - use gluten-free orzo or any other gluten-free pasta in this soup.
    • Vegan/vegetarian orzo soup - Make the soup with vegetable broth and avoid using parmesan cheese. Also, use vegan pesto to prepare the vegan version.
    White beans, pesto, and veggie orzo soup are served in a bowl with a metal spoon on a wooden riser and some basil pesto in a mini dish on the side.

    Make ahead instructions 

    Peel the garlic and dice carrot, bell peppers, celery, and green onions, and store them in an air-tight container for about 2-3 days. On the day of cooking, follow the instructions to prepare the vegetable orzo soup.

    Storage tips

    Store leftover soup in an air-tight container for 2-3 days. Reheat it on the stovetop, add some chicken or vegetable stock, and just bring it to a boil. Turn off the heat, garnish, and serve warm.

    FAQs

    How long does it take to cook orzo?

    See the cooking time given on the orzo package. Mine says it takes eight minutes to cook. I cook it for 6 mins. I then turn off the heat, cover the pot, and let it further cook for a minute or so.

    Is orzo rice or pasta?

    Orzo is a kind of pasta that looks like rice grains. It is made up of semolina flour or wheat flour, just like regular pasta.

    Can I use different pasta?

    Yes, use smaller pasta sizes to make this soup. Pastas such as ditalini, patina, farfalline, etc., are perfect for this soup. I have used ditalini in this simple vegetable pasta soup recipe.

    More healthy soups

    • Instant pot broccoli cheese soup in a serving bowl with toasted bread on the side.
      Instant Pot Broccoli Cheddar Soup
    • Creamy healthy potato soup with a piece of bread in a serving bowl.
      One-Pot Healthy Potato Soup
    • Sweet potato lentil chili in a serving soup bowl. Garnished with tortilla chips and lime wedges.
      Sweet Potato Lentil Chili
    • Whole lentil soup in bowl with bread
      30-min Instant Pot Vegetarian Lentil Soup

    More Italian-inspired recipes you will love

    • Sauteed eggplant and tomatoes in a large skillet.
      15 Min Sauteed Eggplant And Tomatoes
    • Pesto and Peas pasta in a served in a dish with a metal fork.
      20 Min Healthy Pesto Pasta With Peas
    • Instant Pot Pumpkin risotto with wooden spatula.
      Instant Pot Pumpkin Risotto
    • Prepared Italian lentil salad in a serving dish with a serving spoon.
      Under 30 Min Italian Lentil Salad
    White beans, pesto, and vegetable orzo soup are served in a bowl with a metal spoon on a wooden riser and some parmesan cheese and pesto in mini dishes on the side.

    Love this recipe? Please leave a 5-star ⭐⭐⭐⭐⭐ rating in the recipe card below & a review in the comments if you REALLY like this recipe. Thank You!

    📖 Recipe

    Pesto and vegetable orzo soup in large pot with a wooden laddle.
    Print Pin
    No ratings yet

    White Bean Pesto And Vegetable Orzo Soup

    Make a comforting and filling bowl of healthy vegetable orzo soup for a wholesome dinner or lunch on chili days. This nutritious one-pot vegetarian soup is prepared with a variety of veggies and is also perfect for the party or family gatherings. 
    Course: Lunch or Dinner,Main or Side
    Cuisine: Italian Inspired
    Prep Time 15 minutes minutes
    Cook Time 15 minutes minutes
    Servings :4
    Calories :245kcal
    Author:Swati Kadam Gulati

    Would you like to save this recipe?

    Email yourself a link to this post and come back to it later!

    Ingredients

    • 1 cup orzo
    • 2 medium celery stalks diced into small pieces
    • 2-3 stalks of spring onion thinly sliced
    • 2 medium carrots diced into small pieces save some green part for garnishing
    • 1 cup diced bell pepper
    • 2 cups loosely packed baby spinach use whole leaves or chop it
    • 2-3 small garlic cloves peeled and sliced
    • 1 can cannellini beans smash half of it
    • 5 cups liquid veggie stock plus water
    • 2 tablespoon basil pesto
    • salt and pepper
    • 2 tablespoon parmesan cheese optional

    Instructions

    • In a large pot, heat oil on medium heat. Add sliced garlic and cook it for 30-40 seconds or until it turns golden brown.
    • Add spring onions, celery, carrot, and bell pepper, and saute for 2-3 mins.
    • Add veggie stock and water, and bring the mixture to a boil.
    • Then add orzo, salt, and pepper; mix well, cover, and cook on low heat for 5 mins.
    • Now add cannellini beans (whole as well as smashed) and baby spinach, and continue cooking for 2 mins.
    • Turn off the heat and then add basil pesto, mix well, cover, and let it rest for a few minutes. Garnish with some parmesan cheese and spring onion; serve warm.

    Notes

    1. Using a potato masher or the back of a wooden spatula, smash half of the cannellini beans. This will help to thicken the soup and add creaminess to it. While keeping some whole beans will give a nice texture and color to the soup. 
    2. If you do not have spring onions, you can use regular onions instead. Dice one medium onion into small pieces before using. 
    3. Use different colored bell peppers to get more colors in the soup.  Dice all the veggies into small pieces and as evenly as possible. 
    4. I always use half water and half chicken broth/stock to prepare the soup base. You can use full broth/stock and skip using water. 
    5. Taste test the soup and add more basil pesto, salt, and pepper if necessary per your liking.

    Nutrition

    Calories: 245kcal | Carbohydrates: 36.6g | Protein: 11.3g | Fat: 7g | Saturated Fat: 1.4g | Potassium: 604mg | Fiber: 9.4g | Sugar: 5g | Calcium: 182mg | Iron: 4mg
    Tried this recipe?Tag us on Instagram @watchwhatueat or tag #watchwhatueat! OR leave us a comment & rating below. Your feedback is very important to us.

    4 Comments

    Pesto and Peas pasta in a served in a dish with a metal fork.

    Pesto pasta with peas is an easy, delicious, quick, and healthy pasta dish you can prepare in about 20 mins. A perfect dish to use fresh spring peas from the garden (or frozen ones).

    Pesto pasta with peas in a large pan.

    Making easy pasta dishes like garlic kale pasta, Mediterranean pasta, etc., during weekdays makes my life so easy. Healthy yet delicious, and a filling dinner or lunch, which is why I always go for them.

    And my recent favorite is making pea pesto pasta. I even took it to a potluck gathering with our friends, and it was a huge hit. The kids really enjoyed it.

    [feast_advanced_jump_to]

    What is special about this dish

    • Super easy to prepare
    • You will need 20-25 mins to prepare
    • Toasted green peas make this pasta so tempting and hard to resist
    • Healthy yet tasty with loads of nutrients from green peas and pesto

    Ingredients

    • Pasta - use your choice of pasta. I mostly use gluten-free pasta made from brown rice or quinoa, and occasionally the regular variety to make my pasta dishes.
    • Green Peas - either fresh or frozen peas will work in this recipe.
    • Pesto - use good quality pesto to flavor the pasta and peas. Make it at home whenever possible using fresh basil.
    • Tomato - This is optional. I add diced seeded tomatoes to get some color contrast in the green pasta dish.
    • Garlic - always use fresh garlic to get nice flavors in the recipe. Avoid using preserved garlic as it lacks flavors.
    • Oil - I always use olive oil for sauteing and grilling in my kitchen.

    See the recipe card for quantities and more details.

    Recipe variations

    Here, I am listing some variations that you can try with the recipe.

    • Make it gluten-free - Use pasta prepared using gluten-free flour such as brown rice, quinoa, etc.
    • Add some red chili flakes to bring some heat to the pasta.
    • Use sundried tomatoes instead of fresh ones to get added deliciousness and color to the dish.
    • You can also add one or more veggies such as diced bell pepper, broccoli, zucchini, etc., to make the pasta more nutritious.
    • Add shrimp or chicken cut into bite-size pieces to make this dish rich in protein. Just cook them in some oil before roasting the peas. Keep them aside and add them to the pasta while mixing the pesto. Alternatively, you can add cooked chicken meatballs to the dish.
    • Sprinkle some parmesan cheese at the end, and your family will love every bit of it.
    Pesto pasta with peas in a large pan.

    Kind of pasta to use

    Any kind of pasta with any shape and size, such as penne, elbow, shell, or spaghetti, to name a few, will work in this pesto pasta and peas recipe. Make sure to cook the pasta to your liking as per the package instructions.

    How to make healthy pasta with peas?

    This pea pesto pasta recipe involves three main steps-- cooking the pasta, roasting the green peas with garlic, and mixing cooked pasta and peas with pesto sauce.

    Step 1 - Cooking pasta

    Bring water to a boil in a large pot. Add raw pasta and some salt. Cook pasta according to the package instructions. Once the pasta is cooked, drain the water and keep it aside. Also, reserve about ½ cup of pasta water before draining to use it later.

    Pasta while cooking in a pot.
    Cooked pasta drained in a stainless steel colander.

    Step 2 - Preparing green peas

    In a large pan, heat some cooking oil. Add garlic and cook until fragrant. Then add the green peas and roast them for a few minutes.

    Add diced tomato and seasonings like salt, black pepper, and red chili flakes; cook until the tomato softens.

    Sautéing garlic in some oil in a large pan.
    Sautéing green pean with garlic in a large pan.
    Roasted green peans in a large pan.
    Roasted green peas with fresh tomato, salt and pepper.

    Step 3 - Adding back the cooked pasta

    Add cooked pasta, basil pesto, and some pasta water. Mix well to coat the pesto on the pasta evenly.

    Green peas, pasta and pesto ready to mix.
    Pasta with peas and pesto in large pan with wooden spatula.

    Chef's Secret - What makes this Peas Pasta delicious

    The toasted taste of peas with garlic makes this pasta delicious. So, saute the green peas on medium heat until they develop a roasted color. These toasted peas are so tempting to eat that you can even serve them as a side dish.

    Also, season your pasta dish generously with black pepper to add more flavor to the dish.

    Serving suggestions

    • Serve this bowl of pea pea pesto pasta for a light lunch/dinner.
    • You can pair it with chicken in tomato sauce or garlic tomato salmon or 15 min shrimp in tomato sauce for a wholesome meal.
    • Prepare detox broccoli soup with homemade focaccia or whole wheat dinner rolls to serve with this pasta dish. This will be a perfect menu for family gatherings or get-togethers.
    Pesto and Peas pasta in a served in a  dish with a metal fork.

    Helpful tips

    • Cooking pasta - cooking times may vary for different pasta varieties having different sizes and shapes. Therefore, cook the pasta according to the package instructions. Also, add some salt to the boiling water to flavor the pasta while cooking.
    • Reserve pasta water - After cooking the pasta, save some pasta water before draining it for later use. Add a few tablespoons of this water while mixing pesto in the pasta. This will help to coat the pesto evenly.
    • How to save time? - Prepare peas in a frying pan simultaneously while cooking pasta. This will save some time, and your dish will be ready in about 15 minutes or so. However, your dishwasher will not be happy as it will need to work on one more pan.
    • Do not overcook the pasta after adding the basil pesto. Basil tends to lose its flavor during prolonged heating on high heat.

    FAQs

    Can I use fresh peas?

    Yes. You can use fresh peas in this recipe. And if these are from your garden, even better.

    Can I make it ahead of time?

    This pasta and peas with pesto taste better when it is fresh. However, leftovers still taste great, and you can store them in the refrigerator for 1-2 days. Sprinkle some water and microwave the pasta before serving.
    Also, you can prepare sauteed garlic peas ahead of time and cook the pasta fresh. In this case, you simply have to mix the peas and pasta with pesto before serving.

    Can I freeze leftovers?

    I will recommend not freezing the cooked pasta dish. You will not get the same texture and taste upon thawing the pasta.

    Pesto and Peas pasta in a served in a  dish with a metal fork.

    More pasta recipes you will love

    • Healthy lemon chicken soup with orzo in a serving bowl with some croutons on the side.
      Healthy Lemon Chicken Soup With Orzo
    • Healthy Mediterranean pasta with artichokes and olives in a large skillet with a wooden spatula.
      Healthy Mediterranean Pasta With Artichokes and Olives
    • Easy vegetable pasta soup recipe - this fresh veggie and pasta all-in-one pot soup is perfect for healthy weeknight dinners/lunch.
      Easy Vegetable Pasta Soup
    • Under 30 min simple stir fry vegetable pasta salad.
      Vegetable Pasta Salad

    Love this recipe? Please leave a 5-star ⭐⭐⭐⭐⭐ rating in the recipe card below & a review in the comments if you REALLY like this recipe. Thank You!

    📖 Recipe

    Print Pin
    5 from 5 votes

    20 Min Healthy Pesto Pasta With Peas

    This delicious pesto pasta with peas is a simple and easy dish for busy times. You can prepare it using minimal ingredients in just 20 mins. Perfect for healthy lunch or dinner. 
    Course: Lunch / Dinner,Main or Side
    Cuisine: International,Italian Inspired
    Diet Gluten Free
    Prep Time 3 minutes minutes
    Cook Time 17 minutes minutes
    Total Time 20 minutes minutes
    Servings :4
    Calories :302kcal
    Author:Swati Kadam Gulati

    Would you like to save this recipe?

    Email yourself a link to this post and come back to it later!

    Equipment

    • Large Pan

    Ingredients

    • 3 cup raw pasta
    • 1 ½ cup green peas use fresh or frozen
    • ¼ cup basil pesto
    • 1 tomato seeded and diced
    • 2 garlic cloves finely chopped
    • 1 teaspoon back pepper
    • salt
    • ¼ cup pasta water
    • 1 teaspoon cooking oil

    Optional

    • 1 teaspoon red chili flakes
    • 2 tablespoon parmesan cheese (or more)

    Instructions

    • In a large pot, bring water to a boil. Add pasta and cook as per the package instructions. Drain the water and keep it aside. Reserve some pasta water to use it later.
    • Heat cooking oil in a large pan. Add chopped garlic and saute until fragrant.
    • Add green peas and stir-fry them for about 5-7 min or until a light roasted color starts to develop.
    • Then add diced tomato, black pepper, salt, and chili flakes, and cook for another 2-3 min.
    • Add back the cooked pasta, basil pesto, and saved pasta water; mix well to distribute the pesto evenly. Turn off the heat and serve warm.

    Notes

    1. Cooking pasta - Do not overcook the pasta while boiling it in water. Preferably, cook it to an al dente texture.
    2. Taste test and add some more pesto and seasonings, if necessary. 
    3. Save some water before draining the pasta after cooking. Adding a few tablespoons of this water while mixing pasta and pesto to help distribute the pesto evenly.
    4. Do not overcook the dish after mixing pasta and pesto. Turn off the heat just after mixing everything. Cooking basil pesto on high heat for longer times may lose its flavor and can also result in overcooked pasta.
    5. Optional - Add some parmesan cheese at the end for more deliciousness. You can skip using fresh tomatoes in this recipe. I usually add them to get some color in the dish. You can also use sundried tomatoes instead.

    Nutrition

    Calories: 302kcal | Carbohydrates: 44.3g | Protein: 12.3g | Fat: 23g | Saturated Fat: 2.6g | Cholesterol: 4mg | Fiber: 7.6g | Sugar: 3.9g | Calcium: 127mg | Iron: 4mg
    Tried this recipe?Tag us on Instagram @watchwhatueat or tag #watchwhatueat! OR leave us a comment & rating below. Your feedback is very important to us.

    6 Comments

    Chicken drumsticks in Instant Pot coated with lemon garlic sauce and garnished with fresh parsley.

    Make moist and flavorful Instant Pot chicken drumsticks for a protein-rich lunch/dinner. You can prepare this chicken meal in less than 30 mins. These chicken drumsticks are coated with a delicious finger-licking sauce that is so tempting.

    Chicken drumsticks in Instant Pot coated with lemon garlic sauce and garnished with fresh parsley.

    Instant pot never fails in cooking bone-in-chicken and results in a moist and tender texture. Therefore, I love chicken dishes prepared in it. I even make whole chicken with delicious gravy in my Instant Pot.

    Here I will share with you our favorite Instant Pot chicken legs recipe that I prepare using very few ingredients. Also, it takes far less time than cooking them on the stove or in the oven.

    [feast_advanced_jump_to]

    What is special about This Dish

    • You get super moist and tender, fall off the bone texture of the drumsticks
    • Quick and easy recipe with few and simple ingredients that will be ready in under 30 mins.
    • Full of flavors
    • Perfect for serving in gatherings.

    Ingredients

    Raw chicken drumsticks, garlic, lemon, oil, salt pepper laid on a flat surface for making Instant Pot chicken drumsticks.
    • Chicken drumsticks - I always prefer buying organic meat products. To get a nice roasted brown color on them, I do not remove the skin.
    • Lemon juice - this adds a slight tanginess to the dish.
    • Garlic - use freshly chopped garlic for amazing flavors. I feel processed garlic lacks flavor.
    • Salt and pepper - generously season the drumsticks with salt and pepper to make them flavorful.

    Recipe Substitutions/variations

    You can prepare these chicken drumsticks in Instant Pot with some variations or substitutions without compromising on the taste.

    • Skinless chicken - to cut down the fat content, remove the skin from the chicken legs before adding them to the Instant Pot.
    • Spicy - Add some slices of green jalapeno or paprika to add a little heat to the dish.
    • Herbs - add some chicken rub blend with your favorite spices for added flavors.
    • Chicken thighs - you can use bone-in-chicken thighs instead of chicken legs.

    How to make Instant Pot chicken drumsticks?

    This is a two-step process. Roasting chicken drumsticks on saute mode and then pressure cooking them.

    Step 1 - Roasting chicken legs in Instant Pot

    Clean and pat dry chicken drumsticks with a paper towel. Rub them evenly with salt and pepper.

    Turn on Instant Pot in high saute mode. Let it preheat fully, and then place chicken drumsticks in a single layer and roast them for a few min on both sides to get brown color. You may need to roast them in batches if necessary.

    Chicken drumsticks rubbed with salt and pepper in a mixing bowl.
    Preheating Instant Pot.
    Roasting chicken drumstick in Instant Pot.
    Roasting chicken drumstick in Instant Pot.

    Step 2 - Pressure cooking

    Once the roasting is done, take the drumsticks out and keep them aside. Add some water and deglaze the pot by scraping to avoid burnt sign trigger. Add chopped garlic, lemon juice, and roasted drumsticks and gently mix them. Adjust the drumstick to form even layers or stacks.

    Cover, turn off the Instant Pot, and then turn it back on to the manual pressure mode. Cook the drumsticks on manual high pressure for 10 mins. Let the steam release naturally for 5 min, and then open the vent to release the remaining steam.

    Roasted chicken drumsticks in a large shallow bowl before pressure cooking.
    Deglazing the base of Instant Pot.
    Chicken drumsticks layered in Instant Pot for pressure cooking.
    Setting cooking time for Instant Pot chicken legs on manual high pressure.

    Step 3 - Thickening the sauce and giving final touch

    Using tongs, carefully take out the cooked chicken drumsticks in a serving bowl or dish. Then turn on saute mode and let excess water evaporate from the drippings until you get a sauce-like consistency. Pour the sauce on chicken wings evenly to coat them. Garnish with fresh herbs and lemon slices, and serve.

    Chicken drumsticks in Instant Pot after pressure cooking.
    Making sauce from drippings after cooking chicken drumsticks in Instant Pot.
    Sauce made from drippings after cooking chicken drumsticks in Instant Pot.
    Chicken drumsticks with lemon garlic sauce in a serving dish.

    Cooking frozen chicken legs in Instant Pot

    You can cook frozen chicken drumsticks in Instant Pot. There is no need to thaw them before cooking. However, you will need to skip the roasting step before pressure cooking. And, add 5 min extra time in high-pressure cooking.

    For example, for fresh chicken drumsticks, it will take 10 mins. at high pressure; however, cook them for 15 mins. on high pressure, if using frozen.

    How many drumsticks can I put in Instant Pot?

    You can cook as many drumsticks in the Instant Pot that can fit below the maximum mark. So far, I've cooked 5-15 drumsticks in my 6 qt Instant Pot. There is no change in the pressure cooking time. Regardless of the quantity, pressure and cooking times are similar.

    However, you may need to roast the chicken in several batches before pressure cooking, which will take some more time, depending on how many pieces you have.

    Instant Pot chicken legs with lemon garlic sauce and garnished with fresh parsley.

    Serving suggestions

    You can serve these garlic lime chicken drumsticks with many dishes.

    • Garnish with fresh herbs like cilantro or parsley and serve them as appetizer or starter
    • For a wholesome meal, pair them with creamy pumpkin risotto or butternut squash quinoa risotto.
    • Prepare a salad such as avocado cucumber salad, sweet potato wild rice salad or veggie pasta salad to go with them.
    • Or, make this healthy kale pasta or Mediterranean pasta with artichokes and olives to pair with delicious chicken legs.

    Helpful tips

    • Chicken drumsticks - Use organic chicken drumstick whenever possbile. You can remove the skin if you prefer and want to cut down on fat content.
    • Roasting in Instant Pot - Let the pot heat fully and wait until it shows the Hot sign before adding the chicken legs. This will help to roast them nicely.
    • Cooking time - High-pressure cook time will remain the same whether you cook 5 or 15 drumsticks at a time. However, the total roasting time will increase as you will have to roast them in several batches depending on the quantity.

    FAQs

    How to store leftovers?

    Let the drumsticks cool down completely, and then store them in an air-tight container in the refrigerator for about two days. Use an air-tight container to avoid drying them.

    How to reheat leftovers?

    Drizzle some water and heat the drumsticks coated with sauce in a small frying pan over low heat. Make sure to cover the pan and heat them until steamy hot.
    Or microwave for 1 minute, gently stir, and heat them for another 30 seconds.

    Can you overcook chicken legs in an Instant Pot?

    Surprisingly, chicken drumsticks do not become rubbery or chewy if you overcook them in Instant Pot for a long time, unlike cooking them on a stovetop or oven. Instead, they become super soft, and the meat can completely fall off the bone with the fibers separating out. Therefore, they need to be cooked optimally to get the best texture.

    Instant Pot chicken drumsticks with lemon garlic sauce and garnished with fresh parsley.

    More chicken recipes you will love

    • chicken parmesan in the air fryer
      Air Fryer Chicken Parmesan
    • Butter chicken meatballs in a serving dish with naan bread, plain rice, lime wedge and green chili on the side.
      Indian Healthy Butter Chicken Meatballs
    • Healthy lemon chicken soup with orzo in a serving bowl with some croutons on the side.
      Healthy Lemon Chicken Soup With Orzo
    • Healthy Mexican Chicken Rice made in one pot with tons of flavors and deliciousness. A perfect easy dish for busy weeknight dinner. Full of colors with nutritious veggies you will want to make this Mexican rice again and again. #onepot #Mexican #chicken #rice #healthyrecipes #watchwhatueat
      One-Pot Mexican Chicken Rice

    More recipes to try in Instant Pot

    • Healthy Instant Pot Cauliflower - cook whole cauliflower head in the pressure cooker and serve with delicious creamy gravy to make it more flavorful. Perfect vegetarian and vegan recipe for the holiday dinner or weeknight healthy meal. | #watchwhatueat #veganthanksgiving #vegan #cauliflower
      Healthy Instant Pot Cauliflower With Gravy
    • Authentic Indian chicken biryani prepared in an Instant Pot.
      Instant Pot Chicken biryani
    • Instant Pot spinach brown rice after cooking
      Instant Pot Spinach Brown Rice
    • Follow this easy and healthy recipe for making quick Instant pot black bean soup with dried beans. No soaking required. Full of flavors, vegan and gluten-free soup for lunch or dinner. #instantpot #pressurecooker #blackbeans #soup #vegan #glutenfree
      Easy and Healthy Instant Pot Black Bean Soup

    Love this recipe? Please leave a 5-star ⭐⭐⭐⭐⭐ rating in the recipe card below & a review in the comments if you REALLY like this recipe. Thank You!

    📖 Recipe

    Chicken drumsticks in Instant Pot coated with lemon garlic sauce and garnished with fresh parsley.
    Print Pin
    5 from 7 votes

    Easy Instant Pot Chicken Drumsticks

    Make these easy juicy and flavorful Instant Pot chicken drumsticks for healthy and a protein-rich lunch/dinner. You can prepare them in under 30 mins. with simple ingredients. Also, prepare finger-licking sauce from the drippings, which make them so tempting.
    Course: Lunch / Dinner
    Cuisine: International
    Diet Gluten Free,Low Fat
    Prep Time 5 minutes minutes
    Cook Time 25 minutes minutes
    Total Time 30 minutes minutes
    Servings :5
    Calories :182kcal
    Author:Swati Kadam Gulati

    Would you like to save this recipe?

    Email yourself a link to this post and come back to it later!

    Equipment

    • Instant Pot

    Ingredients

    • 10 chicken drumsticks
    • 1 tablespoon cooking oil
    • 2-3 garlic cloves chopped
    • 1 tablespoon lemon juice from ½ fresh lemon
    • 2 tablespoon water
    • Salt and pepper
    • 2 tablespoon fresh cilantro or parsley

    Instructions

    Roasting chicken drumsticks

    • Turn on high saute mode and let the Instant Pot preheat till it shows the HOT sign.
    • Meanwhile, clean and pat dry chicken drumsticks to remove excess moisture as much as possible. Rub salt and pepper generously to coat them evenly.
    • Add oil and place chicken drumsticks in a single layer. Roast them for 3-5 min and turn and roast on the other side for 3 more mins.

    Pressure cooking

    • Turn off the Instant Pot, add 2 tablespoon of water and deglaze the pot by scraping the button using a spatula or the tip of the tongs.
    • Add finely chopped garlic, lemon juice, and chicken drumsticks, mix and adjust them evenly into layers.
    • Turn back on Instant Pot on manual high pressure. Cover and cook the drumsticks for 10 mins. on normal high pressure.
    • Then allow the steam to release naturally for 5 mins. and release the remaining steam manually by turning the valve to the vent position.

    Preparing sauce

    • Carefully take out chicken drumsticks in a large serving bowl. Evaporate excess water from the drippings in the pot on high saute mode until it gets to a sauce-like consistency.
    • Pour the sauce over cooked drumsticks.
    • Garnish with herbs and serve warm.

    Notes

    1. Preheating Instant Pot to HOT helps to roast the first batch of chicken drumsticks nicely. Otherwise, it will take a longer time to roast them.
    2. I always roast 5-6 drumsticks at a time in my 6 qt Instant Pot. Therefore, for 10 drumsticks, I do this step in two batches.
    3. Pat drying chicken drumsticks is important to remove excess water from the skin. This will help to get the roasted brownish color on the skin in less time.
    4. Quantity - I have pressure cooked a batch of a minimum of 5 and a maximum of 15 drumsticks this way in my Instant Pot. Adjust the seasonings accordingly, depending on the quantity.
    5. Sauce - It will take 5-8 mins. or more to thicken the sauce on saute mode after pressure cooking. Again, it will depend on the number of drumsticks being cooked. Also, pour the sauce over the cooked drumsticks evenly and gently mix them to coat the sauce evenly. Make sure not to overmix. The Instant Pot drumsticks are super moist and tender, and the meat can easily break or fall off the bones.

    Nutrition

    Calories: 182kcal | Carbohydrates: 0.5g | Protein: 25.4g | Fat: 8g | Saturated Fat: 1.8g | Potassium: 194mg | Fiber: 0.1g | Sugar: 0.1g | Calcium: 13mg | Iron: 1mg
    Tried this recipe?Tag us on Instagram @watchwhatueat or tag #watchwhatueat! OR leave us a comment & rating below. Your feedback is very important to us.

    1 Comment

    Sweet potato wild rice salad in a serving bowl with serving fork.

    This hearty and healthy roasted sweet potato wild rice salad is packed with superfoods and nutrients. Perfect for wholesome lunch or dinner.

    Sweet potato wild rice salad in a serving bowl with serving fork.
    Sweet potato wild rice salad

    Do you often cook with sweet potatoes?

    Honestly, I am not a big fan of sweet potatoes; however, I try to include them in our diet, given their health benefits. Therefore, I cook them in a way to enjoy my favorite flavors, such as this sweet potato chili, sweet potato gnocchi, etc.

    And here I am sharing one more of our favorite dishes that feature roasted sweet potatoes with wild rice and kale salad. You can also include this as a side in the Thanksgiving or holiday party menu.

    [feast_advanced_jump_to]

    Ingredients needed

    • Wild rice blend - I use a blend of wild rice.
    • Sweet potato - peel and dice sweet potatoes into small pieces.
    • Kale - clean and chop it into small pieces.
    • Pecans - crush or chop them.
    • Green apple - preferably use organic green apple. Dice into small pieces.
    • Arugula - use fresh organic baby arugula leaves as a salad base.
    • Dressing - use a blend of extra virgin olive oil, lemon juice, salt, and freshly chopped parsley to prepare the dressing.
    Ingredients for wild rice salad with sweet potato and kale.
    Ingredients for wild rice salad with sweet potato and kale

    How to make healthy wild rice salad?

    Cooking wild rice - cook rice as per instructions given on the package. I either use an Instant pot or cook it on the stovetop. Cooking wild rice on a stovetop takes about 40-45 min while you can cook it in 20 min in an Instant pot on high pressure. Allow it cool before adding it to the salad.

    Preparing veggies - In a large frying pan, roast diced sweet potatoes for a few mins. Add chopped kale and cook it until it wilts down. Let the mixture cool.

    Sweet potato and kale roasted in a cast iron pan.
    Roasted sweet potato and kale

    Preparing salad dressing - In a small mason jar or bowl combine extra virgin olive oil, lemon juice, fresh parsley, and salt. Mix everything well.

    Making the final salad - Add fresh arugula in a large salad mixing bowl. Then add cooked rice, roasted sweet potato, and kale. Also, add diced green apple, crushed pecans, and the dressing. Using salad spoons or tongs, mix everything gently.

    wild rice salad with sweet potato, kale and arugula in a serving bowl with serving fork.

    Serving suggestions!

    • A bowl of this salad is sufficient for a light lunch or dinner.
    • Pair this salad with cilantro lime chicken to make it more filling and protein-rich.
    • You can also prepare soups like healthy broccoli soup, lentil soup, or roasted tomato soup to serve on the side of wild rice salad.
    • This salad recipe is also perfect for including in your healthy holiday party menu along with roasted chicken with gravy, sauteed brussel sprouts, cranberry mimosa, almond chocolate truffles, etc.

    Helpful tips!

    • You can cook the wild rice blend in an Instant pot to save some time on cooking. If you do not have an Instant pot, then cook it on the stovetop.
    • Dice sweet potato into even pieces as much as possible that will help them roast or cook evenly.
    • Allow cooked wild rice and sweet potato mixture to cool down completely before preparing the final salad. Otherwise, the salad greens will become mushy.
    Sweet potato wild rice salad in a serving bowl with serving fork.
    Sweet potato wild rice salad

    Recipe variations!

    • Greens - you can skip the arugula and use your choice of greens for the salad base. Or, skip using the salad greens and make a salad without it using other ingredients.
    • Non-vegetarian - add sliced chicken sausage while roasting the sweet potato to make the salad protein-rich and filling.
    • Rice - use brown rice instead of wild rice blend to make it into sweet potato brown rice salad.
    • Add dried cranberries to the salad for the pop of color and to make it elegant and perfect for the Thanksgiving dinner table.

    FAQs

    How to store leftover salad?

    Store leftover salad in an air-tight container in the refrigerator. However, fresh greens in the salad will become soggy the next day.

    Preferably make the salad enough to serve on the same day to enjoy while it is fresh. Or, you can save extra cooked wild rice and roasted sweet potato-kale mixture separately to prepare the fresh salad the next day.

    More healthy salad recipes

    • Italian Lentil Salad
    • Healthy Avocado Cucumber Salad
    • Mexican Chicken Avocado Salad
    • Vietnamese Summer Rolls Salad Bowl
    • All Salad Recipes
    Sweet potato wild rice salad in a serving bowl with serving fork.

    Love this recipe? Please leave a 5-star ⭐⭐⭐⭐⭐ rating in the recipe card below & a review in the comments if you REALLY like this recipe. Thank You!

    📖 Recipe

    Sweet potato wild rice salad in a serving bowl with serving fork.
    Print Pin
    5 from 1 vote

    Easy Roasted Sweet Potato Wild Rice Salad

    Mix perfectly-cooked wild rice blend with pan-roasted sweet potato-kale mixture and fresh greens to prepare this nutritious salad. Flavor the salad with delicious olive oil dressing.
    Course: Lunch / Dinner
    Cuisine: American Inspired
    Prep Time 15 minutes minutes
    Cook Time 45 minutes minutes
    Total Time 1 hour hour
    Servings :6
    Calories :224kcal
    Author:Swati Kadam Gulati

    Would you like to save this recipe?

    Email yourself a link to this post and come back to it later!

    Equipment

    • Cast Iron Skillet

    Ingredients

    • 2 cup wild rice blend + 3.5 cups water
    • 1-2 sweet potatoes peeled and diced
    • 4 large kale leaves chopped
    • ½ teaspoon smoked paprika
    • 2 tablespoon water
    • 1 teaspoon cooking oil
    • 2-3 oz Arugula
    • ¼ cup pecans chopped
    • 1 green apple sliced

    Dressing

    • 2 tablespoon lemon juice
    • 2.5 tablespoon olive oil
    • 2 small garlic cloves minced
    • 1 tablespoon fresh parsley chopped
    • salt

    Instructions

    • Cook rice as per the instructions given on the package. Or see the note below for options to cook the rice. Let the rice cool down completely.
    • Meanwhile, heat some cooking oil in a medium skillet and add diced sweet potatoes, little water, smoked paprika, and toast them for 5-6 min.
    • Add chopped fresh kale and cook the mixture for 1-2 min or until the kale wilts down. Turn off the heat and let the mixture cool down.
    • In a small bowl or a small mason jar combine lemon juice, olive oil, minced garlic, and fresh parsley. Mix well and keep it aside.
    • In a large salad bowl add arugula, cooked rice, toasted sweet potatoes, and kale. Also, add diced green apple, chopped pecans, and the prepared olive oil dressing; gently mix everything to combine.

    Notes

    1. Cooking rice in the open pan - In a medium pot add rice and water, bring mixture to boil, and cook it on low heat for 40-45 mins with the lid on or until the rice is tender.
    2. Cooking rice in an Instant pot - Add rice and water to the Instant Pot and cook it for 20 min on manual high pressure. Release the pressure manually and let the rice cool down before adding it to the salad.
    3. Use a large salad bowl and salad hands for easily mixing the salad ingredients. Add dried cranberries to give this salad fall holiday vibes.

    Nutrition

    Calories: 224kcal | Carbohydrates: 34.2g | Protein: 3.6g | Fat: 9g | Saturated Fat: 1.2g | Potassium: 632mg | Fiber: 4.9g | Sugar: 5g | Calcium: 66mg | Iron: 1mg
    Tried this recipe?Tag us on Instagram @watchwhatueat or tag #watchwhatueat! OR leave us a comment & rating below. Your feedback is very important to us.

    5 Comments

    Pumpkin flatbreads stacked in a serving dish are ready to serve.

    Make these garlic herb garlic-herb pumpkin flatbread to enjoy the fall and pumpkin season. These are perfect for pairing with curries and soups or making wraps.

    Pumpkin flatbreads in a serving dish are read to serve.

    If you have made pita bread or naan bread before, then making these pumpkin flatbreads will be almost similar. And even if you don't have experience, this is not rocket science; you can still make them easily.

    Next time instead of buying flatbreads from the store, try this healthy pumpkin flatbread recipe to make them at home. I am sure you will enjoy them fresh. And the beautiful golden yellow color from pumpkin puree automatically adds fall vibes to the flatbreads. You can also make them for fall gatherings or festive parties.

    Let's get started.

    Ingredients Needed!

    • Flour - these flatbreads are prepared using whole wheat flour.
    • Pumpkin puree - use either freshly made or canned pumpkin puree.
    • Warm water - use warm water that helps to activate the yeast faster.
    • Garlic and herb - use fresh, finely chopped rosemary and minced garlic to flavor the flatbreads.
    • Yeast - helps to make the flatbread soft and supple. Also, I find the dough is very easy to roll after proofing. And prefer using Instant yeast (or Rapidrise yeast) for quicker results.
    ingredients for making whole wheat and pumpkin flatbread

    The best flour to make healthy flatbreads

    Usually, flatbreads are prepared using all-purpose flour. However, to make them healthy, I used whole wheat flour. And I always use the Indian version (aka atta) as it is superfine in texture compared to the whole wheat flour available in local grocery stores. You can easily find them in Indian grocery stores or some local grocery stores that carry Indian flours. If you don't find the Indian flour brands, use a 50-50 ratio of all-purpose and regular whole wheat flour in this recipe. This combination will also give a soft texture to the flatbreads.

    How to make flatbread dough?

    Hand-kneading the dough - Combine flour, minced garlic, finely chopped herbs, yeast, and salt in a large mixing bowl. Mix the dry flour with these added ingredients. Then add pumpkin puree and warm water. Using a wooden spatula, mix the flour and water until the dry flour becomes crumbly. Then using hands, knead the mixture for 6-8 minutes or until it forms into a soft, supple dough. You can also rub some oil on your hands to avoid sticking the dough to the hands. Cover the dough and let it rise for 15-20 min.

    The collage image of the whole wheat pumpkin flatbread dough-making process.

    Machine-kneading the dough - Add flour, garlic, herbs, yeast, salt, and pumpkin puree in a mixing bowl. Attach the dough hook to the stand mixer. Gradually add warm water and knead the dough on low to medium settings (I have a KitchenAid stand mixer, and I always knead all kinds of dough on its NO-2 setting). Knead the dough for 5-6 min. Finally, drizzle some oil and knead for a few more seconds. Remove the mixing bowl from the machine, cover it, and let the dough rise for 15-20 min.

    How to make pumpkin flatbread?

    Once the dough has risen, you can start making flatbreads. Deflate and divide the dough into small equal portions. Give each portion a round shape and roll it to make a roughly ¼" thick round flatbread. Meanwhile, heat the cast iron pan on medium to high heat. Cook the prepared flatbread on a preheated pan on both sides until well done. Take out the cooked flatbread from the pan and then lightly brush it with olive oil on both sides. Finally, store them in a tortilla keeper lined with a kitchen paper towel.

    The collage image show flatbread dough divided into small portions and rolled flatbread.

    Serving Suggestions!

    • Serve these warm flatbreads with some dippings like this creamy avocado sauce, roasted red pepper hummus, tahini sauce, etc., for appetizers.
    • You can use pumpkin flatbread to prepare wraps, like these vegan chickpea wraps.
    • Make these flatbreads to pair with Indian curries like red lentil curry, coconut chickpea curry, chicken butter masala, etc.

    Helpful Tips!

    • Preferably use Rapidrise yeast so that the dough is ready in less than 1 hr to prepare the flatbreads. Regular yeast needs to be activated first with warm water and some sugar before adding it to the flour. It will also take a bit longer for the dough to rise.
    • Use warm water for kneading the dough so that it will rise faster. Warm water helps the yeast to activate.
    • Use finely chopped herbs and finely minced garlic in making the flatbread dough. It will help to distribute the flavor evenly. And also, while rolling they won't come in your way.
    Pumpkin flatbreads stacked in a serving dish are read to serve.

    Recipe Variations!

    • Make these flatbreads using all-purpose flour. However, you may need to use less water than mentioned in the recipe, as the whole wheat version absorbs more water.
    • Feel free to use herbs of your choice in making these flatbreads. Fresh parsley or cilantro, or oregano will also work in the recipe.
    • If you are not a garlic fan, then you can skip it completely.
    • You can also make these flatbreads using sweet potato puree instead of pumpkin puree.

    FAQs

    How to store and reuse the leftover flatbread dough?

    Store the leftover dough in an airtight storage container. Make sure the container is big enough and has space for the dough to rise while it is covered. Store it in the refrigerator for a couple of days. Before using the dough again, please bring it to room temperature naturally and then make the flatbreads.

    How to store the leftover garlic herb pumpkin flatbread?

    Place leftover pumpkin flatbreads in an air-tight container and store them in the refrigerator. Before serving, warm them in a hot pan or microwave for 30-45 seconds.

    Personally, I prefer storing leftover dough and then making fresh flatbreads the next day. This way we get fresh soft flatbreads to eat.

    Pumpkin flatbreads in a serving dish are read to serve.

    You will also love these whole wheat bread

    • Whole Wheat Focaccia Bread
    • Homemade Whole Wheat Pita Bread
    • Zucchini Flatbread
    • Garlic Naan Bread Recipe
    • All Whole Wheat Recipes

    📖 Recipe

    Pumpkin flatbreads stacked in a serving dish are read to serve.
    Print Pin
    5 from 5 votes

    Whole Wheat Pumpkin Flatbread

    Make these golden whole wheat pumpkin flatbreads at home with an easy and simple recipe to enjoy the fall and festive season. Flavored with garlic and fresh rosemary these are perfect for pairing with curries and soups or for making
    Course: Bread,Lunch / Dinner
    Cuisine: Indian Inspired,Italian Inspired
    Prep Time 15 minutes minutes
    Cook Time 25 minutes minutes
    Dough Resting Time 15 minutes minutes
    Total Time 55 minutes minutes
    Servings :12 flatbreads
    Calories :134kcal
    Author:Swati Kadam Gulati

    Would you like to save this recipe?

    Email yourself a link to this post and come back to it later!

    Equipment

    • Kitchenaid Stand Mixer
    • Cast Iron Griddle

    Ingredients

    • 3 cup whole wheat flour
    • 11/2 cup pumpkin puree
    • ⅓ cup warm water
    • 1 teaspoon instant yeast
    • 2-3 springs of fresh rosemary finely chopped
    • ½ teaspoon sugar
    • 3-4 garlic cloves minced
    • salt (add according to your taste)
    • 1 tablespoon extra virgin olive oil or more

    Instructions

    • In a large mixing bowl combine flour with sugar, yeast, salt, finely chopped rosemary, and minced garlic. Mix well.
    • Then make room at the center of the flour mixture, add the pumpkin puree and warm water in it. Using a spatula start mixing the flour slowly until all the dry flour absorbs the moisture and becomes a crumbly mixture.
    • Then using your hands knead the mixture to form a soft dough. You can also use little oil to avoid it sticking to the bowl. Finally cover the dough and let it rest for 10-15 mins.
    • Divide the dough into 12 equal parts and make them into small rounds.
    • Sprinkle some dry flour on a flat surface and roll the dough ball to form 6-7” round flatbreads.
    • In a preheated pan cook the rolled flatbread on both sides until well done. It will take 1-2 min to cook on each side. Repeat these steps with the remaining dough to make more flatbreads.
    • Lightly brush the olive oil on cooked flatbreads and serve warm.

    Notes

    1. Kneading the dough using a stand mixer - add all the ingredients mentioned, except oil and water, in a mixing bowl. Attach a dough kneading hook and run the mixer on its number 2 settings. Gradually add water, let the machine run, and knead the dough for about 3-4 mins. Add a little oil and knead it for a few more seconds. Remove the mixing bowl and the kneading hook. Cover the dough and let it sit for 10-15 mins before rolling the flatbreads.
    2. Cast iron pan - use it for cooking the flatbreads. Even heat from a cast iron pan helps to cook the flatbreads evenly and make them soft in texture.
    3. Storing flatbreads - store prepared flatbreads in an insulated tortilla keeper to keep them warm until serving. Prepare pumpkin wraps - to prepare wraps, roll the dough as thin as possible without breaking. This will help to easily wrap around the filling.

    Nutrition

    Calories: 134kcal | Carbohydrates: 26.3g | Protein: 4.6g | Fat: 1.8g | Saturated Fat: 0.2g | Potassium: 75mg | Fiber: 5.1g | Sugar: 3g | Calcium: 11mg | Iron: 2mg
    Tried this recipe?Tag us on Instagram @watchwhatueat or tag #watchwhatueat! OR leave us a comment & rating below. Your feedback is very important to us.

    1 Comment

    Prepared Italian lentil salad in a serving dish with a serving spoon.

    In less than 30 min, you can prepare this healthy Italian lentil salad for a protein-rich lunch or dinner. A quick recipe that you can try any time when you need a protein boost.

    Prepared whole lentil salad in a serving dish with a serving spoon.
    Healthy Lentil Salad

    Ingredients you will need

    • Raw lentils - I use raw whole brown lentils for making this salad
    • Liquid for cooking - preferably use chicken stock or vegetable stock for more flavors
    • Seasonings - use Italian herb mix, salt, and pepper
    • cucumber - dice it into small pieces. Use organic cucumber whenever possible.
    • Roma tomato - remove pulp and then dice into small pieces
    • Fresh herbs - chopped fresh basil and parsley for added flavor
    • Dressing - make a mixture of extra virgin olive oil and lemon juice
    Raw lentils in a metal container with fresh parsley and tomato on the side.
    Ingredients gathered for making lentil salad that includes raw lentils, fresh parsley, tomato, oil, lime, cucumber, and seasonings.

    How to cook lentils for making lentil salad?

    In a large saucepan, add lentils and double the amount of liquid. Bring this mixture to a boil, and then add Italian herb mix, salt, and pepper. Mix well, cover the pan and cook the mixture on low heat for 15-18 min. Turn off the heat and let the lentils cool down completely before making the salad. You can use water or chicken, or vegetable stock for cooking the lentils.

    Cooked lentils in a pot with a serving spoon

    How to make an Italian lentil salad?

    In a large salad bowl, add the cooked lentils. Then add diced tomato, cucumber, and freshly chopped herbs. In the end, add the mixture of extra virgin olive oil and lemon juice. Gently mix everything well. Your lentil salad is ready to serve!

    Serving Suggestions

    • A big bowl of this salad is sufficient for a protein-filled meal.
    • Prepare this lentil salad to pair with simple pesto pasta with kale or quinoa risotto or zucchini flatbread for a complete wholesome meal.
    Healthy Italian lentil salad in a serving dish ready to serve.

    Helpful Tips!

    • Use whole lentils for making this lentil salad. Also, do not overcook the lentils; otherwise, they will become mushy. The mushy lentils won't be suitable for the salad.
    • Preferably use chicken stock or vegetable stock instead of water to cook the lentils. They will enhance the flavor of the lentils and make them more delicious.

    Recipe variations

    • For meat lovers - add cooked chicken or leftover roasted chicken into the salad for making it more filling.
    • You can also add small cubes of feta cheese into the salad for added deliciousness.
    • Skip adding cucumber and tomato in this lentil salad recipe and serve it as a humble lentil dish.

    FAQs

    How to store leftover lentil salad?

    Store leftover lentils in an air-tight container in the refrigerator for 1-2 days. We always avoid storing leftovers for more than a day, even though they will last longer.

    How to use leftover lentil salad?

    Remove leftovers from the refrigerator well in advance before eating. This way, the salad will come to room temperature. Avoid heating the salad as it has cucumber and tomato that can become soggy upon heating. You can also serve it cold if you prefer that way.

    Healthy Italian lentil salad in a serving dish ready to serve.

    More lentil recipes you will love to try

    • Sweet Potato Lentil Chili
    • Instant Pot Vegetarian Lentil Soup
    • Indian-Styled Red Lentil Curry
    • Healthy Brown Rice & Lentil Salad

    📖 Recipe

    Healthy Italian lentil salad in a serving dish ready to serve.
    Print Pin
    5 from 2 votes

    Healthy Italian Lentils Salad

    Prepare this healthy Italian lentil salad for a protein-rich lunch or dinner in under 30 mins. A quick and easy recipe to try any time when you need a protein boost.
    Course: Lunch / Dinner,Salad
    Cuisine: Italian Inspired
    Prep Time 10 minutes minutes
    Cook Time 15 minutes minutes
    Total Time 25 minutes minutes
    Servings :4
    Calories :233kcal
    Author:Swati Kadam Gulati

    Would you like to save this recipe?

    Email yourself a link to this post and come back to it later!

    Ingredients

    • 1 cup raw lentils rinse and drain the water
    • 2 cup chicken stock or vegetable stock or water
    • ½ teaspoon Italian spice blend
    • 2 small cucumbers diced into small pieces
    • 1 Roma tomato pulp removed and diced into small pieces
    • 2 tablespoon parsley chopped
    • salt and pepper
    • 1 tablespoon extra virgin olive oil
    • 1 tablespoon lemon or lime juice

    Instructions

    • In a medium pot add lentils, stock or water, Italian spice blend, salt and pepper. Mix well and bring the mixture to a boil. Cover the pot and cook the lentils for 15-18 mins or until well done on low heat. Turn off the heat and let the lentil cool down completely.
    • In a large mixing bowl or salad bowl add cooked lentils, diced cucumber, tomato, and freshly chopped herbs. Prepare a mixture of olive oil and lemon juice to drizzle on the salad, mix gently to combine well.
    • Garnish with more fresh herbs, lime wedges, and serve while it is fresh.

    Notes

    1. You can cook the lentils in advance and make the salad just before serving.
    2. To make lentils more flavorful add garlic powder or freshly chopped garlic while cooking them.

    Nutrition

    Calories: 233kcal | Carbohydrates: 35.3g | Protein: 14.5g | Fat: 4.5g | Saturated Fat: 0.6g | Fiber: 16.4g | Sugar: 4.9g | Iron: 5mg
    Tried this recipe?Tag us on Instagram @watchwhatueat or tag #watchwhatueat! OR leave us a comment & rating below. Your feedback is very important to us.

    5 Comments

    Authentic Indian chicken biryani prepared in an Instant Pot.

    Make flavorful and healthy Instant Pot chicken biryani at home using this simple and easy-to-follow recipe. A perfect rice dish for people who are busy and want to enjoy authentic Indian chicken biryani at home.

    Indian chicken biryani in a serving dish. Garnished with fresh green chili and a lemon slice.

    If you love eating biryani and cook it at home, this Instant Pot chicken biryani is the perfect dish you can try easily. It has all the authentic Indian flavors. Moreover, this recipe is not complicated, and beginner cooks can also make it at home without much effort.

    Do not have an Instant Pot? No worries, I also have recipes for easy chicken biryani and vegetable biryani that you can make in one pot on a regular stovetop.

    What is Biryani?

    Biryani is an aromatic and flavorful rice dish prepared using exotic Indian spices, fresh herbs, meat, and long grain basmati rice.

    Traditionally biryani is an involved recipe. It's a two-step process, 1. prepare the chicken marinade and cook it partially 2. cook the rice partially with whole spices. Finally, in a large pot, layer these partially cooked chicken and rice; seal the pot and cook it on low heat to develop the flavors.

    This is the best and perfect way to get the most of the flavors in the biryani. However, for novice cooks as well busy people making this dish at home is overwhelming. Moreover, it is essential to cook the rice and chicken at each stage so perfectly that the end dish does not end up raw or overcooked.

    Therefore, Instant Pot Biryani is much more simplified, yet it has all the flavors as in the classic recipe. So, this quick and easy biryani recipe is for those who do not have enough time to make it the classic way, yet they want to enjoy all its flavors whenever you crave biryani.

    Authentic Indian chicken biryani prepared in an Instant Pot.

    What you will need

    • Rice - use long grain aromatic basmati rice.
    • Chicken - boneless skinless chicken thighs that cut into bite-size pieces.
    • Yogurt - for making marination base
    • Garlic and ginger - use finely chopped ginger and garlic and make it into a paste.
    • Onions - cut into half and then slice them. You can also use deep-fried or air-fried onions. Caramelized onions are one of the key ingredients that give a unique flavor to the biryani.
    • Fresh herbs - use a generous amount of fresh mint and cilantro into the marinade and then garnish the dish.
    • Spices - use biryani masala, chili powder to marinate the chicken, and whole spices like black cumin seeds (aka shah jeera), cloves, cinnamon stick, black pepper, green cardamom to flavor the rice.
    • Oil/Ghee - I prefer using ghee (clarified butter).
    Basmati rice soaked in water with whole spices.
    chicken pieces marinated with Indian spices in a large mixing bowl

    How to make Instant Pot Chicken Biryani?

    Preparing rice

    Soak the rice in warm water for at least 15 min. Also, add whole spices like green cardamom, clove, and cinnamon stick to the mixture. These spices will infuse and add flavor to the rice.

    Preparing chicken marinade

    Firstly, cut the chicken into bite-size pieces. Then, in a small mixing bowl, combine yogurt with ginger, garlic, biryani masala, fresh herbs, chili powder, and salt. Finally, in a large mixing bowl, mix this marinade with the chicken.

    Cooking chicken biryani in Instant Pot

    On high sauté mode, cook sliced onion in some ghee until it turns dark golden brown or develops caramelized flavors. Add marinated chicken and cook for about 10 min. Now add soaked rice along with the water and whole spices. Spread it gently and evenly. There is no need to mix it completely with the chicken. Add a few strands of saffron (optional), more fresh herbs, and chopped tomato. Cover the pot and cook the mixture on manual LOW-PRESSURE mode for 5 min. Then release the pressure manually and keep the biryani covered for 20 min to develop the flavors. Serve warm.

    Authentic Indian chicken biryani prepared in an Instant Pot.

    Helpful Tips!

    • Chicken - Use organic and pasture-raised chicken whenever possible. For this recipe, I prefer to use boneless skinless chicken thighs that I cut into bite-size pieces.
    • Soaking rice - Soaking the rice in water with spices helps to infuse its flavors and make it more flavorful.
    • Onion - You can also use air-fried onion and skip the step of cooking or caramelizing onion.
    • Pressure release - Once the cooking timer is off, immediately release the pressure manually. Do not open the lid and let the biryani sit in IP for 20-25 mins. It will help the dish to develop the flavors without overcooking.

    What to serve with chicken biryani?

    • Usually, chicken biryani is served with raita, which is prepared using yogurt, roasted ground cumin, and some water.
    • For the Indian banquet, you can prepare this chicken biryani along with naan bread and curries like chickpea tikka masala or palak paneer. You can also include mango lemonade or homemade mango lassi to complement the menu. 

    Recipe variations

    • If you want to make biryani without any meat, try this similar recipe for Instant Pot veg biryani. A perfect option for a vegetarian/vegan diet.
    Authentic chicken biryani in a serving dish. Garnished with fresh green chili and a lemon slice.

    FAQs

    Is it necessary to soak the rice?

    The answer is Yes.

    Soaked rice cooks evenly and gives a nice appearance to the final dish. Also, Instant Pot takes very little time to cook the rice, which is not sufficient to absorb the flavors from the spices. Therefore soaking rice in water and some whole spices allows the rice to infuse the flavors.

    Which rice is best for biryani?

    Long grain aromatic basmati rice is the preferred choice for making biryani. Upon cooking, aromatic long grain rice gives a beautiful look and flavor to the biryani.

    How to use leftover chicken biryani?

    Sprinkle some water over the leftover biryani, cover, and microwave for 2-3 min a microwave-safe bowl.

    MORE RECIPES TO TRY IN INSTANT POT

    • Whole Cauliflower in Instant Pot
    • Instant Pot Whole Chicken
    • Instant Pot Vegetable Biryani
    • Easy Black Bean Soup
    • Instant Pot Mexican Brown Rice
    • Easy Instant Pot Chicken Drumsticks

    YOU WILL ALSO LOVE THESE INDIAN RECIPES 

    • Chicken Butter Masala
    • Garlic Naan Bread
    • Palak Paneer Rice (Spinach Rice)
    • Chickpea Tikka Masala

    📖 Recipe

    Authentic Indian chicken biryani prepared in an Instant Pot.
    Print Pin
    5 from 2 votes

    Healthy Instant Pot Chicken Biryani

    Make flavorful Instant Pot chicken biryani at home using this simple & easy-to-follow recipe. Indian biryani made easy with authentic flavors.
    Course: Lunch / Dinner
    Cuisine: Indian,Indian Inspired
    Prep Time 15 minutes minutes
    Cook Time 25 minutes minutes
    Time to build pressure 10 minutes minutes
    Total Time 50 minutes minutes
    Servings :4
    Calories :351kcal
    Author:Swati Kadam Gulati

    Would you like to save this recipe?

    Email yourself a link to this post and come back to it later!

    Equipment

    • Instant Pot

    Ingredients

    Chicken Marinade

    • 1 ½ lb chicken thighs cut into bite-size pieces
    • 2 large onions thinly sliced
    • ½ cup yogurt
    • 2 tablespoon biryani masala
    • 1 teaspoon garam masala optional for more flavors
    • 2-3 garlic cloves finely chopped
    • ½” ginger peeled and finely chopped
    • 1 tablespoon lemon juice
    • ⅓ cup loosely packed cilantro leaves
    • ⅓ cup loosely packed mint leaves
    • 1 tablespoon oil or ghee
    • salt

    Rice Preparation

    • 2 cup basmati rice
    • 2 ½ cup warm water
    • 4-5 green cardamom
    • 4-5 cloves
    • 1 cinnamon stick

    Instructions

    • Soak the rice in water with green cardamom, cloves, and cinnamon for 20-30 min.
    • In a small bowl, prepare marinade using yogurt, biryani masala, garam masala, finely chopped garlic and ginger, lemon juice, chopped cilantro, mint, and salt. In a large mixing bowl, mix this marinade with chicken and keep it aside. Save some fresh herbs to use later on.
    • Heat oil or ghee on high saute mode in the Instant Pot.
    • Saute sliced onions for about 10 mins or until golden brown in color.
    • Add marinated chicken and cook for about 10 min.
    • Add soaked rice along with water and spices. Gently mix with chicken.
    • Then add chopped tomato, a few threads of saffron (optional), remaining chopped mint, and cilantro.
    • Cover the pot, turn off the saute mode and cook the mixture on LOW PRESSURE for 5 min. Once the timer is off, release the pressure and keep the biryani covered for 20 min to develop the flavors. Do not open the lid after releasing the pressure. Serve warm.

    Notes

    1. You may notice a slight brownish layer on the bottom of the IP while caramelizing the onion. While cooking the marinated chicken, simply scrape the bottom surface using a spatula to deglaze the pot. It will help to avoid getting burnt signals on the IP while cooking the biryani. 
    2. After removing the pressure manually, do not open the lid but keep the valve in the vent position to avoid building up steam and overcooking the rice.
    3. Before serving, gently fluff and mix the rice to avoid breaking the rice grains. 
    4. If you have pre-made fried onions use them instead of caramelizing onion and skip step no. 4 above. Just add fried onions to the chicken while cooking. It will save you time. Most of the time I use healthy air fried onions in this recipe instead of sautéing it.

    Nutrition

    Calories: 351kcal
    Tried this recipe?Tag us on Instagram @watchwhatueat or tag #watchwhatueat! OR leave us a comment & rating below. Your feedback is very important to us.

    Leave a Comment

    Sweet potato lentil chili in a serving soup bowl. Garnished with tortilla chips and lime wedges.

    This warm bowl of sweet potato lentil chili is a flavor burst and is loaded with all the goodness from fresh ingredients. Perfect comfort chili for whenever you crave one.

    Sweet potato lentil chili prepared in a large pot and is ready to serve.

    I guess I was unconsciously in the mood to eat lentils and sweet potatoes in different forms in the past few weeks. That is probably the reason I prepared sweet potato chickpea burger patties, Italian lentil salad, lentil brown rice, etc., along with this sweet potato chili to publish them here. And that's how we started our new year, eating these protein-packed healthy meals.

    If you are looking for a super easy and quick recipe for a protein-rich meal, then you will love this wholesome chili.

    Let's get started.

    [feast_advanced_jump_to]
    Sweet potato lentil chili in a serving soup bowl. Garnished with tortilla chips and lime wedges.

    Ingredients

    • Sweet potato - peel and dice it into cubes
    • Raw lentils - use whole lentils for more fibers
    • Bell pepper - add your choice of color or a blend of different colors
    • Beans - either cooked black beans or pinto beans will work
    • Onion - peel, and dice it finely
    • Tomato - I always prefer using freshly diced tomatoes. However, you can also use canned ones.
    • Garlic - finely chopped garlic to add flavor to the dish
    • Seasonings - use oregano, smoked paprika, ground cumin, chipotle chili in adobo sauce, and salt to bring out the flavor in the dish
    • Oil - I always use cooking olive oil or avocado oil in my kitchen.
    Collage image of fresh ingredients gathered for making lentil chili such as raw lentils, red pepper, tomato, spices, sweet potato, black beans.

    Cutting sweet potato

    Peel and then rinse the sweet potato before cutting it. Using a sharp knife, dice it into roughly ½" cubes. The reason for keeping them a little bigger in size is to keep their shape intact after cooking the raw whole lentils. Dicing sweet potatoes smaller can make them overcook and blend/disappear in the final chili.

    How to make Sweet Potato Lentil Chili

    • Heat some oil in a large pot. Cook some chopped garlic and diced onion for a couple of mins.
    • Then add chopped tomato, diced sweet potato, red pepper, raw lentils, chipotle chili in adobo sauce, and the spice blend. Mix everything well and sauté the mixture for a few mins.
    • Now add black beans and a blend of water and chicken stock (or vegetable stock). Mix well, and bring the mixture to boil.
    • Cover and cook the chili on low heat until the lentils are nice and tender.
    • While serving, garnish with fresh cilantro, lime wedges, and serve warm.
    Sweet potato lentil chili prepared in a large pot and is ready to serve.

    Serving suggestions

    While serving, add toppings like fresh salsa, Mexican cheese blend, fresh cilantro, a lime wedge, etc. For a wholesome meal, serve this bowl of chili with some tortilla chips and fresh guacamole on the side.

    For the Mexican banquet, add this lentil chili to the menu and Mexican tomato rice, cilantro lime chicken, delicious corn on the cob, and pineapple mojito or raspberry mojito.

    Helpful Tips!

    • Preferably use whole lentils in making this chili. Split lentils may become mushier and disappear in the final dish after cooking.
    • Always peel the sweet potato before using it in the cooking if it is not organic. The concentration of pesticides is usually high in the fruits or veggies outer layers, and peeling the skin can reduce that amount.

    FAQs

    How to use leftover lentil chili?

    The next day you may find lentil chili will be thick and has lost its consistency. Therefore, before serving, add some veggie stock or water and heat the mixture in the microwave for 2-3 min or boil it on the cooktop to bring back its thick soup-like consistency.

    Sweet potato lentil chili in a serving soup bowl. Garnished with tortilla chips and lime wedges.

    More Mexican flavors you will love

    • Healthy Mexican Chicken Rice made in one pot with tons of flavors and deliciousness. A perfect easy dish for busy weeknight dinner. Full of colors with nutritious veggies you will want to make this Mexican rice again and again. #onepot #Mexican #chicken #rice #healthyrecipes #watchwhatueat
      One-Pot Mexican Chicken Rice
    • Once you try this cilantro lime brown rice recipe, I am sure you will start loving brown rice. It is also vegan and gluten free. | watchwhatueat.com
      Cilantro Lime Brown Rice
    • Under 15 mins. make this quick and easy Air fryer corn whenever you need roasted corn.
      Air Fryer Corn On The Cob
    • Mexican Chicken Avocado Salad

    Love this recipe? Please leave a 5-star ⭐⭐⭐⭐⭐ rating in the recipe card below & a review in the comments if you REALLY like this recipe. Thank You!

    📖 Recipe

    Sweet potato lentil chili prepared in a large pot and is ready to serve.
    Print Pin
    5 from 1 vote

    Sweet Potato Lentil Chili

    Prepare this protein-rich lentil chili with sweet potato and black beans for a quick and easy meal. A nutritious and filling bowl of this comforting chili is perfect for busy nights.
    Course: Lunch / Dinner
    Cuisine: Mexican,Mexican Inspired
    Prep Time 15 minutes minutes
    Cook Time 20 minutes minutes
    Total Time 35 minutes minutes
    Servings :4
    Calories :301kcal
    Author:Swati Kadam Gulati

    Would you like to save this recipe?

    Email yourself a link to this post and come back to it later!

    Equipment

    • Dutch Oven

    Ingredients

    • 1 cup raw lentils
    • 1 can of black/pinto beans (rinsed and drained)
    • 1 sweet potato peeled and diced
    • 1 bell pepper diced
    • 2-3 garlic cloves finely chopped
    • 1 onion diced
    • 2 tomatoes diced
    • 2 chipotle chilis in adobo sauce
    • 1 teaspoon oregano
    • 1 ½ teaspoon smoked paprika
    • 1 teaspoon cumin powder
    • 5 cup vegetable or chicken stock (or water plus stock)
    • 1 teaspoon cooking oil

    Instructions

    • Heat oil in a medium to large dutch oven or pot. Add chopped garlic, onion and saute them for a couple of mins.
    • Then add chopped tomatoes, sweet potato, diced red pepper, whole lentils, chipotle chili, and spices like oregano, smoked paprika, and cumin powder. Mix everything well and saute the mixture for 2-3 mins.
    • Add the black beans, all the liquid, mix well and bring the mixture to a boil.
    • Season well with salt, cover, and cook the mixture on low heat for 15-18 min or until the lentils are nice and tender.
    • Garnish the bowl of chili with some fresh cilantro, lime wedges, crushed tortilla chips and serve warm.

    Notes

    1. Do not overcook the lentils otherwise, it will turn the lentil chili into a mushy mixture.

    Nutrition

    Calories: 301kcal
    Tried this recipe?Tag us on Instagram @watchwhatueat or tag #watchwhatueat! OR leave us a comment & rating below. Your feedback is very important to us.

    Leave a Comment

    Butter chicken meatballs in a serving dish with naan bread, plain rice, lime wedge and green chili on the side.

    Learn to prepare Indian healthy butter chicken meatballs using all the authentic spices and flavors. Moreover, it is healthy without any added cream and tons of butter.

    Butter chicken meatballs in a cast iron skillet
    Healthy Butter Chicken Meatballs

    A few years back, my father-in-law shared with me his restaurant-style recipe to prepare butter chicken at home. And guess what, my in-laws are Punjabi.

    The reason I am mentioning this is... Punjab is the state/province in India where butter chicken, palak paneer curry, chicken tikka masala, etc., are staple dishes.

    Here I am sharing a butter chicken recipe originally adapted from my family's version with some twist.

    Why is it adapted??

    Because I am swapping dairy cream and butter with some healthy alternatives that I will explain below. And of course, these swaps are approved by my father-in-law, who used to manage a restaurant for quite a few years as part of his business.

    Let's get started!

    ingredients for making chicken butter masala

    Ingredients you will need

    • Chicken - ground chicken for making meatballs
    • Marinade - for adding flavors to the ground chicken, use ginger, garlic, garam masala, chili powder, lemon juice, and onion
    • Masala sauce - for making the gravy base gather fresh tomatoes, small onion, garlic, and ginger
    • Creamy base - I use raw cashews, sesame seeds, and a few coconut flakes to get the dairy-free cream base.
    • Garnishing - use finely chopped fresh cilantro. Or, optionally use Kasuri methi (dried fenugreek leaf) if you have.
    • Oil/ghee - either ghee or cooking oil to cook the meatballs and the masala (tomato base)

    How to make Indian healthy butter chicken meatballs

    Making chicken meatballs

    In a large mixing bowl, combine ground chicken with finely chopped ginger, garlic, and onion. Then add garam masala, chili powder, and some lemon juice. Mix everything well.

    Collage image of preparing ground chicken mixture for making chicken meatballs

    Use a tablespoon or a metal cookie scoop to divide the ground marinated chicken mixture into equal parts. Put these small portions of the meat mixture on a large plate ensuring they don't touch each other. Spray some oil over the divided meat or rub it on your palms. Now turn each portion into round shapes to form meatballs. This will make your job less messy.

    Collage image of preparing ground chicken meatballs

    Cook these chicken meatballs in a large frying pan using little oil. Take them out and keep them aside. See the helpful tips section below for more details.

    collage image of cooking meatballs in a cast iron pan

    Preparing Butter Chicken Masala base

    In the same pan with leftover oil, add ginger pieces, garlic cloves, roughly chopped onion, and sauté until translucent. Then add tomato pieces, raw cashew, sesame seeds, and shredded coconut and cook until the tomato softens. Turn off the heat, let the mixture cool down slightly and blend it in a blender with some water to ensure a smooth consistency.

    collage image of cooking onion and tomato in a cast iron pan

    Now heat some ghee or oil in a pan and add the pureed tomato mixture. Add more water if necessary to get the desired consistency. Bring the mixture to boil and season with some garam masala and salt to taste.

    Add cooked meatballs, cover the pan and turn off the heat. Before serving, garnish with chopped fresh cilantro and serve warm.

    butter chicken masala in a cast iron skillet

    Serving Suggestions

    • Serve these meatballs masala with steamed plain white rice or garlic naan bread or both for a filling meal.
    • For a healthy Indian banquet, add this butter chicken to the menu along with whole wheat naan bread, palak paneer curry, tandoori chicken wings, tofu tikka, vegetable biryani, etc. You can also include low-fat mango lassi or mango lemonade for drinks on the menu.
    Butter chicken meatballs in a serving dish with naan bread, plain rice, lime wedge and green chili on the side.

    Helpful Tips!

    • Buy organic ground chicken whenever possible.
    • Cook meatballs on medium heat and do not cook them for a longer time. Overcooking and high heat can make the meatballs tough in texture.
    • If you have enough time, allow the meat and spice mixture to marinate for at least 20-30 min.

    Recipe Variations

    Skip making the butter masala sauce and serve these perfectly cooked meatballs as an appetizer with some green mint chutney on the side. Just make sure the meatballs are fully cooked.

    You can replace ground chicken in this recipe with cubes of firm tofu or paneer and turn this dish into a vegetarian butter masala.

    Butter chicken meatballs in a serving dish with naan bread, plain rice, lime wedge and green chili on the side.

    FAQs

    Can I use chicken thighs or chicken breast in this recipe?

    You can use boneless and skinless chicken thigh or breast in this recipe. Cut them into bite-size pieces, follow the same instructions, and use the same ingredients to marinate the chicken. Sear the marinated chicken until well done before adding to the butter masala sauce.

    Is this butter chicken healthy?

    This butter chicken meatballs recipe does not contain any added butter, heavy cream, or whole fat yogurt. It does contain a little amount of ghee (clarified butter). Eating good quality ghee in limited quantities is advisable. Ghee falls into the category of healthy fat if consumed moderately. However, you can avoid using ghee, and it won't affect the final dish's deliciousness.

    butter chicken vs chicken tikka masala

    This question does cross most people's minds. Even Indians can get confused about these two dishes. Both dishes use similar ingredients; however, the slight and subtle difference lies in its sauce or the gravy base.

    Chicken tikka masala: this dish is rich in flavors from spices. Usually, in this recipe, marinated chicken is roasted in a tandoor or clay oven and then added into the tomato-based gravy. Surprisingly tikka masala has a British origin.

    Butter chicken: this dish is more creamy, buttery, and mild in taste than tikka masala. Often marinated chicken is simply pan-roasted before adding into the creamy tomato sauce. Butter chicken originated in the capital of India, which is Delhi.

    Butter chicken meatballs in a serving dish with naan bread, plain rice, lime wedge and green chili on the side.

    MORE INDIAN DISHES YOU WIll ENJOY

    • Salmon Curry With Coconut
    • One-Pot Easy Chicken Biryani
    • Grilled Tandoori Chicken Wings
    • One-Pot Palak Paneer Rice
    • Instant Pot Vegetable Biryani
    • See here: All Indian RECIPES

    📖 Recipe

    Butter chicken meatballs in a serving dish with naan bread, plain rice, lime wedge and green chili on the side.
    Print Pin
    5 from 1 vote

    Indian Healthy Butter Chicken Meatballs

    Learn to prepare Indian healthy butter chicken meatballs using all the authentic spices and flavors. Moreover, it is healthy without any added cream and tons of butter.
    Course: Lunch / Dinner
    Cuisine: Indian,Indian Inspired
    Prep Time 15 minutes minutes
    Cook Time 25 minutes minutes
    Total Time 40 minutes minutes
    Servings :4
    Calories :260kcal
    Author:Swati Kadam Gulati

    Would you like to save this recipe?

    Email yourself a link to this post and come back to it later!

    Equipment

    • Large Skillet
    • Cookie Scoop

    Ingredients

    Meatballs

    • 1 lb ground chicken
    • ½ teaspoon garlic paste (or minced)
    • ½ teaspoon ginger paste (or minced)
    • 1 small onion finely chopped
    • ½ teaspoon garam masala
    • ½ teaspoon chili powder
    • 1 teaspoon lemon juice
    • 1-2 teaspoon oil
    • salt

    Butter masala sauce

    • 1 onion
    • 3 to tomatoes
    • 2-3 garlic cloves
    • 1" ginger
    • 1 teaspoon garam masala
    • ¼ cup raw cashews
    • 1 ½ cup water
    • salt to taste
    • 1 teaspoon cooking oil or ghee

    Instructions

    Making Meatballs

    • In a medium bowl combine everything listed under ‘Meatballs’ except the oil. Mix everything well.
    • Lightly apply some oil on a large plate. Using a tablespoon, scoop out the mixture and lay it on the plate. Repeat until the mixture is over.
    • Then rub some oil on the hands and shape the meat mixture to form round meatballs.
    • Heat some cooking oil in a large skillet or frying pan on medium heat. Place the meatballs without touching each other, cook them for 3 min.
    • Flip them and continue cooking for another 3 mins or until the pink color goes away on the outside. Take them out and keep them aside.

    Making Butter Masala Sauce

    • In the same pan heat the remaining oil/ghee. Then add garlic cloves, ginger pieces and diced onion. Cook them until golden brown for about 2-3 mins.
    • Now add diced tomatoes, raw cashews and cook them until they soften for about 4-5 min.
    • Let the mixture cool down slightly and blend it in the blender with some water to get a smooth consistency.
    • Add back pureed mixture to the pan and add more water if necessary. Bring the mixture to a boil and season with salt and garam masala. Simmer the sauce with the lid on for 5 min.
    • Add the meatballs to the sauce and bring to a boil. Turn off the heat and keep it covered until it is time to serve.
    • Garnish with fresh cilantro or dried fenugreek leaves (kasuri methi) and serve warm.

    Notes

    1. Adjust consistency of the butter masala sauce by adding more or less water as per your preference.
    2. You can also use butter instead of cooking oil or ghee to prepare the tomato sauce.
    3. I could make 20-22 meatballs from the amount of ingredients mentioned in the recipe.

    Nutrition

    Calories: 260kcal
    Tried this recipe?Tag us on Instagram @watchwhatueat or tag #watchwhatueat! OR leave us a comment & rating below. Your feedback is very important to us.

    1 Comment

    Healthy Mediterranean pasta with artichokes and olives in a large skillet with a wooden spatula.

    This post is sponsored by Barilla, but the content and opinions expressed here are my own.

    Super easy and quick healthy Mediterranean pasta with artichokes and olives prepared using awesome flavors and nutritious ingredients. You can prepare this dish in about 20 mins or so using Chickpea Rotini pasta from Barilla. Perfect for a light meal or as a side dish.

    Healthy Mediterranean pasta with artichokes and olives in a large skillet with a wooden spatula.
    Healthy Mediterranean Pasta
    [feast_advanced_jump_to]

    Why Do I use Barilla Chickpea Pasta?

    In this recipe, I am using Barilla chickpea rotini. It is prepared using only one ingredient which is just chickpeas. This means it is...

    1. naturally gluten-free
    2. a good source of plant-based protein
    3. an excellent source of fiber and
    4. there is no added sodium or cholesterol
    5. also non-GMO
    chickpea barilla rotini pasta in its package
    chickpea rotini pasta in a glass jar and in its package

    I was really surprised to see that there is nothing else added to it, no chemicals, no preservatives, and not even an egg. Which is why I am loving this brand over others for legume pasta. As you guys must be aware, I support only those brands that use clean ingredients.

    From my own experience, I find the texture of this chickpea rotini better than other healthy pasta options available in the market. Moreover, the taste of this pasta is so perfect that you won't miss the semolina (classic pasta flour) in it. 

    After reading all of this, if you are interested in trying out Barilla Chickpea Rotini, you can purchase here at Target! They also have a red lentil variety, also made with only ONE ingredient!

    Pasta with artichoke and olives on a serving plate with a spoon.

    Whenever I want to prepare quick dishes for busy times, pasta recipes (like pasta salad) come to the rescue. You can cook pasta on one burner and simultaneously prepare the sauce or veggies on the other to add to the dish. And your meal will be ready in no time.

    Here I am sharing with you a quick and easy healthy pasta with artichokes and olives. It is full of Mediterranean flavors. Let's get started!

    What you will need?

    • Pasta - for this recipe I am using gluten-free pasta made from chickpeas! I bought this Barilla Chickpea Pasta (rotini) at a Target store (you can get it here). I feel except for super long types such as spaghetti, fettucini, etc., any pasta shape will work for this dish.
    • Zucchini - fresh zucchini to add more nutrition.
    • Tomato - use cherry tomatoes or grape tomatoes.
    • Artichoke hearts - I got it from the Mediterranean bar in our local grocery store. You can also use canned ones or cook them freshly at home.
    • Olives - use your favorite olives. I used a blend of green and kalamata olives.
    • Garlic - fresh garlic to add flavor to the pasta.
    • Oil - use some cooking oil to cook the veggies and additional extra virgin olive oil to drizzle over the final dish.
    • Seasonings - use salt and black pepper according to your preference.

    fresh ingredients and rotini pasta for making pasta with artichokes and olives

    How to make healthy Mediterranean pasta with artichokes and olives?

    Bring water to boil in a large pot. Add a generous amount of salt to the water. Then add pasta to the boiling water and cook as per package instructions. The chickpea rotini that I am using takes about 7 mins. to cook. Turn off the heat, drain the water and rinse the pasta with cold water to avoid overcooking.

    Rotini pasta while pouring in a large stainless steel pot.
    rotini in boiling water in a large stainless steel pot.

    While the pasta is being cooked, heat some cooking oil in a large skillet. Add chopped garlic and cook until fragrant. Add diced zucchini, tomato, and cook until they are nice and tender. Then add cooked pasta, artichoke hearts, olives, fresh basil leaves, salt, and pepper. Mix gently to combine well. Turn off the heat and drizzle some extra virgin olive oil over the pasta. Garnish with some more fresh basil, raw tomato pieces, and serve warm.

    Healthy Mediterranean pasta with artichokes and olives while mixing in a large skillet with a wooden spatula.

    Serving Suggestions

    • A bowl of this healthy Mediterranean pasta with artichoke and olives is perfect for a light meal.
    • You can pair it with healthy salads like cucumber and avocado salad.
    • Serve it on the side of warm healthy soups like creamy tomato soup, broccoli soup, or cauliflower soup etc.
    • For a wholesome meal add this pasta dish into the menu along with homemade dinner rolls or whole wheat focaccia bread, healthy eggplant parmesan, and one of the healthy soups mentioned above. You can also turn this into a healthy party menu easily.
    Pasta with artichoke and olives on a serving plate with a spoon.

    Helpful Tips!

    • Flavorful pasta - Add salt generously to the boiling water for cooking the pasta. Taste the water and see if it is a bit strong in salt. This way the pasta will absorb enough salt that you would prefer to have in your final dish.
    • Do not add basil leaves and extra virgin olive oil while cooking the veggies. The heat will reduce its flavors. Add them once the cooking is over and the heat is turned off.

    Recipe variations!

    • Meat - Meat lovers can add cooked chicken or leftover roasted chicken to make this pasta more filling and rich in protein.
    • Vegetables - use more veggies like broccoli florets, a variety of bell peppers, and onion to add more colors and nutrition to the dish.
    • Cheese - you can also add grated parmesan or some feta cheese in the end for more flavors.
    Healthy Mediterranean Pasta with artichoke, olives, and tomato in a large skillet
    Mediterranean Pasta With Artichokes and Olives

    FAQs

    How to cook perfect pasta all the time?

    Use at least 3-4 times the water to cook the pasta. Add enough salt to the water and taste test. It should be a little on the higher side of salt. This way the pasta will absorb enough of it for your liking. Add pasta once the water comes to a boil and not before that. Cook for the time mentioned on the package. Once the timer is off, drain the water and rinse it with cold water to avoid overcooking. If your sauce or veggies are already prepared, then there is no need to rinse the pasta. You can immediately add them to the veggies/sauce.

    How to store and reuse leftover pasta?

    Store leftover pasta in an airtight container in the refrigerator. I prefer to use it within 1-2 days. Before serving again, sprinkle some water over the pasta and then microwave for 1 min. Mix gently and continue heating for another 1 min (or more depending on the quantity). Serve while it is warm.

    More Pasta Recipes

    • Healthy Lemon Chicken Soup With Orzo
    • Vegetable Pasta Soup Recipe
    • 30 min Stir Fry Vegetable Pasta Salad
    • Gnocchi With Spinach And Sun-dried Tomato
    • Garlic Shrimp And Zucchini Noodles

    📖 Recipe

    Healthy Mediterranean pasta with artichokes and olives in a large skillet with a wooden spatula.
    Print Pin
    5 from 1 vote

    Healthy Mediterranean Pasta With Artichokes and Olives

    Make this Mediterranean pasta with artichokes and olives (including olive oil) without any heavy sauce. It uses healthy legume chickpea pasta and needs only 20 mins. to prepare. Perfect for a quick and easy lunch or dinner.
    Course: Lunch / Dinner,Main or Side
    Cuisine: Mediterranean Inspired
    Prep Time 5 minutes minutes
    Cook Time 15 minutes minutes
    Total Time 20 minutes minutes
    Servings :5
    Calories :271kcal
    Author:Swati Kadam Gulati

    Would you like to save this recipe?

    Email yourself a link to this post and come back to it later!

    Ingredients

    • 8-10 oz chickpea rotini or use your choice of pasta
    • 3-4 quarts water
    • 1 medium zucchini diced
    • 1 cup grape tomatoes halved (or use cherry tomatoes)
    • 2 medium garlic cloves chopped
    • 4-6 artichoke hearts cut into quarters
    • ¼ cup kalamata olives pitted and cut into half along their length
    • 1 teaspoon cooking oil
    • 1 tablespoon extra virgin olive oil
    • ¼ cup fresh basil leaves
    • salt and black pepper

    Instructions

    • Bring 3-4 quarts of water to boil. Add 2-3 teaspoon salt and raw pasta. Let it cook for 7 mins (or based on package instructions). Drain and rinse with cold water. Keep it aside.
    • While the pasta is getting cooked, heat some cooking oil in a large skillet over medium heat. Add chopped garlic and saute until fragrant for about 30-40 seconds.
    • Then add diced zucchini, halved grape or cherry tomatoes (reserve some for garnishing later) and cook them for about 5 mins or until tender.
    • Season with salt and black pepper.
    • Now add cooked pasta, artichoke hearts, olives, and fresh basil leaves. Drizzle some extra virgin olive oil and gently mix everything well.
    • Finally, garnish with fresh basil leaves and cherry tomatoes. Serve warm.

    Notes

    1. For cooking the pasta, follow package instructions. For this recipe, the Barilla Chickpea Rotini took 7 mins to get the perfect texture that we prefer. In general, whole wheat or brown rice-based pasta take a longer time to cook.
    2. I bought artichoke hearts and pitted olives from the Mediterranean bar in our local grocery store. These are kept submerged in vinegar and oil. Therefore, it also added a nice taste to the final dish.
    3. You can also use some dried oregano or Italian seasoning mix to flavor this dish. Add it towards the end of cooking the zucchini and tomatoes.

    Nutrition

    Calories: 271kcal | Carbohydrates: 38.6g | Protein: 15.9g | Fat: 9.1g | Saturated Fat: 0.7g | Fiber: 10.9g | Sugar: 6.4g | Iron: 6mg
    Tried this recipe?Tag us on Instagram @watchwhatueat or tag #watchwhatueat! OR leave us a comment & rating below. Your feedback is very important to us.

    Leave a Comment

    Healthy lemon chicken soup with orzo in a serving bowl with some croutons on the side.

    Healthy lemon chicken soup with orzo is a delicious combination of flavors from fresh lemon juice, homemade chicken broth, and Italian seasonings. Our all-time favorite soup for chilly winter nights!

    Healthy lemon chicken soup with orzo in a serving bowl with some croutons on the side.
    Lemon Chicken Orzo Soup

    How often do you make soup at home?

    When nights are cold I really crave a warm bowl of soup with some crusty bread like homemade focaccia. It is so satisfying and truly gives a feeling of warmth.

    Here, I am going to share with you a lemon orzo chicken soup recipe that you can prepare at home from scratch. I mean even the homemade chicken broth for the soup base. This recipe is so simple and easy to prepare. You will need just a little extra time to cook the chicken, that's all.

    Let's get started!

    Image of different ingredients needed for making chicken orzo soup

    Ingredients you will need!

    • Chicken - For this recipe, I am using chicken drumsticks. Remove skins and then use them to prepare the soup base.
    • Orzo - this small-sized pasta works great for making soups.
    • Garlic - it adds nice flavors and aroma to the soup. Peel and simply smash it. No need to finely chop.
    • Onion - half of it is needed to prepare the soup base or chicken broth and the remaining half would go into the soup.
    • Celery - trim off the ends and dice into small pieces.
    • Carrot - peel, and dice into small pieces
    • Oil - I always use olive oil that one can use for sauteing and grilling
    • Seasonings - for the flavors use Italian seasonings, black pepper, and salt.

    How to cut and prepare veggies?

    For making the chicken broth or the soup base you can peel and smash the whole garlic cloves, cut the onion into larger pieces. This will save you some time during prep.

    For the actual soup, peel and dice carrot, celery, and bell pepper into small and even pieces. These multi-colored veggies will also give a nice look to the dish, apart from their nutrients.

    image of chicken drumsticks in a bowl and diced onion and garlic in in a plate
    image of diced vegetables in plate for making lemon orzo chicken soup

    Homemade chicken broth for the lemon orzo soup

    Making quick homemade chicken broth or stock will add an amazing flavor to the soup. It is way better than using bullion or packaged chicken broth. For making this soup base you only need a few mins of prep time however, the cooking time would be a bit longer.

    It's not at all necessary to make this chicken broth at home-I do it because I love the fresh flavors. You can use store-bought broth or bullion to flavor the soup if you so prefer.

    chicken drumstick broth prepared in a large pot

    How long to cook orzo in a soup?

    Cooking pasta in soups can easily overcook them as it is going to remain in the hot soup base even after the cooking is over.

    Therefore, always cook the orzo or other small-sized pasta about halfway in the soup. Then turn off the heat and remove the pot from the stove. The hot liquid base will continue to cook the pasta. This way you will get the perfect texture of the orzo without overcooking them.

    How to make Healthy Lemon Chicken Soup With Orzo

    • In a medium to large dutch oven or soup pot cook diced onion, carrot, celery, and pepper for 3-4 mins. Take them out and keep aside.
    • In the same pot add a little more oil, smashed garlic cloves, and chunks of remaining onion and saute until translucent.
    • Now add the chicken and cook for 3-4 min to get a light brown crust. Then add water, bring the mixture to a boil, and season with salt & pepper. Cook the mixture covered on low heat to get the chicken broth for the soup.
    • Using a small strainer or wire skimmer take out the chicken and onion pieces leaving behind the clear broth.
    • Now in the boiling broth add raw orzo, sauteed carrot-celery mixture, Italian seasoning, and cook the mixture for a few mins. Here, the pasta cooking time would depend on the package instructions. Cook the pasta in the soup for about half the time mentioned on its package.
    • While orzo is being cooked separate the chicken from its bone and then shred using a couple of forks. Then add this shredded chicken back to the soup. Adjust salt, if necessary.
    • Once the cooking time is over, remove the soup pot from the heat.
    • Add lemon juice and garnish with freshly chopped parsley. And the soup is ready to enjoy.
    image of sautéed vegetables in a plate for making lemon orzo chicken soup

    Serving suggestions!

    • A warm bowl of chicken soup with orzo is itself perfect for a light meal.
    • Serve homemade dinner rolls or whole wheat focaccia bread or crusty bread on the side of it for a filling dinner
    • Make a simple healthy salad with avocado and cucumber or your favorite green salad to go with the soup.
    Healthy lemon chicken soup with orzo in a serving bowl with some croutons on the side.

    Helpful Tips!

    • Chicken - here in this recipe I used chicken drumsticks to prepare the soup base. However, you can also use boneless or bone-in chicken thighs. I would suggest removing the skin to lower the amount of saturated fat and cholesterol. Also, boneless chicken thigh may take slightly less time to cook compared to chicken drumsticks.
    • Orzo - you can also use whole wheat-based orzo to make the dish wholesome.

    Recipe variations!

    Variety of pasta - use small-sized pasta in place of orzo. Soup shells, ditalini, mini elbow pasta, etc. are perfect for making lemon chicken soup.

    Veggies - add diced bell peppers, greens like spinach or kale, broccoli florets into the soup for making it more colorful and nutritious.

    If you want to make a meatless version then try this nutritious Veggie Pasta Soup with Italian flavors.

    lemon chicken orzo soup in a serving bowl with some croutons on the side.

    FAQs

    How to reheat leftover lemon chicken orzo soup?

    Simply bring the leftover soup to boil. Add water and adjust seasonings if necessary. Turn off the heat and serve while it is warm. Do not keep it on the heat or boil it for a longer time. It will overcook the orzo and toughen the meat.

    You will also like these pasta recipes

    • Vegetable Pasta Soup Recipe
    • 30 min Stir Fry Vegetable Pasta Salad
    • Homemade Sweet Potato Gnocchi
    • Gnocchi With Spinach And Sun-dried Tomato
    • Garlic Shrimp And Zucchini Noodles

    More chicken favorites

    • One-pan Baked Chicken And Veggies
    • Healthy Chicken Tikka Masala
    • Air Fryer BBQ Chicken Wings
    • Air Fryer Chicken Parmesan
    • Instant Pot Whole Chicken With Gravy
    • Browse all Chicken Recipes
    lemon chicken orzo soup in a serving bowl with some croutons on the side.

    📖 Recipe

    lemon chicken orzo soup in a serving bowl with some croutons on the side.
    Print Pin
    5 from 1 vote

    Healthy Lemon Chicken Orzo Soup

    In this lemon chicken soup with orzo, you will find a delicious combination of flavors from fresh lemon, homemade chicken broth, and Italian seasonings. And, orzo pasta makes this soup wholesome and filling.
    Course: Lunch / Dinner,Soup
    Cuisine: Italian Inspired
    Prep Time 15 minutes minutes
    Cook Time 45 minutes minutes
    Total Time 1 hour hour
    Servings :4
    Calories :316kcal
    Author:Swati Kadam Gulati

    Would you like to save this recipe?

    Email yourself a link to this post and come back to it later!

    Equipment

    • Dutch Oven

    Ingredients

    • 1 ½ cup orzo
    • 5-6 chicken drumsticks
    • 6 cup water
    • 2-3 garlic cloves smashed
    • ½ large onion roughly chopped
    • ½ onion diced
    • 2 medium celery sticks diced
    • 2 medium carrot peeled and diced
    • ½ bell pepper diced (use any color)
    • 2 teaspoon olive oil divided
    • 1 teaspoon Italian seasoning mix
    • 1 lemon
    • salt and pepper

    Instructions

    • In a large dutch oven heat 1 teaspoon oil on medium heat and then saute.
    • Add diced onion, celery, carrot, bell pepper, and saute for 3-4 min. Then take them out and keep aside
    • Now in the same pan add remaining oil, smashed garlic, and roughly chopped onion. Saute them for 1-2 min.
    • Add chicken drumsticks and cook them for 3-4 mins.
    • Then add water and bring mixture to a boil. Season with salt and pepper and simmer the mixture on low heat for 25 mins.
    • Using a small strainer or wire skimmer, take out the chicken, large pieces of onion, etc. in a large plate or bowl leaving behind liquid broth.
    • In the liquid broth add orzo, sauteed celery and carrot mixture, Italian seasonings, and cook the mixture for 4 mins.
    • Meanwhile, use a fork to separate the meat from its bones and shred into small pieces. Then add the shredded chicken back to the soup mixture. Also, add about 1-2 tablespoon freshly squeezed lemon juice and adjust seasonings if necessary.
    • Once the cooking is over, turn off the heat and remove the pan from the heat.
    • Garnish with fresh parsley and serve warm.

    Notes

    1. In soup dishes always cook pasta partially about for 3-4 min less than that mentioned on its package. Because the hot soup base will continue to cook the pasta even after turning off the heat.
    2. Also, do not forget to remove the soup pot from the heat after the cooking is over. Else, it may overcook the orzo.
    3. Preferably, use freshly squeezed lemon juice. I feel it makes a difference to the taste.
    4. You can skip adding bell pepper to the soup if it's not one of your favorite choices.

    Nutrition

    Calories: 316kcal | Carbohydrates: 48g | Protein: 19.9g | Fat: 7g | Saturated Fat: 1g | Cholesterol: 40mg | Sodium: 534mg | Potassium: 288mg | Fiber: 3.5g | Sugar: 6.2g | Iron: 3mg
    Tried this recipe?Tag us on Instagram @watchwhatueat or tag #watchwhatueat! OR leave us a comment & rating below. Your feedback is very important to us.

    Leave a Comment

    Make this healthy zucchini flatbread to up your veggies in the diet. It is wholesome, nutritious, and prepared using whole wheat flour and fresh zucchinis.

    image of baked zucchini flatbread in the baking tray.

    Zucchini is in season now and I am motivated to make it as part of our diet these days. Yes, it's one of my most favorite veggies. I even ended up planting them in my super small balcony. While seeing them grow from the seedlings I published this zucchini pancakes a few weeks back.

    Ingredients you will need!

    • Dough - I prepare homemade whole wheat flour dough for this healthy flatbread recipe
    • Fresh zucchini - cut them in thin slices or long ribbons
    • More fresh produce - use scallions, sliced tomatoes for additional toppings
    • Garlic and Herbs - use chopped garlic and fresh rosemary to add flavors
    • Mozzarella cheese - top with fresh mozzarella cheese for extra deliciousness
    • Olive oil - I prefer using extra virgin olive oil to drizzle on the flatbreads
    image of ingredients for making flatbread. It includes fresh zucchini, scallions, cheese, tomato, whole garlic, oil, rosemary, salt etc.

    How to cut zucchini for flatbreads?

    Particularly, for making this kind of flatbread cut the zucchini into thin slices or thin ribbons. Make sure to clean the zucchini thoroughly before cutting.

    Cutting into slices: For even cooking cut the zucchini into thin slices and as even as possible. You can use a sharp knife for this job. Or, use a mandoline slicer for a quicker and even results.

    Cutting into ribbons: Trim off the ends of the zucchini and cut it in half. Then just use a regular peeler or mandoline to get thin and even ribbons from half the zucchini. Some mandolin slicers also come with a ribbon attachment. I prefer cutting zucchini in half for making ribbons. This helps to manage them easily compared to superlong ribbons.

    Collage image of fresh Zucchini cut into slices and ribbons using mandolin slicer. Then spread it on the baking tray.

    How to make dough for flatbread?

    Usually, dough for making flatbread does not require proofing, and in some recipes, they don't even use yeast. As you can see, there are a number of ways one can prepare the dough for making flatbreads. I prefer using little yeast in my flatbread dough.

    Combine whole wheat flour, salt to taste, some yeast, little sugar to activate the yeast and warm water in a large mixing bowl. Knead it into a soft supple dough. Use a stand mixer if you have one for a mess-free and quick kneading job. There is no need to let the dough rise and you can use it immediately.

    Sometimes, I simply use my homemade pizza dough for making flatbreads. You can't go wrong using the pizza dough as it gives an excellent texture and taste upon baking. Who won't love the texture of a pizza base?

    How to make healthy zucchini flatbread?

    This recipe makes two 10x15" size or one large 12x17" flatbreads.

    Spread the flatbread or pizza dough in two baking trays evenly. Then add sliced zucchinis or ribbons in a single layer. For additional toppings and pop of color add some sliced tomatoes and scallions. For the flavors sprinkle fresh chopped rosemary and chopped garlic. Then drizzle some olive oil on the top.

    gif while building flatbread toppings on whole wheat dough base

    Bake the flatbreads in a preheated oven (400F) for about 15 min. Then add some fresh mozzarella cheese and continue baking for another 3-5 min or until the cheese melts down and is bubbly.

    image of baked zucchini flatbread in the baking tray.

    Serving Suggestions

    • Cut the flatbread into smaller pieces and serve them as appetizers. You can also serve chili garlic olive oil for the dipping on the side.
    • For a wholesome meal, pair this healthy zucchini flatbread with warm soups like lentil potato soup, homemade tomato soup, butternut squash soup or veggie pasta soup, etc.
    • Or, serve them on side of this quinoa risotto or veggie pasta salad or sweet potato gnocchi.
    image of zucchini flatbread slice while lifting from the baking tray.

    Helpful Tips!

    • Cut the zucchini into even slices or ribbons and then mix with a little salt. Spread them on a kitchen paper or clean kitchen towel in a single layer for 10-15 mins. This will help remove some moisture from the zucchini.
    • For more health benefits use whole wheat flatbread or pizza dough. You can use this whole wheat pizza dough recipe for making it at home.
    • If you are making homemade pizza dough then you can skip the proofing time and use the dough immediately. The flatbread doesn't necessarily need a spongy pizza-like base. Moreover, you don't have to wait for at least an hour for the dough to rise.
    • Use fresh mozzarella cheese instead of processed and preserved ones for more deliciousness in the flatbread.
    image of zucchini flatbread cut into slices in the baking tray.

    Recipe Variations

    Add a variety of toppings: You can consider adding thinly sliced onion, spinach, eggplant, jalapeño, etc in addition to zucchini on your flatbread.

    Turn flatbread into veggie pizza - spread your favorite pizza sauce on the dough base and build your pizza toppings using the rest of the ingredients. You can bake it over a pizza stone or in a pizza pan. For more Italian flavors add some fresh basil leaves.

    image of flatbread with all the toppings ready to bake.

    FAQs

    What is the difference between a Flatbread and Pizza?

    I find it very confusing to differentiate between a flatbread and a pizza. As far as I understand and what I've read from different sources, the following points can help to differentiate.

    • Flatbread does not have a layer of sauce (tomato or pesto or any other etc) as the pizza.
    • The base of the flatbreads is more thin, dense, and crispy than regular pizzas.
    • Flatbread dough does not necessarily require to add yeast. Also, no proofing is needed.
    • You can make flatbreads of any shape. It does not matter. Pizza is usually round or square in shape.

    This means flatbread is more rustic and forgiving yet delicious.

    zucchini flat bread slices in the baking tray

    MORE ZUCCHINI FAVORITES

    • Healthy Zucchini Pancakes
    • Garlic Zucchini Rice
    • Air Fryer Zucchini Corn Fritters
    • Lemon Garlic Shrimp And Zucchini Noodles
    • Zucchini Salmon Burger

    📖 Recipe

    zucchini flat bread slices in the baking tray
    Print Pin
    5 from 1 vote

    Healthy Whole Wheat Zucchini Flatbread

    This super simple homemade healthy flatbread loaded with fresh herbs, garlic, whole wheat and fresh mozzarella will tempt you to make it again and again.
    Course: Appetizer,Lunch / Dinner,Side Dish
    Cuisine: Italian Inspired
    Prep Time 20 minutes minutes
    Cook Time 18 minutes minutes
    Resting Time 15 minutes minutes
    Total Time 53 minutes minutes
    Servings :8
    Calories :244kcal
    Author:Swati Kadam Gulati

    Would you like to save this recipe?

    Email yourself a link to this post and come back to it later!

    Equipment

    • Kitchenaid Stand Mixer
    • Baking Trays
    • Mandoline Food Slicer

    Ingredients

    Flatbread Dough

    • 3 cup white whole wheat flour
    • 1 ½ cup warm water
    • 1 teaspoon instant yeast
    • ½ teaspoon sugar
    • 1 tablespoon olive oil
    • salt

    Toppings

    • 1 large zucchini thinly sliced or cut into ribbons (see notes)
    • 3-4 garlic cloves finely chopped
    • 1 to tomato seeded and thinly sliced (see notes)
    • ½ tablespoon fresh rosemary or more
    • 1 tablespoon olive oil or more
    • ½ cup mozzarella cheese
    • salt

    Instructions

    • Mix the sliced zucchini (or ribbons) with some salt and spread them on a paper towel in a single layer. Let it rest for 10-15 mins. Meanwhile, prepare the dough and other ingredients.
      Collage image of fresh Zucchini cut into slices and ribbons using mandolin slicer. Then spread it on the baking tray.
    • Combine flour, yeast, sugar, and salt in a stand mixer with the dough hook attached. Gradually add warm water and let the machine run on setting no. 2 (mine is a Kitchenaid Stand Mixer). Knead the dough for about 3-4 mins to form a soft dough.
    • Preheat the oven to 400F.
    • Brush or spray some oil on the two 10x15" baking trays. Divide the dough into two equal parts and spread it evenly on the trays to form the base.
    • Evenly place zucchini slices or ribbons in a single layer over the dough.
      gif of whole wheat flatbread dough spread into thin even layer in a baking tray.
    • Build up more toppings such as scallions, serrano pepper (optional), rosemary, tomato, and chopped garlic.
    • Bake the flatbread in a preheated oven for 15 mins.
    • Finally, add some fresh mozzarella cheese and continue baking for another 3 min or until cheese melts and is bubbly.

    Notes

    1. Hand mixing the dough - In a large mixing bowl combine flour, yeast, sugar, and salt. Add warm water gradually and mix the flour with water using a wooden spatula. Transfer the mixture to a flat surface and knead it to form a soft dough. Keep using little oil at a time to avoid sticking the dough to the surface and hands.
    2. There is no need to proof the dough. It is ready to use as soon as the kneading is done.
    3. Want to use pizza dough?? -- Then use around 1.75 lb ready-to-use pizza dough instead of making the flatbread dough above.
    4. This recipe can make two 10x15" or one 12x17" size flatbreads. You can use either size trays to prepare the flatbreads. Do not forget to apply a little oil on the trays before shaping the dough in it. Otherwise, the crust may stick to the bottom upon baking.

    Nutrition

    Calories: 244kcal | Carbohydrates: 46.5g | Protein: 10.4g | Fat: 5.5g | Saturated Fat: 0.7g | Potassium: 159mg | Fiber: 9.8g | Sugar: 2.9g | Iron: 3mg
    Tried this recipe?Tag us on Instagram @watchwhatueat or tag #watchwhatueat! OR leave us a comment & rating below. Your feedback is very important to us.

    2 Comments

    Mexican chicken avocado salad - filling, satisfying, and, with full of flavors this easy wholesome dish will make you fall in love with salads.

    Mexican Avocado and chicken salad in a salad bowl

    If you are not a big fan of salads because you find them boring and not filling then try this healthy salad recipe. I am sure that this recipe will change your views on salads.

    This chicken avocado salad is inspired by Mexican flavors such as Mexican rice, cilantro-lime rice, etc.. The spicy, tangy, crunchy, and meaty combination in this salad makes this dish flavorful and satisfying.

    [feast_advanced_jump_to]

    Ingredients you will need!

    • Chicken - use skinless chicken breasts or boneless and skinless chicken thighs.
    • Spices - chipotle chili powder, smoked paprika, and cumin powder are the main spices that bring out amazing flavors in the chicken.
    • Salad base - use cucumbers, avocados, roasted corn kernels, spring mix, etc.
    • Lime/lemon juice - you will need it to make the salad dressing. Also, drizzle some lime juice on the chicken while cooking for added tangy flavors. 
    • Olive oil - use cooking oil for roasting chicken and extra virgin olive oil for preparing the salad dressing.
    • Garlic cloves - add finely minced garlic into the salad dressing.
    • Fresh cilantro - use fresh leaves in the salad base and chop them finely to add in the dressing.

    How to make a chicken avocado salad?

    Cooking Chicken

    Cut chicken breast in half along its length. It will reduce its cooking time and will be more flavorful. In a small mixing bowl combine dry spices like chipotle chili powder, smoked paprika, cumin powder with some salt, and black pepper. Then rub each piece of chicken breast with the prepared spice mixture evenly.

    Chicken breasts mixed with Mexican spices in a mixing bowl and then cooked in cast iron skillet

    Then heat some oil in a large cast-iron skillet and place the chicken pieces without overlapping. Cook the chicken on both sides until well done. Once done let it cool before adding into the salad.

    collage image with chicken breast in a cast iron skillet and corn kernels in a cast iron skillet

    Salad Dressing

    For making the salad dressing, in a small mixing bowl add extra virgin olive oil, lime or lemon juice, finely minced garlic, fresh chopped cilantro, and some salt. Mix well using a small whisk. Or, use a small mason jar to combine all the ingredients, close the lid and shake it to mix well.

    cilantro lime dressing in a small mixing bowl

    Preparing Salad Base

    In a large mixing bowl combine spring mix, corn kernels, diced cucumbers, and diced avocados. Gently toss everything well.

    Finishing the Salad

    Finally, cut the chicken into thick slices and add them to the greens mixture. Drizzle the prepared olive oil dressing and gently mix the salad. Salad servers or salad hands make it very easy to mix the salad ingredients.

    drizzling cilantro lime dressing oven Mexican Chicken Avocado Salad in a salad bowl.

    Serving suggestions

    • A large serving bowl of this salad is filling and sufficient for a wholesome lunch or dinner.
    • You can serve this salad on the side of Mexican flavored soups such as black bean soup or lentil soup, turkey chili, etc.
    • You can also add cilantro-lime brown rice or cilantro-lime quinoa into this Mexican salad for added fibers and carbohydrates.

    Helpful Tips!

    • Buy organic and pasture-raised chicken whenever possible. Remove the skin on the chicken pieces to reduce the amount of saturated fat and cholesterol. And, use boneless chicken for this recipe.
    • Do not overcook the chicken else the meat will be hard and chewy in texture.
    • Roast the corn kernels in the same pan after cooking the chicken. Drippings and seasonings from the chicken add flavors to the corn kernels. You can also use raw corn kernels if you want to avoid this step.
    Mexican Chicken Avocado Salad in salad bowl

    Recipe variations

    • Skip the salad part and serve the cooked chicken breasts on the side of Mexican style brown rice. You can also add homemade guacamole into this menu.
    • Summer barbecue grilling - marinate the chicken with the spices mentioned above in advance. Then cook them on an outdoor grill for the smokey taste. And follow all the recipe instructions for making the awesome grilled chicken avocado salad.
    • Chipotle bowl: Add cooked black beans or pinto beans, cilantro-lime rice, a dollop of sour cream, guacamole instead of diced avocados and Mexican cheese blend to turn this salad into a Chipotle-style bowl.

    FAQs:

    How can you tell if the chicken is cooked?

    Using a knife make a small incision on the thickest side of the chicken. If its center appears light pink in color this would mean you will need to cook the chicken a little longer. And, if it appears white then the chicken is fully cooked.

    What can I do with leftover Mexican salad?

    I recommend mixing greens, meat, and dressing just before serving the salad based on the number of servings. You can store leftover chicken and dressing and prepare a quick 'n fresh salad the next day. Storing leftover salad will make the salad greens wilt down from the salt in the dressing.

    Mexican Chicken Avocado Salad in salad bowl

    More Healthy Mexican Recipes

    • One-Pot Mexican Chicken And Rice
    • Cilantro Lime Chicken
    • Mexican Tomato Brown Rice
    • Air Fryer Corn
    • Cilantro Lime Quinoa
    • Homemade Healthy Guacamole
    Mexican Salad with chicken and avocado in salad bowl

    📖 Recipe

    Print Pin
    5 from 2 votes

    Mexican Chicken Avocado Salad

    Quick and easy, full with proteins and greens, this Mexican Chicken Avocado Salad is perfect for wholesome healthy meals.
    Course: Lunch / Dinner
    Cuisine: Mexican Inspired
    Prep Time 15 minutes minutes
    Cook Time 12 minutes minutes
    Servings :4
    Calories :464kcal
    Author:Swati Kadam Gulati

    Would you like to save this recipe?

    Email yourself a link to this post and come back to it later!

    Equipment

    • Salad Servers
    • Cast Iron Skillet

    Ingredients

    Cooking Chicken

    • 2 chicken breasts cut in half lengthwise
    • 1 teaspoon chipotle chili powder
    • 1 ½ teaspoon smoked paprika
    • ½ teaspoon cumin powder
    • 1 teaspoon cooking oil
    • salt and pepper

    Salad Base

    • 4 cup spring mix (or lettuce) or more
    • 2 avocados peeled and diced
    • 1 cup roasted corn kernels see notes
    • ¼ fresh chopped cilantro
    • 4 small cucumbers sliced
    • ½ cup cherry tomatoes sliced optional

    Dressing

    • 3 tablespoon olive oil
    • 2 tablespoon lime juice
    • 2 small garlic cloves minced
    • 1 tablespoon chopped cilantro
    • salt and pepper

    Instructions

    Cooking chicken

    • In a small mixing bowl prepare the spice mix with chipotle chili powder, smoked paprika, cumin powder, salt, and pepper.
    • Cut the chicken breast in half along its length and evenly coat with the prepared spice rub.
    • In a cast-iron skillet, heat some cooking oil on medium heat.
    • Place chicken pieces in a single layer and cook for about 3 min. Then flip the chicken and cook on the other side for another 3 min or until well done.
    • Let it cool and then slice or dice into bite-size pieces.

    Salad Dressing

    • In a small mixing bowl combine olive oil, lime juice, finely minced garlic, fresh cilantro, salt, and pepper. Mix well and keep aside.

    Salad base

    • In a large salad mixing bowl add greens, diced avocados, corn kernels, cucumber etc.
    • Then add sliced chicken and prepared salad dressing to the salad base. Using two wooden spatulas or salad hands gently mix everything well.

    Notes

    1. Cutting chicken breast in half lengthwise will help absorb more flavors while reducing cooking time compared to the whole thick piece.
    2. Grilled Chicken Salad: during summertime, you can also grill the chicken on the barbecue for awesome smokey flavors.
    3. You can use your choice of greens in the salad base, for example, use only lettuce or a mix of spinach, arugula, and kale, etc.
    4. If you want to save the salad for another day or meal prep then store the chicken, avocado, and salad dressing separately. Simply mix with the salad base or greens just before serving the next time you want to enjoy them.

    Nutrition

    Calories: 464kcal | Carbohydrates: 27.5g | Protein: 29.6g | Fat: 28.8g | Saturated Fat: 4.8g | Cholesterol: 73mg | Potassium: 1349mg | Fiber: 9.1g | Sugar: 6.2g | Iron: 5mg
    Tried this recipe?Tag us on Instagram @watchwhatueat or tag #watchwhatueat! OR leave us a comment & rating below. Your feedback is very important to us.

    Other Chicken Recipes to Try

    • Baked lemon pepper chicken drumsticks with lemon slices on a serving platter.
      Lemon Pepper Chicken Drumsticks (Legs) – Baked or Grilled!
    • A bowl filled with shawarma chicken, creamy hummus, fluffy quinoa, and roasted peppers, topped with fresh cilantro, olives and lime for garnish.
      Shawarma Chicken Hummus Bowl With Quinoa
    • Breaded ground chicken nuggets in a serving shallow bowl with the dipping sauce on the side are ready to serve. The bowl is placed over a round wooden board.
      Homemade Crispy Ground Chicken Nuggets Recipe
    • Chicken drumsticks in Instant Pot coated with lemon garlic sauce and garnished with fresh parsley.
      Easy Instant Pot Chicken Drumsticks

    Browse all chicken recipes→

    2 Comments

    Instant Pot spinach brown rice after cooking

    Instant Pot Spinach Brown Rice - make flavorful tender brown rice with spinach in an electric pressure cooker. A quick and easy wholesome meal you can make in less than one hour.

    Instant Pot spinach brown rice after cooking

    Are you looking to include more greens and fibers into your diet?

    Then you are in the right place. Here you will learn how to cook spinach with brown rice in an Instant Pot (IP).

    DO NOT have Instant Pot?

    No worries! Try our most popular Spinach Rice recipe on the regular stove instead.

    I think I am secretly in love with spinach. I use it in my dishes all the time. Whether it is greens-salad, a pasta dish or green smoothie or Indian palak paneer, or Christmas pinwheels tree you can use spinach without any doubt. It is a perfect and versatile green that you can use in any cuisine.

    [feast_advanced_jump_to]

    Ingredients

    • Brown rice - long-grain brown rice gives good result
    • Spinach - buy organic baby spinach leaves for less cleanup and quick preparation
    • Green peas - use fresh or frozen green peas
    • Garlic - chop it finely
    • Onion - dice it into small pieces
    • Tomato - dice into small pieces
    • Spices and seasonings - to flavor the dish add good quality aromatic curry powder, cumin powder, salt, and pepper
    • Liquid - use vegetable stock or chicken stock. You can also use a combination of stock and water
    • Oil - use cooking oil of your choice. In my kitchen, I always use olive oil or avocado oil for cooking.
    Ingredients for making spinach brown rice in Instant Pot

    How To Make Instant Pot Spinach Brown Rice?

    Heat some oil in an Instant Pot on high saute mode. Cook onion, fresh chopped garlic until translucent. Add chopped tomatoes and let them soften. Now add brown rice, spinach leaves, green peas, and spices. Mix everything well. Then add vegetable stock or chicken stock and generously season with salt and pepper.

    Cooking onion and tomato in Instant Pot

    Cover the Instant Pot and cook the mixture on manual high pressure for 22 mins. Let the pressure release naturally. A delicious wholesome meal is ready to enjoy.

    Preparing brown rice with spinach and green peas in Instant Pot

    Serving Suggestions!

    • Serve a warm bowl of this green rice with some sliced cucumbers and carrots on the side. You can also add a dollop of yogurt on the side.
    • To make it protein-rich and a more filling dish, serve sliced roasted cilantro-lime chicken with this spinach rice.
    Spinach with brown rice and green peas in a serving bowl

    Helpful Tips!

    • Brown rice - I prefer using long grain basmati brown rice.
    • If you want your cooked rice texture to be al dente then manually release the pressure as soon as the cooking timer is over. Do not let the steam release naturally as it takes a longer time and can overcook the rice for your liking.
    • How to get fluffy rice - once done with cooking the rice, separate the grains using a fork to get fluffy rice.
    • Instead of green peas, you can also add your choice of cooked beans.
    Instant Pot spinach brown rice after cooking

    Recipe Variations

    Spinach rice with Indian flavors - replace curry powder with aromatic garam masala to give this rice dish a twist of Indian flavors.

    Spinach rice with added proteins - Once cooking is complete add cooked or roasted cilantro lime chicken to make this into a chicken dish. Also, consider adding your favorite cooked beans if you want a meatless dish.

    FAQs

    How to Use Leftover Rice?

    If you have enough leftover rice then evenly spread them to cover the bottom of the stainless steel pot of your IP. Simply turn it on to "warm" mode, sprinkle some water and let the rice warm-up for at least 30 min.
    Or, heat the rice in a microwave-safe bowl for 2-3 min depending on the amount of leftover rice. Make sure to cover the bowl so that the rice will not dry out. Additionally, sprinkle some water over the rice before heating to keep it moist.

    Instant Pot spinach with brown rice and green peas in a serving bowl

    More Recipes To Try In Instant Pot

    • Whole Cauliflower in Instant Pot
    • Instant Pot Whole Chicken
    • Instant Pot Lentil Soup
    • Easy Black Bean Soup
    • Instant Pot Mexican Brown Rice
    • Instant Pot Veg Biryani With Authentic flavors

    More Recipes With Brown Rice

    • Fried Brown Rice With Vegetables
    • Cilantro Lime Brown Rice
    • Mexican-Style Tomato Brown Rice
    • Vegetable Thai Fried Rice
    • Brown Rice & Lentil Salad
    Spinach with brown rice and green peas in a serving bowl

    📖 Recipe

    Instant Pot spinach brown rice after cooking
    Print Pin
    4.50 from 2 votes

    Instant Pot Spinach Brown Rice

    Cook brown rice with spinach in an Instant Pot for easy wholesome healthy lunch or dinner. Quick and easy recipe for busy days.
    Course: Lunch / Dinner
    Cuisine: International
    Prep Time 10 minutes minutes
    Cook Time 30 minutes minutes
    Servings :4
    Calories :348kcal
    Author:Swati Kadam Gulati

    Would you like to save this recipe?

    Email yourself a link to this post and come back to it later!

    Equipment

    • Instant Pot

    Ingredients

    • 2 cup brown rice
    • 5 oz spinach
    • 2-3 garlic cloves finely chopped
    • 1 medium onion diced
    • 2 medium tomatoes chopped
    • 1 ½ teaspoon curry powder or more
    • ½ teaspoon cumin powder
    • 1 cup green peas fresh or frozen
    • salt and pepper
    • ½ tablespoon cooking oil
    • 3 cup vegetable stock or chicken stock or water

    Instructions

    • Heat cooking oil in an Instant Pot on high saute settings
    • Add onion, garlic and cook for about 2-3 min
    • Then add chopped tomatoes and cook until they soften for about 3-5 min
      Cooking onion and tomato in Instant Pot
    • Add brown rice, spinach, green peas, cumin powder, and curry powder; mix well
    • Add liquid and season with salt and pepper.
      Preparing brown rice with spinach and green peas in Instant Pot
    • Cover the pot and cook the mixture on manual high-pressure mode for 22 min.
    • Let the pressure release naturally. It may take around 15-20 min. Garnish with freshly chopped spinach leaves and cilantro. Serve warm.

    Notes

    1. You can use half vegetable stock (or chicken stock) and half water in this recipe.
    2. For al dente rice texture, release the IP pressure manually as soon as the cooking timer is over.
    3. Before closing the lid, taste the liquid and adjust seasonings according to your liking. At this point, a slightly strong taste will result in perfect final flavors as the rice will absorb the seasonings while cooking.
    4. Try this recipe for Spinach Rice if you want to use white rice.

    Nutrition

    Calories: 348kcal
    Tried this recipe?Tag us on Instagram @watchwhatueat or tag #watchwhatueat! OR leave us a comment & rating below. Your feedback is very important to us.

    1 Comment

    chicken parmesan in the air fryer

    Air fryer chicken parmesan - breaded chicken fried in an Air Fryer for a healthier twist on the classic chicken parm recipe. Chunky marinara sauce and fresh melting mozzarella cheese toppings make this healthy chicken parmesan hard to resist.

    This recipe is inspired by Air Fryer Eggplant Parmesan which I published last year. After getting several positive feedbacks on this popular recipe on the blog, I thought to share a recipe for making chicken parmesan in the Air Fryer for those who are meat lovers. 

    Ready to give it a try?

    [feast_advanced_jump_to]

    Ingredients you will need

    • Fresh chicken - use boneless skinless chicken breasts. Slice them into half lengthwise.
    • Egg - whisk 1 large egg into a large deep dish.
    • Bread crumbs - use regular bread crumbs.
    • Parmesan cheese - use finely grated parmesan cheese. 
    • Garlic - mince it finely or use a garlic crusher for this job.
    • Seasonings - such as salt, pepper, and Italian spice blend to flavor the chicken.
    • Tomato sauce - use this homemade pizza sauce or marinara sauce. 
    • Mozzarella cheese - I prefer to use fresh mozzarella cheese. 
    • Fresh basil or parsley - chop it finely for topping and garnish.
    • Oil Spray - I use Olive Oil spray to lightly oil the breaded chicken during air frying.

    How to bread chicken breasts?

    Prepping Chicken:

    I prefer cutting chicken breasts into half along their length so that 1 chicken breast will give 2 even-sized slices or cutlets. It helps to cook them evenly and will also reduce the cooking time. And it tastes better than keeping it whole. 

    Preparing Breadcrumbs:

    In a wide and deep round dish, whisk 1 large egg. In another similar dish prepare the breadcrumb mixture. Add parmesan cheese, Italian seasonings blend, finely minced garlic, salt, and pepper into the bread crumbs for some nice flavors. Find a detailed list of ingredients and recipe instructions below.

    Coating the Chicken:

    Now dip the chicken slices into the beaten egg and transfer them into the breadcrumb mixture. Lightly press the crumbs so that they stick on both sides more or less evenly. Keep it aside until all the chicken breasts are done with the coating. 

    ready to cook parmesan breaded chicken in a tray and in a air fryer basket.

    How long to cook chicken parmesan in the Air Fryer?

    Preheat your Air Fryer to 360 F. My Philips XL Air Fryer takes 3 mins to preheat. Then place the parmesan breaded chicken breasts in the Air Fryer basket. Spray some olive oil and cook them for 6 min at 360F. Flip the chicken, spray oil on the other side, and cook for another 2 mins. Top with some marinara sauce and fresh mozzarella cheese, and then cook again until the cheese melts and is bubbly--this takes about 2 mins. 

    My Philips XL Air Fryer can hold two large pieces of chicken at a time. So, I cook this chicken in two batches in this recipe. 

    chicken parmesan in the air fryer

    Serving suggestions

    • Serve this healthy chicken parm with loaded greens salad or simple kale pasta, or toasted pea pasta or this vegetable pasta salad for a wholesome lunch or dinner.
    • Or make this Italian-inspired quinoa risotto or Instant Pot healthy pumpkin risotto to pair with it.
    • Even sauteed brussels sprouts or garlicky green beans would go well with this air-fried chicken parm.
    air fryer chicken parmesan in a serving plate with some plain macaroni pasta

    Helpful tips!

    • Buying chicken - buy organic pasture-raised chicken whenever possible. It is always better to consume chickens that are raised in a healthy environment. Also, try to get locally raised chickens to help local businesses. 
    • Chicken breast works best for making this air-fried chicken parm dish. However, you can also use boneless skinless chicken thighs. Cooking times may vary slightly, though.
    • Cut the chicken breast in half along its length to get thin slices of breast meat. It will cook evenly and will also reduce the cooking time. A sharp large knife will make this job much easier. 
    • Use fresh mozzarella cheese to top the fried breaded chicken for added deliciousness. 
    • Use whole-wheat bread crumbs for a healthier twist to this classic recipe. If you have panko bread crumbs, then pulse them in a food processor or blender for a few seconds to make them into regular crumbs. Panko bread crumbs are usually quite coarse in texture. However, if you prefer the coarse texture, then feel free to use them. 
    air fried chicken parmesan in a serving tray

    FAQs

    How to store and reheat leftovers?

    I would recommend storing breaded parmesan chicken pieces without adding any toppings in the refrigerator. For the next day, preheat your Air Fryer to 360F and then place leftover breaded chicken, top with marinara sauce and mozzarella cheese, and cook for 2-3 min. This way, you can enjoy this dish fresh the next day. 

    Is air-fried chicken parmesan healthy?

    Air Fryer cooks breaded chicken with way less amount of oil than is normally required for deep frying. You just need to lightly spray or brush oil on the chicken to get the desired color after cooking. This is why low-fat chicken parmesan is always healthy than deep-fried.  

    air fryer chicken parmesan in a serving plate with some plain macaroni pasta

    More Air Fryer recipes to try

    • Air Fryer roasted butternut squash bites
      Air Fryer Butternut Squash
    • Air fryer cauliflower wings with bbq sauce just after cooking is over
      Air Fryer Cauliflower BBQ Wings
    • Air Fryer Crispy Onions
    • Under 15 mins. make this quick and easy Air fryer corn whenever you need roasted corn.
      Air Fryer Corn On The Cob

    Delicious chicken recipes you will love 

    • Roasted whole chicken in Air Fryer basket
      Easy Air Fryer Whole Chicken
    • Chicken drumsticks in Instant Pot coated with lemon garlic sauce and garnished with fresh parsley.
      Easy Instant Pot Chicken Drumsticks
    • Sous Vide Chicken Thighs
    • Healthy lemon chicken soup with orzo in a serving bowl with some croutons on the side.
      Healthy Lemon Chicken Soup With Orzo

    Love this recipe? Please leave a 5-star ⭐⭐⭐⭐⭐ rating in the recipe card below & a review in the comments if you REALLY like this recipe. Thank You!

    📖 Recipe

    chicken parmesan in the air fryer
    Print Pin
    5 from 1 vote

    Air Fryer Chicken Parmesan

    Healthy Chicken Parmesan Recipe- crispy parmesan crust and juicy tender chicken topped with flavorful tomato sauce and fresh mozzarella cheese, and then fried in the Air Fryer for a wholesome dinner.  
    Course: Lunch / Dinner
    Cuisine: Italian Inspired
    Prep Time 10 minutes minutes
    Cook Time 20 minutes minutes
    Servings :4
    Calories :309kcal
    Author:Swati Kadam Gulati

    Would you like to save this recipe?

    Email yourself a link to this post and come back to it later!

    Equipment

    • Air Fryer

    Ingredients

    Breaded Chicken

    • 2 large chicken breasts cut in half lengthwise
    • 1 large egg
    • ½ cup bread crumbs
    • 1 teaspoon Italian seasoning
    • 2 tablespoon parmesan cheese or more
    • 1 teaspoon finely minced garlic
    • salt and pepper

    Toppings

    • ½ cup marinara sauce or homemade tomato sauce
    • 4 oz mozzarella cheese
    • Fresh parsley or basil leaves
    • 1 tablespoon parmesan cheese optional

    Instructions

    • Whisk one large egg in a wide and deep dish. Add salt and pepper to taste.
    • In another similar dish combine bread crumbs, Italian seasonings, parmesan cheese, minced garlic, some more salt, and pepper; mix well.
    • Pat dry chicken using a paper towel and then dip it in the beaten egg. Then transfer the breast to the bread crumbs mixture and press the crumbs to coat on both sides. Repeat for the remaining breast pieces and keep them aside.
    • Now preheat the Air Fryer to 360 F with its basket.
    • Place breaded chicken in the air fryer basket, spray some oil over it and cook for 6 min. Flip the chicken and spray oil to coat the other side and cook for 2 more mins.
      ready to cook parmesan breaded chicken in a tray and in a air fryer basket.
    • Then spread 1-2 tablespoon of marinara sauce over the chicken and top it with some shredded mozzarella cheese. Sprinkle parmesan cheese (optional) and continue cooking for 2 more mins or until the cheese is bubbly.
      air fried chicken parmesan topped with marinara sauce and fresh mozzarella cheese.
    • Finally, garnish with some chopped fresh parsley or basil leaves and serve warm.

    Notes

    1. Depending on the size of your Air Fryer you may need to cook all the chicken pieces in two batches.
    2. For the toppings, you can also use this homemade pizza sauce.

    Nutrition

    Calories: 309kcal
    Tried this recipe?Tag us on Instagram @watchwhatueat or tag #watchwhatueat! OR leave us a comment & rating below. Your feedback is very important to us.

    Leave a Comment

    Try this super simple and easy recipe to make garlic herb whole wheat focaccia bread at home. This delicious bread with a moist and airy texture will tempt you to prepare it again and again.

    garlic herb whole wheat focaccia bread baked in a baking sheet pan

    If you are a cooking enthusiast like me then I am sure you are adventurous in baking different kinds of bread at home.

    Isn't it?

    So do I. Whether it is garlic naan bread or whole wheat dinner rolls or homemade pita bread I always prefer to bake bread at home.

    A big advantage of making homemade bread is that you have control over the ingredients that would go in it. Usually, store-bought bread is loaded with excess sugar, all-purpose flour, and unnecessary preservatives. And these culprit ingredients turn this bread into empty calories. Moreover, eating freshly baked bread always makes our gut dance with happiness.

    [feast_advanced_jump_to]

    Ingredients

    • Flour blend - I use a blend of white whole wheat flour and all-purpose flour
    • Yeast - use rapid rise or instant rise yeast for proofing the dough in less time
    • Sugar - it helps to activate the yeast
    • Garlic - peel and chop it finely
    • Fresh Rosemary - also chop it finely
    • Warm water - to help yeast to do their job quicker
    • Olive oil - use extra virgin olive oil for kneading the dough and topping the bread
    • Parmesan cheese - use finely grated parmesan cheese for topping the bread before baking

    How to make healthy focaccia bread at home?

    Make the dough- In a large mixing bowl combine flour, yeast, salt, and sugar. You can also add fresh rosemary and chopped garlic into it. Reserve some chopped garlic and rosemary for adding as toppings later on. Then combine the flour with other ingredients. Gradually add warm water and mix with the flour either using your hands or a wooden spatula. Once the water is well incorporated into the flour transfer the mixture to a flat surface and knead it to form a dough. Keep adding little olive oil to avoid the dough sticking to the surface and hands. Knead the dough for at least 8-10 minutes.

    Let the dough rise - Once the kneading is done transfer the dough back to the mixing bowl. Cover the bowl and keep it in a warm place for the dough to rise. I usually put it in the oven without turning on any settings.

    Whole wheat dough in a mixing bowl. Before and after proofing dough.

    Preheat the oven - Preheat the oven to 400F. DO NOT forget to take the dough out if you are keeping it inside the oven for proofing before turning it on.

    Prepare baking sheet - Spread or brush the olive oil on a baking sheet and transfer the dough to it. Using hands spread the dough evenly to form a uniform layer.

    Topping the focaccia - Using fingers or the round back of a wood spatula create random but close dimples all over the flat dough. Then generously brush or drizzle olive oil. Sprinkle some finely chopped fresh rosemary and garlic. Finally, top with some finely grated parmesan cheese.

    Bake - Transfer the garlic herb focaccia bread to the preheated oven and bake until well done. It will take around 15-20 min to get the bread done. Detailed Ingredients list and instructions are given below (see the Recipe Card below)

    whole wheat dough in a baking sheet before and after baking

    Serving suggestions

    • For an appetizer or starter, serve this freshly baked whole wheat focaccia bread with seasoned extra virgin olive oil.
    • Serve warm bread on the side of homemade soups like creamy tomato soup, golden cauliflower soup, vegetarian lentil soup, etc., for a wholesome meal.
    • You can also use this bread to prepare a sandwich in the recipes like Italian veggie sandwich or shredded chicken sandwich.

    Helpful tips!

    • Flour - Use white whole wheat flour for making this homemade focaccia. Using 100% whole wheat flour in making this bread will give a slightly dense texture. Therefore I prefer using a 1:1 ratio of whole wheat and all-purpose flour.
    • Warm water - Make sure to use very warm water. If you are able to touch the water without feeling a burning sensation then that's the perfect temperature you can use. It will help to grow the yeast and dough will rise easily in a short time.
    • Rapid rise yeast - it helps to raise the dough quickly compared to regular yeast. And you can add it directly into the flour and start kneading the dough without soaking it in warm water to activate. However, you can use regular active dry yeast, just make sure to soak it in warm water with some sugar for 15-20 min before adding into the flour.
    • Amount of water - The wetter the dough the more soft and moist the bread will be. If you are comfortable adding little more water and kneading the dough, give it a try. Stop adding water if the dough starts to become sticky.
    • Season generously - Focaccia bread is a classic Italian bread made with flour, herbs, and yeast. So be generous in using herbs, garlic, salt and olive oil for a richer taste.
    • Dough proofing time - If you are using instant yeast or rapid rise yeast then allow at least 1 ½ hours for the dough rise. You can also prepare the dough in advance and keep it in the refrigerator for up to 12 hours or overnight before baking the focaccia.
    • Toppings - In this recipe, I use parmesan cheese, fresh rosemary and chopped garlic for topping the bread. You can add your favorite toppings if you want to make it with different flavors. In restaurants or store-bought focaccia, I have noticed that they add sliced tomatoes, sun-dried tomatoes, sliced onion, cheese or even pieces of meat. So be creative in topping up the bread and create your favorite combination of flavors.
    whole wheat focaccia bread cut into pieces in a baking sheet pan.

    FAQs:

    How long will homemade focaccia stay fresh?

    After baking focaccia bread it stays good for 1-2 days. I would not recommend storing and consuming it beyond 2 days.

    How to store leftover whole wheat focaccia bread?

    Store all leftover bread in an airtight glass container or ziplock bag in the refrigerator for up to 1-2 days.

    How to use leftover focaccia bread?

    Simply put the bread in a microwave-safe bowl or container and microwave it for 30-40 seconds just before serving. And serve while it is warm.

    More whole wheat recipes to try

    • Healthy Whole Wheat Zucchini Flatbread
    • Healthy Whole Wheat Dinner Rolls - use this recipe to make easy, soft & fluffy dinner rolls at home. Add fresh garlic and herbs to give them an absolute taste. The best part is no one will ever believe that these are made from 100% whole wheat flour. | #watchwhatueat #dinnerrolls #wholewheat #wholewheatrolls #healthythanksgiving
      Homemade Whole Wheat Dinner Rolls
    • Healthy and delicious whole wheat pita bread.
      Homemade Whole Wheat Pita Bread
    • Perfect Whole Wheat Pizza Dough Recipe

    Love this recipe? Please leave a 5-star ⭐⭐⭐⭐⭐ rating in the recipe card below & a review in the comments if you REALLY like this recipe. Thank You!

    📖 Recipe

    Print Pin
    5 from 1 vote

    Garlic Rosemary Whole Wheat Focaccia Bread

    Try this super simple and easy recipe to make garlic herb whole wheat focaccia bread at home. Flavors from roasted garlic and rosemary make this whole wheat focaccia bread super delicious and hard to resist.
    Course: Appetizer,Side Dish
    Cuisine: Italian Inspired
    Prep Time 15 minutes minutes
    Cook Time 20 minutes minutes
    Proofing Time 1 hour hour
    Total Time 1 hour hour 35 minutes minutes
    Servings :6
    Calories :196kcal
    Author:Swati Kadam Gulati

    Would you like to save this recipe?

    Email yourself a link to this post and come back to it later!

    Ingredients

    For Dough

    • 3 cup flour (1 ½ cup white whole wheat + 1 ½ cup all-purpose flour)
    • 1 ⅓ cup warm water
    • 2 teaspoon instant yeast
    • 1 teaspoon sugar
    • 2-3 garlic cloves finely chopped
    • ½ tablespoon finely chopped fresh rosemary
    • 1 ½ tablespoon olive oil
    • salt to taste

    For Toppings:

    • ½ tablespoon olive oil
    • 1-2 garlic cloves finely chopped
    • ½ tablespoon fresh rosemary
    • 1 tablespoon parmesan cheese finely grated

    Instructions

    • Making the dough: In a large mixing bowl combine flour, yeast, sugar, and salt. Also, add some chopped garlic and chopped fresh rosemary. Mix everything well. Gradually add warm water and mix the flour with wooden spatula or hands. Then transfer the mixture to a flat surface and knead it for 8-10 mins to form a soft supple dough. Keep adding olive oil bit by bit while kneading the dough to avoid sticking to the hands and the kneading surface. (See notes if you want to use a stand mixer for making this dough)
    • Once the kneading is done transfer the dough to the mixing bowl, cover and keep it in a warm place for at least 1 - 1.5 hrs.
    • Lightly oil a baking sheet pan (mine is 10x15"). Transfer the dough to the pan and stretch it gently across the length and width of the pan to form an even layer of the focaccia dough. Let the dough rise until the oven is preheated.
    • Once the sheet pan with dough is ready, preheat the oven to 400F
    • After the oven is preheated using the round back of a wooden spatula or fingertips poke the dough and make dimples all over it.
    • Then drizzle or brush some olive oil over the dough. Also, spread chopped garlic and fresh rosemary. And finally, top with some finely grated parmesan cheese.
    • Place the pan on the middle rack of the oven and bake the dough for 18 min or until well done.
    • Let the bread cool down slightly and then cut into small pieces. Serve warm.

    Notes

    1. Dough In a Stand Mixer - Add flour, yeast, sugar, salt, chopped garlic, and fresh rosemary into the mixing bowl of the mixer. Also, drizzle half of the olive oil (around 1 tbsp) into the mixture. Start the machine with the dough hook attached. Gradually add warm water and let the machine mix everything well. Once all the water is well incorporated continue kneading the dough for about 5 mins. I use the KitchenAid Stand Mixer in my kitchen. For making the dough I always run the machine on its No.2 setting with the dough hook attached.
    2. Want to make 100% whole wheat focaccia bread? - simply use 3 cups white whole wheat flour plus 1 ½ cup water in the above recipe. All other ingredients and recipe instructions will remain the same.
    3. Proofing the dough - I usually place dough in a closed oven to rise. It gives a perfect warm environment for the proofing. Do not turn on the oven though. Also, remember to take out the dough bowl before hitting the preheat button. Otherwise, you will get a rustic bread loaf instead of flat focaccia bread. Just kidding! But, seriously don't forget! 
    4. This recipe is inspired by Herb Foacaccia Bread from our local grocery store.

    Nutrition

    Calories: 196kcal
    Tried this recipe?Tag us on Instagram @watchwhatueat or tag #watchwhatueat! OR leave us a comment & rating below. Your feedback is very important to us.

    2 Comments

    Healthy vegetable Thai fried rice in a frying pan

    Make this super easy and healthy Vegetable Thai Fried Rice using a variety of fresh veggies and aromatic jasmine rice with Thai style sauce. It is a perfect wholesome fried rice recipe for making a quick dinner or lunch. 

    Healthy vegetable Thai fried rice in a frying pan

    Have you tried drunken noodles in Thai restaurants? If you love the flavors in it, then you will enjoy this homemade Thai style fried rice. This dish is slightly different from Chinese fried rice.

    In the past few months, I have made it several times for our picnic potlucks, meditation gatherings and of course for our weeknight dinners. It took a long time to make it happen on this website though, but finally, we have it for you all! 

    [feast_advanced_jump_to]

    Ingredients

    • Rice - use aromatic brown or white jasmine rice. 
    • Thai fried rice sauce - use a blend of soy sauce, fish sauce, oyster sauce, rice vinegar, and little honey to flavor the dish.
    • Veggies - dice carrot, bell peppers, mushrooms, etc., into small pieces. I also use green peas.
    • Shallot or small onion - dice into small pieces.
    • Garlic, ginger, and Thai red chili - Mash or chop them finely. 
    • Cooking oil - Most of the time, I use olive oil for cooking.  You can also use sesame oil in this recipe. 
    • Thai basil - use a generous amount of fresh Thai basil leaves for the authentic flavors. 

    How To Make Vegetable Thai fried rice?

    Cooking Rice: 

    Cook brown or white jasmine rice according to package instructions. Preferably cook the rice well in advance and allow it to cool or keep it in the refrigerator to chill. Cold rice works perfectly well in making fried rice recipes. Leftover rice also works better if you have them.

    Thai Fried Rice Sauce:

    In a small mixing bowl, combine oyster sauce, soy sauce, fish sauce, rice vinegar, and some honey. Mix everything well and keep it aside.

    ginger, garlic and Thai in a molcajete

    Cooking Veggies and Rice

    Cook mashed fresh garlic, ginger, and Thai red chili in some oil in a large skillet on medium heat. Then add diced vegetables, green peas and cook them until they soften. Pour in prepared sauce blend and mix everything well. Now add cooked cold or chilled rice and mix well to coat the sauce evenly with the rice. Finally, add fresh Thai basil leaves for the added flavors. Serve warm.

    Serving suggestions

    You can serve this vegetarian Thai fried rice warm with some lemon wedges, fresh cucumber slices, and thinly cut cabbage threads on the side. That's how they serve rice or noodles in Thai restaurants.

    Or pair this dish with chili garlic tofu for added protein content. 

    Helpful Tips!

    • Cook the Jasmine rice well in advance and let it cool before using in the recipe. This way, you can get nice fluffy rice without breaking the grains. When the rice is cold, the grains separate easily and mix well with the Thai sauce blend and vegetables. 
    • Cut all the vegetables into equal sizes so that they cook evenly. You can keep them crunchy or cook until tender as per your preference.
    • Use a generous amount of fresh Thai basil leaves. This is a key ingredient that adds a lot of flavors into this rice dish. 
    stir fried vegetable Thai rice in a frying pan

    Recipe Variations

    Thai fried rice with egg 

    Once the vegetables are cooked with fish sauce blend, make some space in the pan and cook eggs on one side of veggies. Once the eggs are done, mix them with veggies in the pan and then add cooked rice. 

    Or you can also cook eggs with some oil in a separate frying pan. Then mix this scrambled eggs with prepared fried rice.

    Tofu Fried Rice

    Cut extra-firm tofu into bite-size pieces. Then stir-fry them in little oil and add it to the prepared fried rice to make it a more filling dish.

    Chicken Thai Fried Rice

    You can cut the chicken into bite-size pieces, cook them in some oil until they are well done, and then add into the fried rice.

    Seafood Fried Rice 

    Use a variety of seafood like shrimp, fish, or scallops in this rice dish to make it rich in omega-3 fatty acids and proteins. Just cook them to perfection before adding into the rice. 

    Thai fried rice with vegetables in a serving plate

    Best kind of rice to use in Thai fried rice?

    Usually, aromatic Jasmine Rice is the prime choice for making Thai Fried Rice. It also comes in brown rice variety, if you prefer.

    Precooked or Leftover Rice Vs. Fresh Rice?

    For making any kind of fried rice precooked, cold and slightly dried rice or leftover rice works best. Because precooked rice does not stick to the pan and makes the dish more fluffy.

    However, you can still use freshly cooked rice to make this dish. Although, it will take some time to mix the rice and sauce properly. Also, fresh and soft rice breaks easily while stirring. Despite this, fresh rice gives a more delicious and fresh taste, which I always prefer. Because fresh rice is easy to digest and does not put pressure on our stomach. 

    Difference between Chinese fried rice and Thai fried rice

    The key difference is that Chinese fried rice uses only soy sauce to flavor the dish while Thai fried rice is flavored using fish sauce and fresh Thai basil leaves in addition to soy sauce.

    In my recipe, I also love to use the oyster sauce for added deliciousness. 

    Thai fried rice with vegetables in a serving plate

    You will also love these Asian recipes

    • Healthy Fried Brown Rice
    • Vietnamese Healthy Spring Rolls
    • Vietnamese Spring Rolls Salad
    • Chili Garlic Tofu Stir Fry

    Love this recipe? Please leave a 5-star ⭐⭐⭐⭐⭐ rating in the recipe card below & a review in the comments if you REALLY like this recipe. Thank You!

    📖 Recipe

    Healthy vegetable Thai fried rice in a frying pan
    Print Pin
    5 from 2 votes

    Healthy Vegetable Thai Fried Rice

    Thai fried rice prepared using colorful vegetables and aromatic jasmine rice. Make it using white rice or brown rice for a wholesome lunch or dinner. 
    Course: Lunch / Dinner
    Cuisine: Thai Inspired
    Prep Time 15 minutes minutes
    Cook Time 30 minutes minutes
    Servings :4
    Calories :332kcal
    Author:Swati Kadam Gulati

    Would you like to save this recipe?

    Email yourself a link to this post and come back to it later!

    Equipment

    • Large skillet or pan
    • Wok

    Ingredients

    Rice

    • 2 cup jasmine rice
    • 3 cup water

    Fried Rice Sauce

    • 2 tablespoon oyster sauce
    • 1 tablespoon soy sauce
    • 1 teaspoon fish sauce
    • ½ teaspoon honey
    • 1 tablespoon rice vinegar

    Veggies

    • 1 small onion finely chopped
    • 2 medium carrots peeled and sliced
    • ½ red bell pepper diced
    • ½ cup green peas
    • 1 cup sliced shitake mushroom
    • 1 Thai red chili
    • 3-4 whole garlic cloves peeled
    • 1” ginger peeled
    • 1 tablespoon cooking oil
    • salt to taste
    • 1 cup fresh Thai basil chopped

    Instructions

    • Cook rice according to instructions given on the package. Let it cool.
    • In a small mixing bowl, combine oyster sauce, soy sauce, fish sauce, honey, and vinegar. Mix well and keep it aside.
    • In a molcajete, mash Thai red chili, garlic cloves, and ginger (or finely chop them or use a mini food processor).
    • Heat oil in a large frying pan or wok on medium to high heat. Add mashed chili, garlic, ginger, and cook for a min or so.
    • Then add onion and cook until translucent.
    • Add diced carrot, pepper, green peas, and mushroom and cook them for 2-3 min.
    • Then add prepared sauce blend and mix well.
    • Now add cooked rice and combine well with veggies and sauce. Add salt if necessary.
    • Finally, add chopped fresh Thai basil leaves and serve warm.

    Notes

    1. Cook rice well in advance and let it cool down completely before adding them to the veggies. Leftover rice will also work great in such recipes. Gently fluff the rice using a fork to separate the grains before adding them into the pan or wok.
    2. You can taste test at the end and add more oyster sauce or soy sauce according to your preference. I always tend to add less soy sauce in my recipes to keep the sodium content down.
    3. Be generous in adding Thai basil leaves that make this rice distinct and flavorful.
    4. For additional tips, read the Helpful Tips section above.

    Nutrition

    Calories: 332kcal
    Tried this recipe?Tag us on Instagram @watchwhatueat or tag #watchwhatueat! OR leave us a comment & rating below. Your feedback is very important to us.

    2 Comments

    Roasted whole chicken in Air Fryer basket

    Air Fryer Whole Chicken - get roasted chicken with soft and juicy meat on the inside and a crispy crust on the outside in an Air Fryer. An easy recipe for weeknights or a large gathering. Also, learn how to make a delicious gravy that adds awesome flavors to this dish.

    Personally, I feel an Air Fryer (AF) is like a small compact oven. You can fry, cook, or roast mostly everything in it. Whether it is frying french fries, making BBQ chicken wings, roasting corn on the cob or reheating leftover pizzas, it will never fail you. And it is energy efficient as well because it takes less time and electricity compared to preheating and baking in large household ovens. 

    Recently, I have started to make whole roasted chicken in Air Fryer. To my surprise, it came out amazingly delicious with crispy skin and soft and moist meat inside. On my husband's request, I also prepared a delicious gravy using the drippings from the chicken collected in the AF pan. 

    I am sure you will love this recipe for Air Fryer rotisserie-style whole chicken. Let's get started.

    [feast_advanced_jump_to]

    Ingredients you will need! 

    • Chicken - Use chicken based on the size of your Air Fryer. 
    • Garlic - Finely chop using a knife or use a garlic crusher to mince it.
    • Oil - I use olive oil or avocado oil.
    • Lemon - Cut into smaller pieces. Also, you will need some lemon juice.
    • Paprika - Smoked paprika gives a nice flavor to the roasted chicken.
    • Black pepper and salt - Use according to taste.
    marination ingredients in a plate and raw chicken in a bowl
    Marination for whole roast chicken

    How to cook a whole chicken in an air fryer?

    Marinating Whole Chicken:

    In a small mixing bowl prepare marinade using minced garlic, oil, lemon juice, smoked paprika, salt, and black pepper. Mix everything well.

    Take the chicken out from its packaging and empty its cavity. If you prefer you can rinse the whole chicken under running cool water in the kitchen sink. Using a paper towel pat dry the chicken to remove all the excess water from the surface and its cavity as well. If you do not prefer to rinse the chicken you would still need to pat dry the chicken for any moisture that is already present. 

    Apply the prepared marinade all over the chicken and inside the cavity. Also, try to gently insert the marinade inside the loose skin using fingertips. This way chicken breasts will absorb the flavors. Cover and let the chicken marinate in the refrigerator for at least 1 hour for a flavorful result. The longer you marinate the more flavorful the chicken will be. 

    marinated whole chicken in a bowl and in a Air Fryer basket

    Roasting Whole Chicken in Air Fryer:

    Preheat the Air Fryer to 360F if you have that as an option in your Air Fryer. My Philips XL Air Fryer takes 3 min to preheat. Meanwhile, add some lemon pieces into the cavity of the marinated chicken. Place the chicken on the wire basket of the AF with the breast facing down. Cook at 360F for 30 min and then flip the chicken to continue cooking for another 20 mins. Drizzle some water over the chicken after every 10 min of cooking to avoid burning the chicken. Once the chicken is well done let it cool for sometime before carving it. This will help to distribute the juices inside the meat and keep it moist. 

    whole chicken in a Air Fryer basket

    How to make gravy?

    Heat a medium-sized pan on medium heat. Add all the chicken drippings collected in the Air Fryer pan. You can also add some lemon juice and pulp from the lemons cooked while roasting the chicken. Then add whole-wheat or all-purpose flour into the drippings. Mix well and cook the mixture for 2-3 min. Gradually add water and simultaneously stir the mixture to get a smooth consistency. Bring mixture to a boil and simmer for about 5 min. Add salt if necessary and serve warm to add flavor to the whole roast chicken.

    Recipe variations

    Cooking whole chicken in Instant Pot: You can cook the whole marinated chicken in an Instant Pot in less than 30 min. For this, you can follow the steps in this recipe for Instant Pot Whole Chicken

    Roasting whole chicken in oven: Cook the marinated chicken in a preheated oven at 375F. Initially, cover the chicken with Aluminum foil in a baking tray and then cook for 40 min. Then remove the cover and bake further for another 30-35 min to develop the crust. You can follow the instructions mentioned in this Oven Roasted Whole Chicken Recipe.

    Roasted whole chicken in Air Fryer basket

    Serving suggestions

    • Prepare garlic lemon gravy from the pan drippings and serve it with roasted chicken. This chicken and gravy combination goes perfectly well with any of these dishes: plain couscous or couscous salad, creamy polenta, quinoa risotto, mashed cauliflower, mashed potatoes, etc.
    • You can serve this roasted chicken on the side of stir-fry vegetables or garlic green beans and homemade dinner rolls. 

    Helpful Tips!

    • Use organic and pasture-raised chicken whenever possible. I always prefer to buy chicken locally raised to support local businesses. 
    • If you have time let the chicken marinate with spices for a few hours. It will be even more flavorful. You can also brine the chicken well in advance with some salt and pepper for delicious flavors.
    • If you have a Philips XL Air Fryer (3.5qt) then buy whole chicken that weighs less than 3.5 lb for better results. Air Fryers larger than 3.5 qt can accommodate bigger chicken than what I have mentioned in this recipe. 
    • You can use your choice of spices to marinate and flavor the chicken. Cooking time will not vary in this case.
    • Prepare delicious gravy from the drippings collected in the Air Fryer pan. Make sure the pan is clean before roasting the chicken. See below for the gravy recipe. 
    • Stuff lemon and garlic cloves inside the chicken cavity just before roasting it. Also, take out the cooked lemon pieces as soon as possible after the cooking is done. Keeping lemon for long inside the chicken might give a bitter taste. You can add the lemon juice and pulp from this cooked lemons into the gravy for a slight tangy taste if you prefer. 
    Roasted whole chicken in Air Fryer basket

    Is air fried chicken healthy?

    Air fryer needs very little oil to cook or fry the food. And it gives a similar texture that of fried food without the need to deep fry it in oil. 

    What can i make with leftover chicken?

    You can try these recipes to utilize leftover roast chicken

    • Make this quick and easy shredded chicken sandwich.
    • Add it to this vegetable pasta salad to make it a wholesome meal.
    • Cut the chicken into bite-size pieces and add them to stir-fry vegetables.
    Roasted whole chicken in Air Fryer basket

    More Air Fryer recipes to try

    • Air Fryer Corn On The Cob
    • Air Fryer Eggplant Parmesan
    • Zucchini And Corn Fritters
    • Air Fryer BBQ Flavored Chicken Wings
    • Air Fryer French Fries

    Love this recipe? Please leave a 5-star ⭐⭐⭐⭐⭐ rating in the recipe card below & a review in the comments if you REALLY like this recipe. Thank You!

    📖 Recipe

    Roasted whole chicken in Air Fryer basket
    Print Pin
    5 from 2 votes

    Easy Air Fryer Whole Chicken

    Air Fryer Whole Chicken - get roasted chicken with soft and moist meat on the inside and a crispy crust on the outside in an Air Fryer. An easy recipe for any weeknight or a large gathering.
    Course: Lunch / Dinner
    Cuisine: American Inspired
    Prep Time 10 minutes minutes
    Cook Time 50 minutes minutes
    Total Time 1 hour hour
    Servings :5
    Calories :391kcal
    Author:Swati Kadam Gulati

    Would you like to save this recipe?

    Email yourself a link to this post and come back to it later!

    Equipment

    • Air Fryer

    Ingredients

    Roasting Chicken

    • 3 lb whole chicken
    • 4-5 garlic cloves plus 2-3 more for stuffing in the cavity
    • 1 tablespoon avocado oil
    • 1 tablespoon lemon juice
    • 2 teaspoon smoked paprika
    • 1 teaspoon crushed black pepper
    • Salt
    • 1 lemon cut into 8 pieces

    Gravy Preparation (optional)

    • 1 ½ tablespoon whole wheat flour
    • 2 cup chicken stock

    Instructions

    Roasted Whole Chicken In Air Fryer:

    • In a small bowl combine minced garlic, oil,  lemon juice, smoked paprika, crushed black pepper, and salt. Mix well.
    • Empty the cavity and clean the whole chicken. Pat dry using a paper towel to remove excess water.
    • Rub or brush the prepared spice mixture inside the cavity and all over the chicken. Then stuff the lemon pieces and some garlic cloves inside the cavity.
    • Place the chicken with the breast side down in the Air Fryer basket and cook it for 30 min at 360 F.
    • Flip the chicken and continue cooking for another 20 min. Once done let the chicken cool down slightly before carving. Remove the cooked lemons and extra garlic from the cavity.

    Preparing Delicious Gravy (optional)

    • Heat a medium frying pan or saucepan on medium heat. Add all the chicken drippings collected in the Air fryer pan. Also, add lemon juice and pulp from the cooked lemons and garlic.
    • Add flour and cook the mixture for 2-3 min. Stir continuously.
    • Then gradually add chicken stock and keep stirring simultaneously to make a smooth gravy without lumps.
    • Bring mixture to a boil, cover and cook it on low heat for 5 min. Serve warm.

    Notes

    1. I recommend using whole chicken weighing around 3 lb (and not more than 3.5 lb) if you have a Philips XL Air Fryer (similar to mine).
    2. After the first 20 min of cooking drizzle 1 tablespoon of water every 10 min over the chicken until well done. It will prevent the chicken skin from burning.
    3. You can use large stainless steel tongs and a wooden spatula to flip the chicken.
    4. For more flavorful results marinate the chicken with the spice mixture well in advance for a few hours. 

    Nutrition

    Calories: 391kcal
    Tried this recipe?Tag us on Instagram @watchwhatueat or tag #watchwhatueat! OR leave us a comment & rating below. Your feedback is very important to us.

    1 Comment

    Indian veg biryani in a serving bowl

    Make this Instant Pot Vegetable Biryani with all the authentic Indian flavors. Super easy to prepare at home whenever you crave for Biryani. This rice dish is loaded with fresh vegetables and perfect for a vegetarian meal.

    Indian veg biryani in a serving bowl

    Don't have an Instant Pot? No worries! You can make this one-pot easy veg biryani on the stovetop.

    Looking for a meat version? Then try this easy chicken biryani.

    [feast_advanced_jump_to]

    What is Biryani?

    Biryani is a rich and flavorful Indian rice dish prepared using aromatic rice, meat or veggies, yogurt, a variety of exotic spices, fried onions and fresh herbs like cilantro and mint. 

    Usually, biryani is a very involved recipe. Meat or veggies are cooked in yogurt with spices and are then layered with partially cooked rice in a large pot. This pot is then completely sealed to trap the steam and cooked on very low heat to develop the flavors inside the rice.

    However, today I am sharing with you a simple and easy way to prepare this dish in an Instant Pot with all the authentic flavors.  

    Ingredients

    You can find the following main ingredients needed for any type of biryani very easily in a nearby Indian grocery store or online. Some local grocery stores also carry Indian spices and basmati rice in their International section. 

    • Rice - for making biryani, long grain aromatic basmati rice is usually the prime choice.
    • Vegetables - use fresh vegetables like carrot, cauliflower, green beans, green peas, and potatoes. Cut vegetables into large cubes.
    • Yogurt - it gives moisture and a little tangy taste to the biryani rice.
    • Ginger and garlic - finely mince them or make them into a paste.
    • Spices - you will need whole spices like black cumin seeds (aka shah jeera), cloves, cinnamon stick, black pepper, green cardamom, and biryani masala.
    • Onions - cut them into slices. Caramelized onion adds a distinct flavor to the biryani.
    • Fresh herbs - lots of fresh cilantro and mint leaves. Chop them finely.
    • Oil - usually ghee (clarified butter) is used for making biryanis. However, you can use your choice of fats and oils. 
    Fresh mint, cilantro and sliced onion in a bowl and assorted vegetables cut into 1-2" size in another for making Instant Pot veg biryani.

    How to make Instant Pot Vegetable Biryani?

    Preparing Rice and Veggies:

    In a large bowl soak the rice in water. Add spices like black cumin seeds, cloves, cinnamon stick, black pepper and cardamom to the rice. It will infuse the flavors into the rice. While the rice getting soaked, in a small mixing bowl combine yogurt with ginger, garlic, biryani masala, salt, and some chopped fresh herbs. Then in a large mixing bowl mix all the cut vegetables with the prepared yogurt marinade. Keep it aside. 

    Rice soaked in water with some whole spices and yogurt mixed with Indian spices in a small bowl for making Instant Pot vegetable biryani

    Cooking Biryani in Instant Pot:

    Cook onions in little oil or ghee on high saute mode of Instant Pot until they caramelize or turn dark golden brown. Then add marinated vegetables and cook for a few minutes. Add soaked rice along with water and spread the rice evenly. No need to completely mix it with veggies. Adjust salt if necessary. Finally, add the remaining chopped herbs, few strands of saffron and chopped tomato. Cover the lid and cook on manual low pressure for just 5 mins. Then quick release the pressure and keep the lid closed for about 20 min or so (do not keep the valve on Seal position after releasing the pressure). Gently stir the rice and serve warm.

    Sliced onion caramelized in Instant Pot

    Helpful Tips!

    • Use fresh vegetables and organic ones whenever possible. Cut vegetables into large sizes so that they don't get overcooked and become mushy. Frozen vegetables won't work well for this kind of recipe.
    • While cooking onions you may find brown or burnt spots from caramelization at the bottom of the pot. This is normal. To remove them, simply add a tablespoon of water after caramelization and scrape it off using a spatula. Also, you can scrape them after adding the veggies with yogurt. Water from the yogurt will remove the brown spots of the caramelized onions. Don't worry--it will add flavor to the dish unless it is really burnt and black. 
    • Soaking rice with spices for some time will help to absorb the flavors from them. Use rice along with this flavored water to add to the veggies.
    • Once the pressure cooking timer is off, quick release the pressure to remove the steam. It will stop further cooking the biryani. Once all the pressure is gone keep the lid closed and let the biryani sit in IP for another 20-30 min. It will help to develop the flavor in the dish without overcooking the rice. 
    Instant Pot vegetable biryani

    Serving suggestions

    Biryani is usually served with spiced yogurt sauce also known as raita. This raita is very similar to the Mediterranean tzatziki. 

    You can also pair this veg biryani with naan bread and curries like chickpea tikka masala or palak paneer for a complete party menu. To complement the menu you can also include homemade mango lassi. 

    Indian veg biryani in a serving bowl

    FAQs:

    Is it necessary to soak the rice before making biryani?

    In short, the answer is YES.
    Especially, when making this Instant Pot veg biryani it is a must to soak the rice before cooking.
    Why? If you use dry rice it will take more time to cook. And cooking rice for a longer time will overcook the vegetables which will make them mushy in the biryani. This will not give an appealing taste and texture to the dish.
    I tried making this biryani without soaking the rice and it was a complete failure. 

    Which rice is good for biryani?

    For making biryani extra long grain aromatic basmati rice is the preferred choice. Upon cooking, long grain basmati rice gives soft texture and the grains stay separated from each other. These non-sticky aromatic cooked rice add a beautiful touch and flavor to the dish which makes biryani tempting. 

    How to use leftover Biryani?

    Simply reheat the biryani rice in the microwave for 2-3 min. You can also sprinkle some water over the rice before putting it in the microwave. This way the rice will stay moist.
    Leftover biryani always tastes more delicious as more and more flavors infuse into the rice over time. 

    Indian vegetable biryani in a serving bowl and raita on the side

    More Recipes to Try In Instant Pot

    • Instant pot broccoli cheese soup in a serving bowl with toasted bread on the side.
      Instant Pot Broccoli Cheddar Soup
    • Instant Pot Pumpkin risotto with wooden spatula.
      Instant Pot Pumpkin Risotto
    • Chicken drumsticks in Instant Pot coated with lemon garlic sauce and garnished with fresh parsley.
      Easy Instant Pot Chicken Drumsticks
    • Instant Pot spinach brown rice after cooking
      Instant Pot Spinach Brown Rice

    You Will Also Love These Indian Recipes 

    • Easiest one pot chicken biryani
      One Pot Easy Chicken Biryani Recipe
    • homemade naan recipe
      Garlic Naan Bread Recipe
    • One Pot Easy Palak Paneer Rice or Healthy Spinach Rice | Indian palak paneer turned into one pot rice dish. #spinach #palakpaneer #healthyrecipes
      One Pot Easy Palak Paneer Rice
    • Toasted chickpeas dunked in creamy tomato authentic tikka sauce to make this easy restaurant-style healthy chickpea tikka masala.
      Vegetarian Chickpea Tikka Masala

    Love this recipe? Please leave a 5-star ⭐⭐⭐⭐⭐ rating in the recipe card below & a review in the comments if you REALLY like this recipe. Thank You!

    📖 Recipe

    Indian veg biryani in a serving bowl
    Print Pin
    5 from 1 vote

    Effortless Instant Pot Vegetable Biryani

    Instant Pot Vegetable Biryani - Quick and easy recipe to prepare healthy veg biryani with all the authentic flavors.  
    Course: Lunch / Dinner
    Cuisine: Indian,Indian Inspired
    Diet Gluten Free,Low Fat
    Prep Time 15 minutes minutes
    Cook Time 15 minutes minutes
    Total Time 30 minutes minutes
    Servings :5
    Calories :418kcal
    Author:Swati Kadam Gulati

    Would you like to save this recipe?

    Email yourself a link to this post and come back to it later!

    Equipment

    • Instant Pot

    Ingredients

    Rice Preparation

    • 2 cups basmati rice
    • 1 teaspoon black cumin seeds
    • 4-5 whole cloves
    • 4-5 green cardamom
    • 1 medium cinnamon stick
    • 3 cups warm water

    Vegetables

    • 2 cups cauliflower florets around 2" size
    • 2 small carrots peeled and diced into 1-2" size
    • 1 small red bell pepper cut into 1-2" size
    • 1 cup green beans cut into 1-2" size
    • 2 medium potatoes diced into 1-2" size
    • 2 medium onions sliced
    • 1 medium tomato cut into 1-2" size
    • 2-3 garlic cloves finely chopped
    • 1" ginger finely chopped
    • 1 tablespoon cooking oil (or ghee)
    • pinch of saffron

    Spiced Yogurt

    • ¾ cup low-fat yogurt
    • 2 ½ tablespoon biryani masala
    • ⅓ cup fresh mint leaves chopped divided
    • ⅓ cup fresh cilantro leaves chopped divided
    • salt

    Instructions

    • In a medium bowl soak rice in warm water along with spices mentioned under 'rice preparation' for about 20-30 min.
    • Meanwhile in a small bowl mix yogurt with biryani masala, half of the fresh herbs, and salt. Save some herbs to use at the end.
    • Then in another large bowl combine all the cut vegetables like cauliflower florets, carrot, bell pepper, green beans, and potatoes. Add the prepared yogurt mixture and combine well to coat all the veggies with yogurt and spices evenly.
    • Heat oil or ghee on high saute mode in the Instant Pot.
    • Add sliced onions and cook them until caramelized for about 6-8 min.
    • Add chopped garlic and ginger and cook them for about a min.
    • Then add marinated vegetables and saute them for 2-3 min.
    • Now add water from the soaked rice and mix well with vegetables. Then add soaked rice and gently mix to make sure the water covers the rice.
    • Top it up with chopped tomatoes,  fresh mint, fresh cilantro and a few strands of saffron.
    • Finally, put the lid and cook the rice on manual LOW PRESSURE for 5 mins (make sure the valve is in seal position). Once done turn off the Instant Pot and then quick release the pressure and steam. Keep the rice covered for another 20-30 min (this will help to develop the flavors).
    • Serve warm.

    Notes

    1. Adding spices while soaking will make the rice more flavorful.
    2. In this recipe, I used regular yogurt. However, you can also use greek yogurt. If you decide to use greek yogurt instead make sure to add an additional ½ cup water to the rice. This is because greek yogurt has very less retained water compared to regular yogurt.
    3. After quick releasing the pressure keep the valve on vent position to avoid building up steam again and overcooking the rice. 

    Nutrition

    Calories: 418kcal
    Tried this recipe?Tag us on Instagram @watchwhatueat or tag #watchwhatueat! OR leave us a comment & rating below. Your feedback is very important to us.

    1 Comment

    Restaurant style chicken tikka masala in a large skillet

    Make this quick, easy, and healthy restaurant-style chicken tikka masala with all the authentic flavors at home. Perfect for a wholesome lunch/dinner or to include in a party menu. Trust me, your guests will never forget the dining experience. 

    Restaurant style chicken tikka masala in a large skillet
    [feast_advanced_jump_to]

    What is Chicken Tikka Masala?

    Tikka masala is very popular in Indian restaurants worldwide. There will be hardly any Indian restaurant in western countries that won't serve this dish on their menu. 

    Traditionally, marinated chicken is cooked to perfection in a hot tandoor (clay) oven, after which this smokey chicken is dunked in a tomato-based sauce or gravy (aka masala). Marination, as well as the sauce, is generously infused with Indian spices for the unique flavors and taste that this dish has. And it is usually served with plain rice and/or fresh naan bread.

    People who don't eat meat or are vegetarian; they can also enjoy this dish by preparing vegetarian tikka masala with all the authentic flavors. 

    Restaurant style chicken tikka masala ready to serve in serving plate with homemade naan bread and plain rice

    Ingredients

    As usual, my goal is to turn such recipes into simple, easy to follow and healthy dishes. Here are the ingredients that you will need for making this healthy tikka masala. 

    • Chicken - skinless and boneless chicken thighs cut into bite-size pieces
    • Tomato - fresh red tomatoes cut into large pieces
    • Onion - peel, and dice into large pieces
    • Fresh ginger and garlic - use fresh garlic cloves and peeled ginger pieces
    • Raw cashews - helps to thicken and gives a creamy texture to the sauce
    • Spices - use a variety of spices like cumin powder, coriander powder, chili powder, turmeric powder, and garam masala
    • Oil - use your favorite cooking oil or ghee
    Ingredients for making healthy chicken tikka masala at home

    How to make healthy restaurant-style chicken tikka masala

    Cooking Chicken: Boneless chicken thighs are cut into bite-size pieces and then sauteed in little oil with some chili powder, garam masala, lemon juice, salt, and pepper. Cook the chicken until all the water evaporates. Once done take out chicken pieces and keep them aside. If you have time marinate the chicken with mentioned spices well in advance for a more flavorful taste.

    Coking marinated chicken in a large skillet

    Preparing authentic tikka masala sauce: In the same pan with leftover oil cook garlic cloves, ginger, and onion chunks until translucent. Then add tomatoes, raw cashews and cook until softened. Take out this tomato mixture in a blender jar and blend until it gets smooth and creamy.

    Clean the pan and heat some ghee or oil in it on low heat. Now add some turmeric and chili powder and cook until fragrant for a few seconds. Pour in the creamy tomato mixture and bring to boil. Then add garam masala, ground cumin, coriander powder and mix well. Season with salt and pepper according to your taste. Cover and simmer the mixture for a few more minutes on low heat. Finally, add cooked chicken and mix well. Turn off the heat and keep it covered. Serve warm. 

    Process of making chicken tikka masala in a large skillet

    Serving suggestions

    • Serve it warm with plain rice or pulao. 
    • It goes very well with naan bread or plain wheat flatbread. 
    • For a perfect Indian feast make this dish along with garlic naan bread, easy chicken biryani, healthy palak paneer, tandoori chicken wings, mango lassi etc.,

    Helpful Tips!

    • Buy organic and pasture-raised chicken whenever possible. Use skinless and boneless chicken in this recipe. Boneless chicken is easy to cut into bite-size pieces. And skinless chicken helps to cut down fat and unwanted cholesterols. 
    • Use homemade roasted ground cumin and ground coriander for the best flavorful results.
    • If you are allergic to cashews, you can use raw almonds instead. Soak the almonds in water for a few hours, peel and then use it in the recipe. For quick use, boil raw almonds in some water in the microwave for 3 mins and then peel them before using.  
    Restaurant style chicken tikka masala ready to serve in serving plate with homemade naan bread and plain rice

    FAQs:

    Whether to use chicken thighs or breasts?

    Personally, I prefer using chicken thighs when making Indian dishes. I think that works best as Indian cooking involves sauteeing, cooking or roasting for long times in order to infuse the aromatic spices in the recipe. In my experience, thigh pieces absorb the spices very well and give a juicy texture upon cooking.
    On the other hand, chicken breasts tend to get hard, dry and chewy in texture if overcooked. However, you can use chicken breast in this recipe--just look out for the cooking time and if possible, marinate the chicken well in advance for best results. 

    To blend or not to blend the tikka masala sauce

    Usually, tikka masala sauce is creamy in texture. I will recommend blending the sauce to get a smooth and creamy texture. Also, blending the sauce brings out more flavors as pulverized particles of the base ingredients combine well with flavorful spices. 

    What does chicken tikka masala taste like?

    The chicken in this dish has a smokey and roasted taste while the tikka masala sauce is creamy and slightly tangy, nutty, and creamy in taste. Along with aromatic spices, it brings out an amazing combination of flavors and aroma in the masala. 

    Is Chicken Tikka good for you?

    Definitely, it will healthy if you can avoid unhealthy ingredients. For example, use skinless chicken for less fat and cholesterol. Also, avoid adding full-fat yogurt, whole cream, and butter that can make this dish loaded with saturated fats and cholesterol.
    And if you want to completely avoid the meat then try this vegetarian chickpea tikka masala.

    Difference between butter chicken and chicken tikka masala

    The main difference between two dishes is in its sauce or gravy base. Typically, both dishes use almost the same ingredients with slight variations in making the masala or sauce.

    Butter Chicken: It is an Indian dish that originated in Delhi. It is a more creamy, buttery, and mild in spices version with less on the tomatoes. It also has less flavors from the spices. Most of the time the marinated chicken is simply sauteed in a pan or cooked in tandoor oven before adding into the creamy tomato gravy. You can try this butter chicken meatballs masala.

    Chicken Tikka Masala: Surprisingly, it is a dish of British origin similar to butter chicken. It has more tomatoes in it along with being rich in flavors from spices. Usually, in this recipe, marinated chicken is cooked in a tandoor (clay) oven and then added into the creamy tomato sauce.

    Restaurant style chicken tikka masala in a large skillet

    More Indian dishes you will enjoy

    • Vegetarian Tikka Masala
    • Grilled Tandoori Chicken Wings
    • One-Pot Palak Paneer Rice
    • Grilled Tofu Tikka Skewers
    • Coconut Shrimp Curry

    Love this recipe? Please leave a 5-star ⭐⭐⭐⭐⭐ rating in the recipe card below & a review in the comments if you REALLY like this recipe. Thank You!

    📖 Recipe

    Enjoy authentic Indian flavors in this healthy restaurant-style Chicken Tikka Masala. Simple and easy tikka masala recipe for a weeknight meal or to serve at a party. And the tomato-based sauce or gravy is dairy-free that you will want to make again and again. | #watchwhatueat #chickentikka #chickentikkamasala #indiancurry #tikkamasala
    Print Pin
    5 from 1 vote

    Healthy Restaurant-style Chicken Tikka Masala

    Pan-roasted chicken dunked in tomato-based creamy and authentic tikka sauce to make this healthy restaurant-style chicken tikka masala. 
    Course: Lunch / Dinner
    Cuisine: Indian
    Prep Time 15 minutes minutes
    Cook Time 30 minutes minutes
    Servings :4
    Calories :350kcal
    Author:Swati Kadam Gulati

    Would you like to save this recipe?

    Email yourself a link to this post and come back to it later!

    Equipment

    • Large skillet or pan
    • Blender

    Ingredients

    Prepping Chicken

    • 1 ½ lb chicken thighs cut into bite-size pieces
    • ½ teaspoon chili powder
    • ½ teaspoon garam masala
    • 1 tablespoon lemon juice
    • Salt and pepper
    • 1 teaspoon cooking oil

    Prepping Sauce

    • 3-4 whole garlic cloves peeled
    • ½" ginger peeled and cut into large chunks
    • 1 medium onion cut into larger pieces
    • 4 medium tomatoes cut into larger pieces
    • ¼ cup raw cashews
    • 1 ½ cup water
    • 1 teaspoon oil or ghee
    • ¼ teaspoon turmeric powder
    • ½ teaspoon chili powder
    • 2 teaspoon coriander powder
    • 1 teaspoon cumin powder
    • 1 teaspoon garam masala
    • salt to taste
    • fresh cilantro optional for garnishing

    Instructions

    Making Chicken Tikka:

    • Heat oil in a large frying pan or skillet on medium to high heat.
    • Add chicken, chili powder, garam masala, lemon juice, salt, and pepper; mix well.
    • Saute the chicken on medium to high heat for 10-12 mins or until they start developing a light brown roasted crust. Once done, take them out and keep aside.

    Preparing Tikka Masala Sauce:

    • In the same pan add garlic cloves, ginger, and onion; cook them on medium heat until translucent for 2-3 min.
    • Add tomato, raw cashews and cook them for 5-6 min or until it gets a sauce-like consistency.
    • Transfer this tomato mixture to a blender jar, add 1 cup of water and blend until smooth and creamy.
    • Then heat oil (or ghee) in a frying pan on low heat. Add chili powder, turmeric powder and cook until fragrant for just a few seconds.
    • Immediately add the blended creamy tomato mixture, remaining water and bring to a boil.
    • Then add coriander powder, chili powder, garam masala, and salt to taste. Mix well and simmer the mixture (cover with lid) on low heat for 5 mins.
    • Finally, add pan-roasted chicken, optionally, garnish with cilantro and serve warm.

    Notes

    1. Add more water if necessary to adjust the consistency of the sauce as per your likings.
    2. Try to use freshly ground cumin and coriander powder whenever possible. Homemade ground spices make the dish more aromatic and flavorful. For quick use in this recipe, I always roast 1 teaspoon cumin seeds and 2 tsp coriander seeds together in the same frying pan before cooking the chicken. And using a spice grinder or stone molcajete I ground the roasted seeds into fine powder.
    3. If you don't want to use raw cashews, you can use raw almonds instead. Read helpful tips section above for details and some more interesting tips.
    4. This dish is dairy-free. Traditionally, people use yogurt to marinate and flavor the chicken and use full-fat cream to thicken the tikka sauce. However, I always try to avoid combining dairy and meat together. (According to Indian Ayurveda they advise to not combine milk products with meat. The only exception is ghee and it is okay to use.) 

    Nutrition

    Calories: 350kcal
    Tried this recipe?Tag us on Instagram @watchwhatueat or tag #watchwhatueat! OR leave us a comment & rating below. Your feedback is very important to us.

    2 Comments

    garlic basil chicken with tomato sauce in a large skillet

    Garlic Basil Chicken in Tomato Sauce! A delicious, quick and easy meal for a satisfying filling lunch or dinner. Pair it with simple pasta or couscous for a healthy wholesome complete meal. 

    Garlic basil chicken with tomato sauce in a large skillet.

    If you are looking for a quick and easy recipe using chicken then give this dish a try. Simple with an Italian touch—this is something you can make in less than 30 mins. This recipe is a variation of our popular shrimp in tomato sauce (or salmon) that you can find on Watch What U Eat. 

    [feast_advanced_jump_to]

    What you will need!

    • Chicken thighs - get boneless and skinless chicken thighs for this recipe
    • Fresh tomatoes - diced in small pieces
    • Onion - diced in small pieces
    • Garlic cloves - minced or finely chopped
    • Spices - like dried oregano, paprika, black pepper 
    • Some pine nuts
    • Fresh basil leaves 
    • Grated parmesan cheese
    • And cooking oil - I prefer using olive oil
    Chicken in garlic basil tomato sauce in a large skillet.

    How to make Garlic Basil Chicken In Tomato Sauce?

    This recipe involves two steps: 1. pan-frying chicken and 2. cooking garlic basil tomato sauce in leftover oil in the same pan

    Cooking chicken 

    Simply heat some oil on medium heat in a large skillet or frying pan and add chicken pieces in a single layer. Sprinkle some salt to taste and cook for a few mins. Then flip the chicken pieces and continue cooking until well done. You will get a nice brown crust on the chicken. Take out the chicken pieces and keep them aside.

    Making Tomato basil sauce

    In the same pan, using the leftover oil add finely chopped garlic and diced onion to it. Cook for a few mins or until the raw taste goes away. Then add chopped fresh tomatoes and cook them until they soften and give a sauce-like consistency. You can also add chicken stock or water to get the consistency as you would normally prefer. Now add dried oregano, paprika, and some pine nuts. Mix well.

    Okay, let me reveal the secret ingredient here. The pine nuts is the secret ingredient that I mentioned in the title of the recipe. They give a nice nutty flavor and also add a nice crunch to the dish!

    Finishing the dish

    Add back the cooked chicken pieces to the freshly prepared garlic tomato sauce. Finally, garnish with some grated parmesan cheese and a generous amount of chopped fresh basil leaves. Serve warm.

    Garlic basil chicken in tomato sauce in a large skillet.

    Helpful Tips!

    • Use organic and pasture-raised chicken whenever possible. If it is locally grown go for it to support the local businesses.
    • To get a nice brown crust on the chicken thighs do not flip the chicken frequently. Let it cook on one side for the duration of cooking time mentioned below and then flip once to cook on the other side for the said duration.
    • I prefer using fresh tomatoes in this recipe instead of canned ones. I feel fresh tomatoes give fresh flavors and added deliciousness to the dish. However, using fresh tomatoes may take a little longer to complete the dish. The reason is fresh tomatoes might take some more time to cook in order to remove the raw taste as opposed to processed ones.
    • To give a smoother consistency to the sauce use the back of a wooden spatula or a masher to mash the tomatoes in the pan (once they are soft) while cooking. 
    • You can skip the pine nuts if you don't have any. This basil tomato chicken tastes equally delicious even without using the pine nuts—I’ve tried it both ways. 
    Garlic basil chicken with tomato sauce in a large skillet.

    Recipe variations

    • You can cut the chicken into bite-size pieces instead of using the whole thigh. And, you can cut the chicken before or after cooking them in the frying pan. However, cooking times may vary for the smaller pieces than what is mentioned for this recipe. 
    • You can just make garlic basil tomato sauce without the chicken. This sauce is perfect to go even with plain pasta.
    • Use fresh shrimp or salmon in place of chicken to make a seafood version of this dish.
    • Use chicken breasts in place chicken thighs. However, cooking times may slightly vary for the chicken breasts. 

    Serving suggestions

    You can pair this tomato chicken dish with plain pasta, or lemony couscous, creamy polenta, or this butternut squash quinoa risotto, easy pumpkin risotto for a wholesome healthy complete meal. 

    Garlic basil chicken with a delicious tomato sauce in a large skillet.

    More Italian recipes to try

    • Garlic Shrimp In Tomato Sauce
    • Quick'n Easy Salmon With Tomato Sauce
    • Homemade Sweet Potato Gnocchi
    • Roasted Tomato Soup

    Love this recipe? Please leave a 5-star ⭐⭐⭐⭐⭐ rating in the recipe card below & a review in the comments if you REALLY like this recipe. Thank You!

    📖 Recipe

    garlic basil chicken with tomato sauce in a large skillet
    Print Pin
    5 from 1 vote

    Garlic Basil Chicken In Tomato Sauce

    Make this pan-roasted chicken coated with healthy garlic basil tomato sauce for a quick and easy dinner or lunch. You can serve it with plain pasta or couscous for a wholesome, complete and a satisfying meal.
    Course: Lunch / Dinner
    Cuisine: Italian Inspired
    Diet Gluten Free
    Prep Time 10 minutes minutes
    Cook Time 20 minutes minutes
    Total Time 30 minutes minutes
    Servings :6
    Calories :246kcal
    Author:Swati Kadam Gulati

    Would you like to save this recipe?

    Email yourself a link to this post and come back to it later!

    Equipment

    • Large skillet or pan

    Ingredients

    • ½ tablespoon olive oil
    • 6 medium chicken thighs skinless and boneless
    • 3-4 garlic cloves finely chopped
    • 1 medium onion finely diced
    • 5-6 medium red tomatoes finely diced
    • 1 teaspoon paprika
    • ½ teaspoon oregano dry
    • 2 tablespoon pine nuts
    • 2 tablespoon grated parmesan cheese
    • ½ cup loosely packed fresh basil leaves
    • salt and pepper
    • ⅓ cup chicken stock or water

    Instructions

    • Heat oil in a skillet or frying pan. Place chicken thighs in a single layer, sprinkle some salt and cook for 5-6 min. Then flip the chicken and cook on the other side for another 5-6 mins. Once done take them out and keep aside.
    • In the same pan, using the leftover oil add chopped garlic and onion to it and sauté for 2-3 min or until translucent.
    • Then add chopped tomatoes and cook for 5-6 min or until they soften and give a sauce-like consistency. If necessary, add some chicken stock or water.
    • Now add dried oregano, paprika, and pine nuts. Mix well.
    • Add back the cooked chicken thighs and mix well to coat the chicken with sauce.
    • Finally, sprinkle some grated parmesan cheese, garnish with fresh basil and serve warm.

    Notes

    1. Add more or less water to get the consistency of the sauce as per your likings.
    2. To get the nice crust on the chicken cook them for the mentioned time without flipping them too frequently (I flipped only once). Chicken thighs with skin give a nice uniform crust as opposed to what you get with the skinless version. In this recipe, I used skinless chicken thighs. So, you may not get the brownish crust as uniform as you may expect.
    3. Before adding back the cooked chicken, taste the sauce and add more salt and pepper if necessary.
    4. If you want a creamy sauce then you can blend the cooked tomato mixture using a blender before adding the chicken. I just don't do it to avoid extra steps and extra cleanup. Or, you can use a masher or the back of a wooden spatula to smash the tomatoes while cooking in the pan to get a smoother consistency.

    Nutrition

    Calories: 246kcal
    Tried this recipe?Tag us on Instagram @watchwhatueat or tag #watchwhatueat! OR leave us a comment & rating below. Your feedback is very important to us.

    5 Comments

    Healthy ground turkey meatballs with gravy in a large skillet

    Super soft melt-in-mouth texture of these healthy ground turkey meatballs, along with creamy, delicious gravy, makes this dish into a satisfying meal.

    Healthy turkey meatballs with gravy in a large skillet

    Turkey meat is considered to be low in saturated fat and cholesterol, unlike red meat. So it's a perfect alternative for incorporating in a healthy eating lifestyle.

    This white meat perfectly blends with different spices that bring out a delicious aroma and taste. For example, during a grilling season, you can make grilled mini turkey meatloaves that are perfect appetizers and prepare turkey chili for cold nights. Or make them into meatballs that can be served as appetizers or in a creamy sauce to pair with side dishes like pasta, polenta or grits, etc.

    Here I am sharing with you these healthy turkey meatballs in mushroom gravy. 

    [feast_advanced_jump_to]
    ingredients for making turkey meatballs and gravy

    Ingredients

    • Ground turkey meat - Get organic meat whenever possible
    • Fresh bread slices - give a super soft texture to meatballs
    • Onion - chop them finely
    • Garlic - chop or mince finely
    • Fresh herbs - use fresh parsley and rosemary. Chop them finely
    • Mushrooms - finely chopped
    • Flour - it helps to thicken the gravy
    • Chicken stock or broth - makes the gravy more flavorful
    • Salt and pepper - use it according to your taste

    How to make turkey meatballs with gravy

    Making turkey meatballs in gravy is a two-step process as the name suggests; 1. preparing meatballs using ground meat and 2. cooking delicious gravy to go with it. 

    Preparing turkey meatballs 

    In a large mixing bowl, combine ground meat with fresh bread crumbs (see helpful tips below), chopped onion, minced garlic, and fresh herbs like parsley and rosemary. Also, add salt and pepper to taste. Mix everything well to distribute the flavorings in the meat evenly. Divide the mixture into small portions and give them a round shape. 

    Turkey meatballs making process

    Cooking meatballs on the stove

    Heat some oil in a large frying pan or skillet. Place the prepared meatballs leaving some space in between, and cook them until well done. Once done, take them out and keep them aside. Find detailed instructions and helpful tips below. 

    How to cook meatballs on the stove

    How to make mushroom gravy

    After cooking the meatballs, add garlic, onion, and chopped mushrooms to the same pan and cook for a few minutes. Then add some flour and cook the mixture for another couple of minutes. Slowly add the chicken stock and simultaneously mix everything using a whisk. Bring the mixture to a boil and then simmer on low heat for a few minutes.

    Finally, add cooked meatballs, some fresh herbs, salt, and pepper to taste. Mix well, cover, and simmer for another minute or so. Turn off the heat and keep covered. 

    sautéing mushroom and onion in large skillet for making mushroom gravy

    Learn helpful tips!

    • Buy organic turkey meat whenever possible. 
    • Finely chop the bread slices or pulse them in a food processor to make into soft bread crumbs. These fresh bread crumbs help to bind and give a soft texture to the turkey meatballs. 
    • Do not cook the meatballs for a longer time. Overcooking the meat makes them chewy and tough in texture. 
    • Use a metal cookie scoop to divide the meat mixture into equal parts. Put these small portions of the meat on parchment paper or a large plate, whichever is available. Spray some oil over the divided meat, or rub some oil on your palms. Then turn each meat portion into a round shape. The oil helps to roll the meatballs without sticking them to your hands. 
    • You can also add an egg to the ground turkey mixture in this recipe. It helps to bind the meatballs and make them moist. 
    Healthy ground turkey meatballs with gravy and mashed cauliflower in a serving deep dish

    What goes well with turkey meatballs

    • These healthy turkey meatballs with gravy go well with simple grits, creamy polenta, plain, or this butternut squash risotto.
    • You can also serve them on the side of simple pasta or cooked cilantro lime quinoa for a healthy meal. 
    • For a perfect holiday menu or a non-traditional healthy Thanksgiving menu, pair this dish with creamy cauliflower mash or mashed potato, skillet garlic green beans, or roasted potatoes and green beans, and delicious non-alcoholic cranberry mimosa.
    • Skip the gravy process and serve these healthy meatballs as a healthy appetizer. 

    Healthy ground turkey meatballs with gravy in a large skillet

    FAQs

    How to make turkey meatballs moist?

    Adding freshly chopped bread or fresh bread crumbs to the ground meat helps to make the meatballs moist and soft in texture. You can also add an egg along with the bread crumbs to the mixture to get a moist texture. 

    How do you know when turkey meatballs are done?

    When the center of the meatballs is no more pink, you can safely say that they are cooked. For this, you have to cut open a meatball in half to check the center.

    You can also use a thermometer to check when it reaches 165 F at the center of the meatballs if they are well done and safe to eat. 

    Are turkey meatballs healthy?

    Yes! They are a very good source of protein. Turkey meat is lean with less fat compared to red meat. Moreover, these meatballs are cooked in a frying pan with very little oil. 

    You will also love these non-traditional Thanksgiving recipes

    • Super juicy garlic and herb roasted whole chicken you can make for your weekend family dinner or holiday party night. Super easy with quick preparation and tons of flavors.
      Super Juicy Garlic And Herb Roasted Whole Chicken With Delicious Gravy
    • Healthy Instant Pot Cauliflower - cook whole cauliflower head in the pressure cooker and serve with delicious creamy gravy to make it more flavorful. Perfect vegetarian and vegan recipe for the holiday dinner or weeknight healthy meal. | #watchwhatueat #veganthanksgiving #vegan #cauliflower
      Healthy Instant Pot Cauliflower With Gravy
    • This shredded garlic parmesan brussels sprouts are super quick & easy to prepare in no time. | #brusselssprouts #healthysides #thanksgivingsides
      Garlic Parmesan Sauteed Brussels Sprouts
    • Sauteed garlic green beans in a serving plate with spoon
      15-min Easy Healthy Garlic Green Beans
    Healthy ground turkey meatballs with gravy and mashed cauliflower in a serving deep dish

    Love this recipe? Please leave a 5-star ⭐⭐⭐⭐⭐ rating in the recipe card below & a review in the comments if you REALLY like this recipe. Thank You!

    📖 Recipe

    Healthy ground turkey meatballs with gravy in a large skillet
    Print Pin
    5 from 1 vote

    Healthy Turkey Meatballs With Gravy

    These moist & melt-in-mouth healthy turkey meatballs with gravy will make you love lean turkey meat. Also, learn unique tips on making healthy meatballs at home.
    Course: Lunch / Dinner
    Cuisine: American Inspired,Italian Inspired
    Prep Time 15 minutes minutes
    Cook Time 15 minutes minutes
    Total Time 30 minutes minutes
    Servings :5
    Calories :314kcal
    Author:Swati Kadam Gulati

    Would you like to save this recipe?

    Email yourself a link to this post and come back to it later!

    Equipment

    • Large Skillet
    • Silicone Whisk
    • Cookie Scoop

    Ingredients

    Turkey Meatballs

    • 1 lb ground turkey
    • 2 bread slices
    • ½ small onion finely chopped
    • 1 teaspoon freshly chopped parsley
    • 2 garlic cloves finely minced
    • 1 teaspoon freshly chopped rosemary
    • salt and pepper
    • 1 tablespoon cooking oil

    Gravy

    • 2-3 garlic cloves minced
    • ½ small onion finely chopped
    • ½ cup finely chopped mushrooms
    • 3 tablespoon whole wheat flour
    • 1 teaspoon freshly chopped parsley
    • 1 teaspoon freshly chopped rosemary
    • 3 cup chicken stock or half stock or half water
    • salt and pepper

    Instructions

    Making Turkey Meatballs

    • Cut bread slices into large pieces. Pulse them in a blender or food processor to make them into crumbs.
    • In a large mixing bowl combine ground turkey, fresh bread crumbs, onion, parsley, minced garlic, chopped rosemary, salt, and pepper. Mix everything well.
    • Roughly divide the mixture into 20 parts and form them into small meatballs (see helpful tips or notes).
    • Heat oil in a large skillet. Place meatballs keeping some distance in between
    • Cover the pan and cook for about 3 minutes. Flip the meatballs, cover and cook for another 3 minutes.
    • Once done take them out

    Making Gravy

    • In the same pan add garlic, onion, and mushrooms. Cook them for 3-4 minutes. Add more oil if necessary.
    • Then add flour and cook the mixture for another 1-2 minutes.
    • Now slowly add chicken stock. Simultaneously mix continuously using a whisk.
    • Bring mixture to boil. Cover and cook the gravy on low heat for about 5 minutes.
    • Finally add meatballs, herbs, salt, and pepper. Mix well, cover and cook for about one minute.
    • Take it out from the heat and keep covered until serving.

    Notes

    1. You can also use all-purpose flour for making gravy instead of whole wheat flour
    2. If you are using a non-stick frying pan or skillet then make sure to use silicone whisk to prevent scratching.
    3. Use metal cookie scoop or meatball maker to divide the ground turkey mixture and make uniform sized meatballs

    Nutrition

    Calories: 314kcal
    Tried this recipe?Tag us on Instagram @watchwhatueat or tag #watchwhatueat! OR leave us a comment & rating below. Your feedback is very important to us.
    • Page 1
    • Page 2
    • Page 3
    • Page 4
    • Go to Next Page »

    Primary Sidebar

    Hi, we are Swati and Tushar! Our passion for food and cooking has led us to write this blog focusing on healthy recipes to eat well and live well!

    More about me →

    Summer Drinks

    • Cranberry Sangria in a large pitcher is ready to serve
      Non Alcoholic Cranberry Sangria
    • Fresh watermelon slush in a drinking glass
      3 Ingredient Watermelon Slush
    • This pineapple strawberry sangria is a perfect non-alcoholic summer drink to enjoy fresh seasonal fruits and beat the summer heat. It is prepared using fresh strawberries and pineapple. | #watchwhatueat #nonalcoholic #summerdrink #strawberry #nonalcoholicsangria #sangria
      Non-Alcoholic Pineapple Strawberry Sangria
    • Easy Homemade Fresh Strawberry Lemonade -- healthy, refreshing and cooling drink recipe to enjoy the warm days of spring and summer. | #watchwhatuwat #lemonade #summerdrink
      Homemade Fresh Strawberry Lemonade
    • Healthy And Festive Non-alcoholic Cranberry Mimosa! | #thanksgivingdrinks #nonalcoholic #cranberry #mimosa
      Healthy And Festive Cranberry Mimosa Recipe
    • Watermelon Detox Water - refreshing sugar-free drink to stay hydrated during hot days.
      Summer Cooling Watermelon Detox Water

    Popular Recipes

    • Angled view of beet and feta dip in a serving bowl on a wooden board, garnished with crumbled feta, parsley, and pumpkin seeds, alongside crackers.
      Bold & Beautiful Feta Beetroot Dip Recipe
    • Zucchini meatballs with a dipping sauce on the side, served on a terracotta plate lined with parchment paper.
      Baked Chickpea Zucchini Balls (Vegetarian Meatballs)
    • A bowl of creamy green peas hummus garnished with roasted green peas and a drizzle of olive oil.
      Homemade Geen Pea Hummus Recipe
    • Broccoli and zucchini soup in a ceramic serving bowl with a wooden spoon. Garnished with bread croutons and roasted zucchini pieces.
      20 Min Easiest Broccoli And Zucchini Soup

    Footer

    As Featured On featured on logos

    • Contact us
    • Subscribe
    • Accessibility Statement
    • Homepage
    • Privacy Policy

    Copyright © 2025 | Watch What U Eat

    Rate This Recipe

    Your vote:


    Let us know what you thought of this recipe:

    This worked exactly as written, thanks!
    My family loved this!
    Thank you for sharing this recipe

    Or write in your own words:

    A rating is required
    A name is required
    An email is required